Frequently Asked Questions
Short answers to the questions we hear most often, each with a link to the page that covers the topic in detail. The answers describe SoftyFlow 8.6.
GeneralDirect link to General
Where are the IDE menus since version 8.6?Direct link to Where are the IDE menus since version 8.6?
The IDE no longer has a top menu bar: everything starts from the dock, the floating bar on the left of the screen. Resources holds Projects, Files, External databases (EDS), Collections and Scheduled tasks; Account holds Users, Roles and Settings (gear icon); Monitoring holds Instance tracking, Usage, Logs and Flowy runs. The SoftyFlow logo opens the Hub (Ctrl + /), a full-screen view of every destination, and Ctrl + K searches every resource of every project. Inside a project, the Design / Build / Deploy / Run bar at the top right switches between the modes of the project.
See Find your way in the IDE and Project Setup.
Can SoftyFlow build an application from a description?Direct link to Can SoftyFlow build an application from a description?
Yes, with Flowy AI, the home page of the IDE. Describe the application or the change you need: Flowy finds the project (or creates it), builds the interfaces, processes, collections, reports and menus, and tries them in TEST. Deploying to UAT and PROD stays your decision: Flowy never creates or deploys a version. Flowy is available to the users who have access to the IDE.
See Flowy AI.
Users and SettingsDirect link to Users and Settings
What are user attributes, and how do I create one?Direct link to What are user attributes, and how do I create one?
User attributes (called Metadata before version 8.6) are your own fields on every user account: department, manager, employee ID, region… An administrator with the Settings right creates them in Settings › User attributes (Add an attribute…): a name and a field type (Text, Number, Yes / no, Custom list, Collection record, User…). Each attribute then appears as a field in the user form.
See Settings › User attributes.
How do I attach information to a user, such as the name of their manager or their age?Direct link to How do I attach information to a user, such as the name of their manager or their age?
- Create a user attribute for it (see the previous question), for example
managerof type User ordepartmentof type Text. - Fill in the value in Users › the user › Metadata tab. The values are set per environment: choose Test, UAT or Prod at the top of the tab. To fill in many users at once, use the Excel export and import of the Users page.
- Use the value:
- in an interface, through the connected user, for example the default value
={{SF_connectedUser.metadata.department}}; - in a process script, with
SF.user.getUserMetadata(userId); - in a redirect rule of the classic home, with
SF_connectedUser.metadata.
- in an interface, through the connected user, for example the default value
See User Management › Metadata, Redirection by user attribute and getUserMetadata.
How do I create or update many users at once?Direct link to How do I create or update many users at once?
Click Export to Excel on the Users page: one workbook holds the users, their roles and their attributes per environment, with drop-down lists. Edit it in Excel, then import it back: SoftyFlow shows a validation report and applies only what you changed.
See Export and Import Users with Excel.
Can a user receive their process emails grouped in one email instead of one email per notification?Direct link to Can a user receive their process emails grouped in one email instead of one email per notification?
Yes, since version 8.6, with the email digest:
- An administrator turns the feature on for the platform: Settings › Emails › Process emails › Individual sending and digest (off by default).
- Each user chooses their digest in the applications portal: My settings › Email notifications › Group my email notifications, with the frequency (every day, every N days or some days of the week), the time and the time zone.
- An administrator can set the same thing for any account in the IDE: Users › the user › Notifications tab.
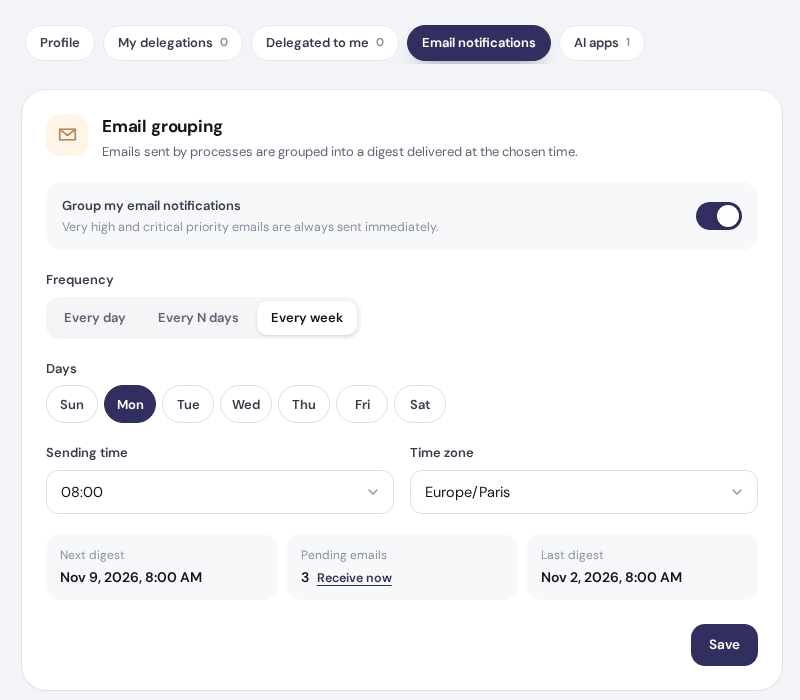
Both screens show the next digest and the emails waiting for it; Receive now in the portal (Send the pending mails now in the IDE) sends them at once. Only the process emails of the production environment wait for the digest. Emails with the Very High or Critical priority, password, welcome and error emails, and the emails of TEST and UAT are always sent at once.
See Process Emails and the Email Digest, My Settings › Email Notifications and User Management › Notifications.
ProcessesDirect link to Processes
What is the relation between an interface and a process?Direct link to What is the relation between an interface and a process?
The interface is what the user sees; the process is the workflow that follows. They meet in three places:
- Starting the process: a button of an interface runs the
startProcessaction. The data of the page becomes the variables of the new instance. - User tasks: each user task of the process names an Interface and a Screen. The user who opens the task sees that screen with the data of the instance; the
updateaction validates the task, saves the changes in the instance and moves the process on. - Instance page: the process settings name the interface and the screen that show an instance.
See Process Components › User Task, Screens and Process and Workflow Actions.
Do I need a database to store process data?Direct link to Do I need a database to store process data?
No. SoftyFlow keeps the data of every instance itself. Use a collection or an external database (EDS) only for data that lives beyond one request: reference data, master data, or data shared with other processes or other systems.
See Database.
Where is the process data stored?Direct link to Where is the process data stored?
In the SoftyFlow database, with each instance, separately for TEST, UAT and PROD:
- the variables of the instance: the data of the forms sent at the start and at each task, and the values set by the scripts;
- its measures, computed from these variables;
- its tasks, its history and its errors.
Open an instance from the Run mode of the project to see its Variables and Measures views, and use reports to list the instances and tasks with their data.
See Monitor & Run › Instance Detail Views.
What are measures used for?Direct link to What are measures used for?
Measures are values computed from the variables of an instance (an amount, a status, a duration, a department…) and stored with the instance. They are recomputed while the instance runs (at the start, before the user tasks, after each task, at the end). Their main use is reporting: measures become the columns, filters and sorts of the instance and task reports.
See Measures.
What is a sub-process?Direct link to What is a sub-process?
A sub-process is a step that runs another process. The parent process sends it input variables, waits for it to finish, then gets back its output variables. It can also start one sub-process per element of an array, in parallel. On the page of the parent instance, the Sub-processes view lists the child instances.
See Sub Process.
I added a measure: why is it empty on the existing instances?Direct link to I added a measure: why is it empty on the existing instances?
Measures are not versioned: they belong to the process itself, so a measure you add or change is used at once in TEST, UAT and PROD, whatever the version an instance follows. But a measure is only computed when an instance moves on (at the start, before and after each user task, at the end): a running instance gets it at its next step, and the instances that already ended keep their old values. To fill it in:
- Open the Run mode of the project.
- Click Measures in the dock.
- Choose the Process, the Measures to recalculate (or All) and the Environment, click Recalculate, then Confirm.
The measures are recalculated on every instance of the process in that environment, whatever its status or its version, with a progress bar.
See Monitor & Run › Recalculating the Measures.
ReportsDirect link to Reports
What is the difference between instance and task reports?Direct link to What is the difference between instance and task reports?
- An instance report has one row per process instance: it follows whole requests from start to end (status, dates, measures). Example: "All requests", "My requests".
- A task report has one row per user task: it follows the work of people (who must do what, since when, at which step). Example: "My tasks".
A Report interface creates the usual tables in one go (My Tasks, My Requests, All Requests, My Drafts).
InterfacesDirect link to Interfaces
What are back offices?Direct link to What are back offices?
A back office is an interface that manages the data of a collection: a list with a form to create, view, update and delete its records. Choose the Back office type when you create the interface, then the Edit mode (form In a popup or In a separate page), the Collection (new or existing) and the Form fields. SoftyFlow creates the interface (two interfaces, List and Form, with In a separate page), the new collection and a custom list for each field that has options.
What are screens in an interface?Direct link to What are screens in an interface?
A screen is a version of the same interface for one step of a process. All the screens share the same widgets; for each screen you decide which widgets are available, visible, required or disabled. Each user task then opens the interface on its own screen: for example, the employee fills in the request on the first screen, and the manager sees it read-only with an approval field on another one. Manage the screens with the All Screens selector of the builder.
See Screens.
How do I make a field visible, disabled or required based on a rule?Direct link to How do I make a field visible, disabled or required based on a rule?
Select the widget in the builder and open the Validation card of the configuration panel. For each screen, switch Available, Visible, Required and Disable on or off, or click the pencil next to a switch to write a condition, for example to show a field only when another field has a given value. In actions, show, hide, setRequired and setDisable do the same at run time.
See Validation Rules and UI Manipulation actions.
How do I add a specific validation rule or a mask on a field?Direct link to How do I add a specific validation rule or a mask on a field?
- Validation rule: in the Rules card of the widget, click Add rule, choose the type (Min (Char), Max (Char), Type, Email, Regex or Custom), its value and the error message.
- Mask: on an Input widget of type String, fill in the Mask field of the Global card, for example
+ ## # ## ## ## ##for a phone number (#is a digit).
See Input Widget › Input Masking and Validation and Rules.
How do I fill some fields automatically from the item chosen in a dropdown, checkbox or radio button linked to a collection?Direct link to How do I fill some fields automatically from the item chosen in a dropdown, checkbox or radio button linked to a collection?
Add an Action on field change in the Global card of the dropdown (or checkbox, or radio button). In the action, SF_input.value is the value chosen and SF_input.SF_data is the whole record of the collection behind it (an array for a checkbox or a multiple dropdown). Copy the fields you need into the page, for example with setModel or in a script: model.customer_email = SF_input.SF_data.email.
See Select Widget › Working with Actions and SF_input and Populating Forms with Database Data.
How can someone submit an interface without a SoftyFlow account?Direct link to How can someone submit an interface without a SoftyFlow account?
Make the interface Public: choose Public in Access rights when you create it, or later in Page settings › Access (Allowed roles). Anyone with the link can then open it without signing in. If the page starts a process, add Public to Who can start it in the process settings, and turn on reCAPTCHA there to protect it from spam (its keys are set in Settings › Keys & secrets). Deploy the version that contains the page and the process to Prod before you share the link.
See Page Settings › Access and Process Settings.
I don't see my change on the production interface. Why?Direct link to I don't see my change on the production interface. Why?
SoftyFlow has three environments. TEST always runs the latest saved resources: View interface in the builder opens the page in TEST. UAT and PROD run the resources of the version deployed there, each at a fixed resource version. To bring a change to production:
- Check that the interface is saved (the builder shows Saved).
- In the Deploy mode of the project, create a version (or duplicate the current one) and move the interface to its latest resource version (Refresh), then Save.
- Use Move to UAT to check it, then Move to Prod.
The instances already running in PROD keep following their version; Migrate the instances moves them to the new one.
See Test & Deploy › Environments, Resource Selection and Migrating Instances.
Can each user keep their own filters and columns in a table?Direct link to Can each user keep their own filters and columns in a table?
Yes, since version 8.6: turn on the User views option of the table (Data source card). Each user then saves named views with their filters, sort, column order and widths, and picks a default view.
See Table Widget › User Views.
InstancesDirect link to Instances
How do I debug an instance that is in error?Direct link to How do I debug an instance that is in error?
- Find the instance: open the Run mode of the project (or Instance tracking in the dock, for every project), in the right environment (Test, UAT or Prod). An instance in error has a red stripe and an Error pill; click the Errors card to list only those.
- Read the error: open the instance. The failing step is red on the diagram and listed In error in the Progress card, and the Errors view (Follow-up group, on the left) shows each error with its type, its message, the element or the date, and its technical detail.
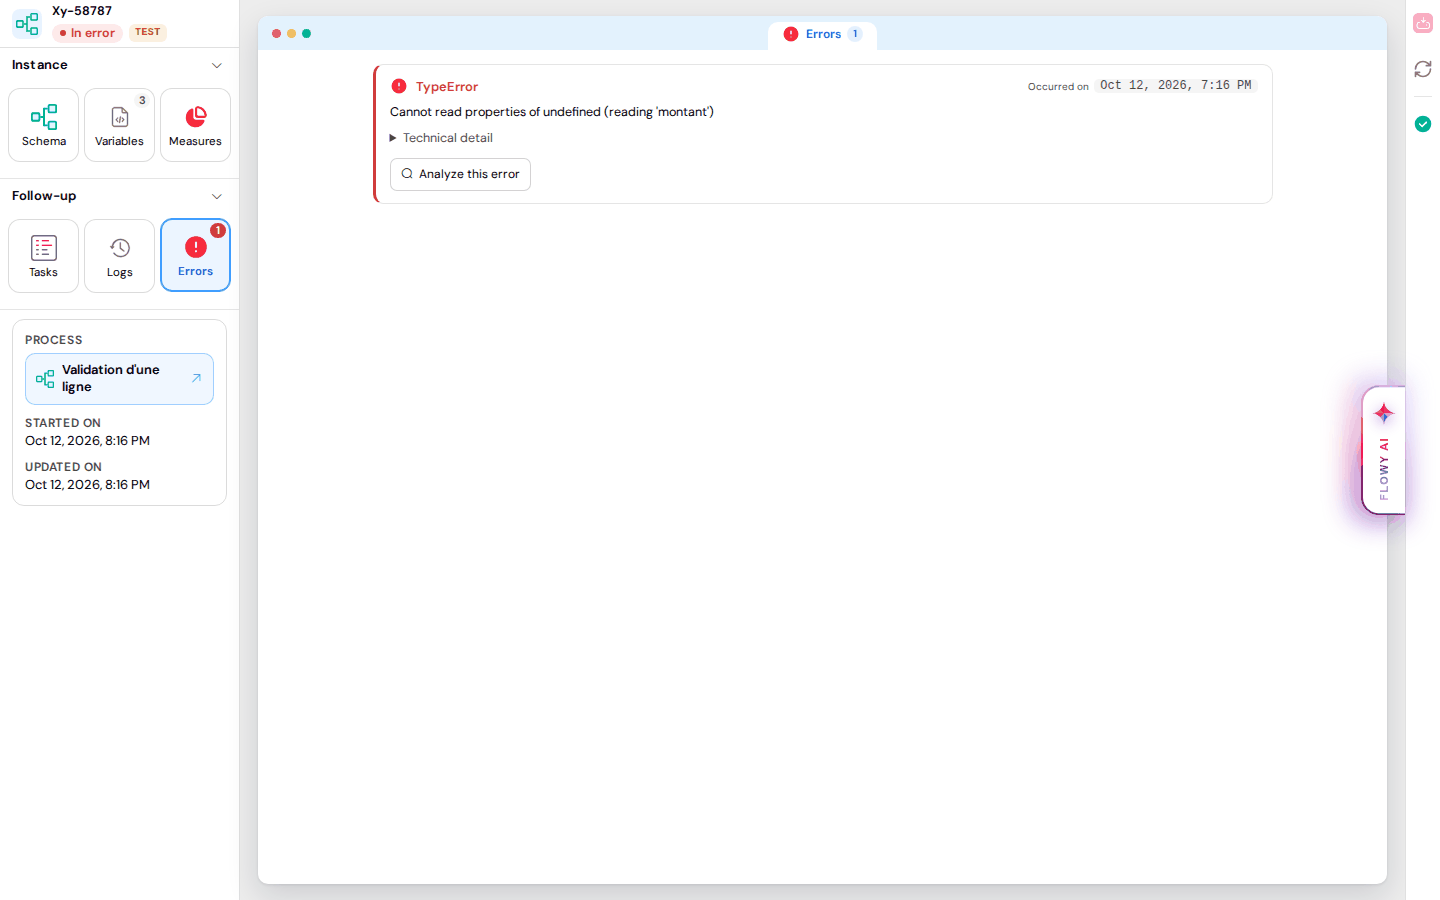
- Ask Flowy AI: when you open an instance in error, Flowy offers to investigate it (Start investigation); in the Errors view, Analyze this error does the same for one error. Flowy reads the history, the variables and the errors of the instance and its process, then proposes a cause and a fix. Nothing changes before you click Accepter et appliquer la solution (accept and apply the solution) under the proposal, and the instance is never restarted for you. You can also ask from the Flowy AI home page of the IDE, for example "The instance Xy-58787 does not work: find out why".
- Fix the cause: correct a value in the Variables view and save it, or fix the process. TEST runs the latest process; in UAT and PROD, deploy a new version and migrate the instance to it.
- Restart the step: on the Schema view, click Restart from here on the failed step, choose Run this step again (or Skip this step), then click Run again (or Skip the step).
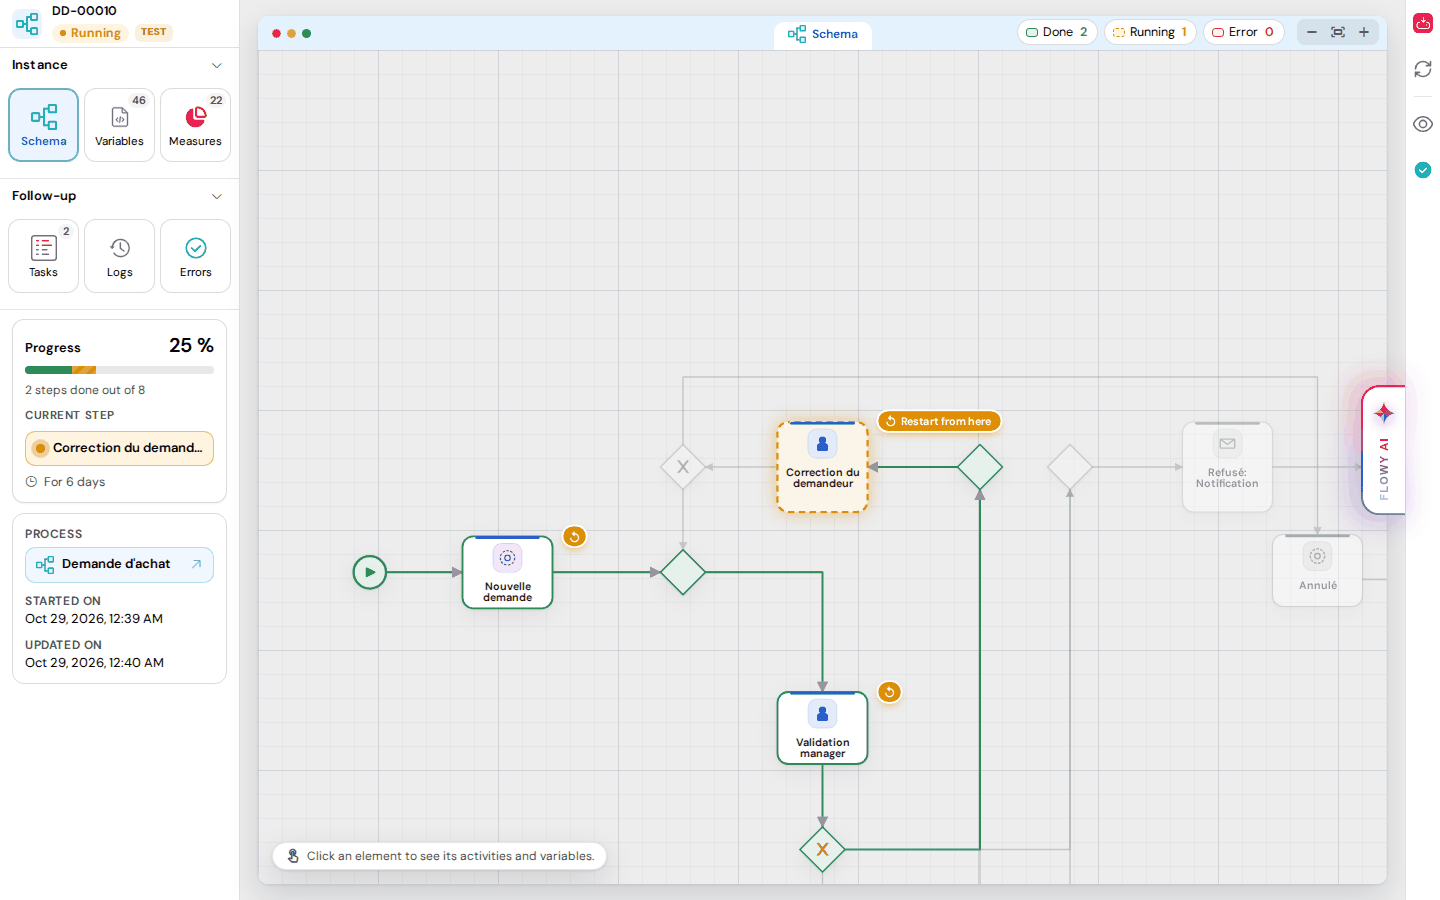
See Monitor & Run › How to View Errors, Restart From Here, Migrating Instances and Flowy AI.