Tutorials: Build your first Softyflow application
Welcome to the Softyflow tutorial section! Here, you'll embark on an exciting journey to build your very first functional application using our intuitive low-code platform. We'll guide you step-by-step, ensuring you gain hands-on experience and confidence in bringing your ideas to life.
For this tutorial, we'll tackle a common real-world scenario: a Budget Approval Request Application. Imagine a system where employees can easily submit budget requests, and their managers can efficiently review, validate, or reject them. By the end, you'll have a fully operational application that demonstrates Softyflow's power and simplicity.
Before diving in, make sure you understand the core concepts behind Softyflow. For a complete overview of the platform, check out our getting started guide.
Level: Beginner Estimated Time: 15–20 minutes
What you'll learn
This tutorial is designed to give you a comprehensive overview of Softyflow's core capabilities. You will learn to:
- Create Your First Project: The foundational step for any application in Softyflow using our project setup guide.
- Design a User Form for Budget Approval: How to build an interactive form for users to submit their requests, without writing a single line of code using our web interface design tools.
- Build an Approval Workflow: Implement the logic that defines how budget requests flow through the approval process, including manager validation using process design.
- Store Data in a Collection: Understand how Softyflow automatically handles data storage for your application using MongoDB collections.
- Add a Basic Report: Generate simple reports to visualize and track your budget requests with our reporting tools.
- Test and Run Your App: See your application in action and understand how users will interact with it using our test and deploy features.
The best part? No coding is required! Just follow these simple steps, and watch your application come to life right before your eyes.
Build your first app
Let's dive in and start building our Budget Approval Request Application. This app will allow employees to easily initiate purchase or budget requests, and empower managers to validate or reject them based on predefined criteria, such as amount thresholds.
1. Create your first project
Every application in Softyflow begins with a project. Think of a project as the central container that brings together all the essential components of your application: your user forms, the underlying workflows, data collections, and any reports you generate.
Step-by-Step Instructions:
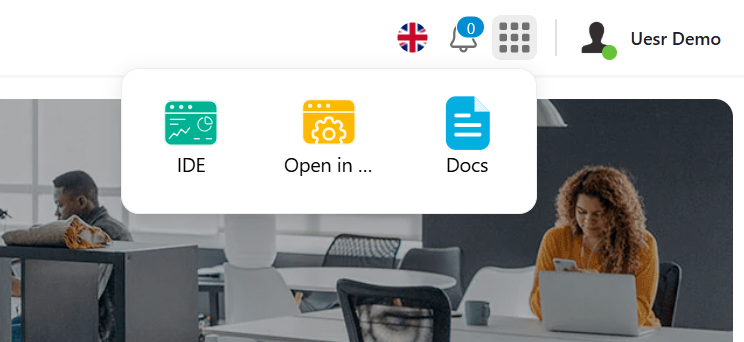
Navigate to the IDE:
- Once you're logged into Softyflow, locate and click on the "IDE" (Integrated Development Environment) button or tab in your main navigation. This is where all your application building magic happens.
- Start a New Project:
- Within the IDE, look for a prominent button typically labeled "New Project" or an icon representing creation (e.g., a
+sign). Click on it. - A dialog box or form will appear, prompting you for project details.
- Within the IDE, look for a prominent button typically labeled "New Project" or an icon representing creation (e.g., a

Name Your Project:
- In the "Project Name" field, enter a clear and descriptive name for your application. We recommend something like:
budget-approval-demo - Tip: Using hyphens (
-) instead of spaces is a common practice for project names and makes them easier to manage in many systems.
- In the "Project Name" field, enter a clear and descriptive name for your application. We recommend something like:
Add a description (Optional but recommended):
- In the "Description" field, you can add a brief explanation of what your project is about. For instance: "An application to manage budget approval requests from employees to managers."
- Why this is useful: A good description helps you and your team quickly understand the purpose of the project, especially as you build more applications.
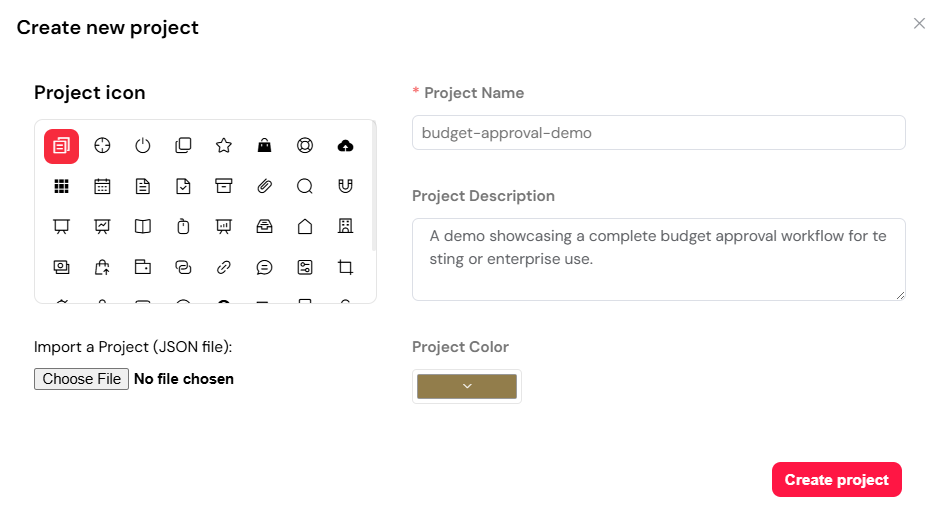
Create the Project:
- After filling in the details, click the "Create Project" button.
Congratulations! You have successfully created your first Softyflow project. You're now ready to start building and bringing your Budget Approval Request App to life within this project environment.
2. Create your first form
Now that you've set up your project, it's time to build the user interface—the form employees will use to submit their budget approval requests. This form will be the primary point of interaction for users initiating new requests.
Key fields and their purpose
Our Budget Approval Request Form will include various fields, each designed to capture specific information. Understanding these fields is crucial for building an effective application:
- Requestor: This field will automatically display the name of the current user who is logged in and creating the request. It's a read-only field, meaning users cannot change it. Learn about user management for user authentication.
- Status: This field will also be automatically updated and read-only. It will reflect the current stage of the budget request within the approval workflow. Possible values include: - Draft - Waiting for department manager approval - Waiting for financial director approval - Waiting for managing director approval - Waiting for executive director approval - Rejected - Approved
- Internal Ref.: An automatically generated reference number for each submitted request. This field will be read-only and will appear once the request is submitted.
- Department: A dropdown list allowing the user to select the department making the request. Use our select widget for this field.
- Request Title: A short, descriptive title for the budget request (e.g., "Purchase of new office chairs"). Use an input field widget.
- Expenditure Type: Defines the category or nature of the expenditure (e.g., "Office Supplies," "Software License," "Travel"). This could be a checkbox widget or select widget.
- Completion Date: The expected date when the purchase or expenditure is planned to occur. Use our date picker widget.
- Cost Justification: An optional, multi-line text field where the user can provide a detailed explanation of why the purchase is necessary, including expected savings or benefits. Use a textarea widget.
- Purchase Details: This is a crucial section that will allow users to add multiple line items for different items within a single request using a loop widget or table widget. Each line item will include:
- Description: A brief description of the specific item being purchased.
- Category: The category of the individual purchase item.
- Quantity: The number of units required.
- Unit price (€): The cost per unit.
- VAT rate: The applicable Value Added Tax rate for that item.
- Subtotal (€): Automatically calculated total for the item excluding VAT (Quantity * Unit Price).
- VAT (€): Automatically calculated VAT amount for the item (Subtotal * VAT Rate).
- Total (€): Automatically calculated total for the item including VAT (Subtotal + VAT).
Approval steps
This section will display the list of required approval steps and the users assigned to each. The number of mandatory steps will dynamically adjust based on the total requested amount:
Under 2,500€: 1 mandatory validation step.
Between 2,501€ and 7,500€: 2 mandatory validation steps.
Above 7,500€: 4 mandatory validation steps (with 1 additional optional step).
Comments: An optional field where different users (requestor, approvers) can leave comments throughout the request's lifecycle. There will be a text box to enter a comment and an "Add Comment" button to submit it.
Form actions (Buttons)
The form will also include essential buttons for user interaction:
- Save (as Draft): This button allows the user to save the request without submitting it for approval. Drafts can be accessed later from the "My requests by status" tab in the "Budget Approval Management - Report" web interface. Use a button widget for this action.
- Save and Submit for Approval: This button initiates the budget approval workflow using our process design features. A request can only be submitted if all mandatory fields are filled.
Step-by-Step: Building your budget approval form
Let's begin constructing the form within your Softyflow project using our web interface design tools. Unlike building from a blank slate, Softyflow often provides a pre-configured template, giving you a strong starting point. We'll show you how to leverage this default structure and customize it to fit our needs.
Create a new form:
There are a couple of ways to initiate the creation of a new form:
Option 1: Using the "Get Started" panel (recommended for beginners)
- Within your
budget-approval-demoproject in the Softyflow IDE, ensure you are in the "Build" section (look for the "Build" tab at the top). - On the right-hand side, locate the "Get Started" panel.
- Click on the "+ Form" button within this panel.
- Within your
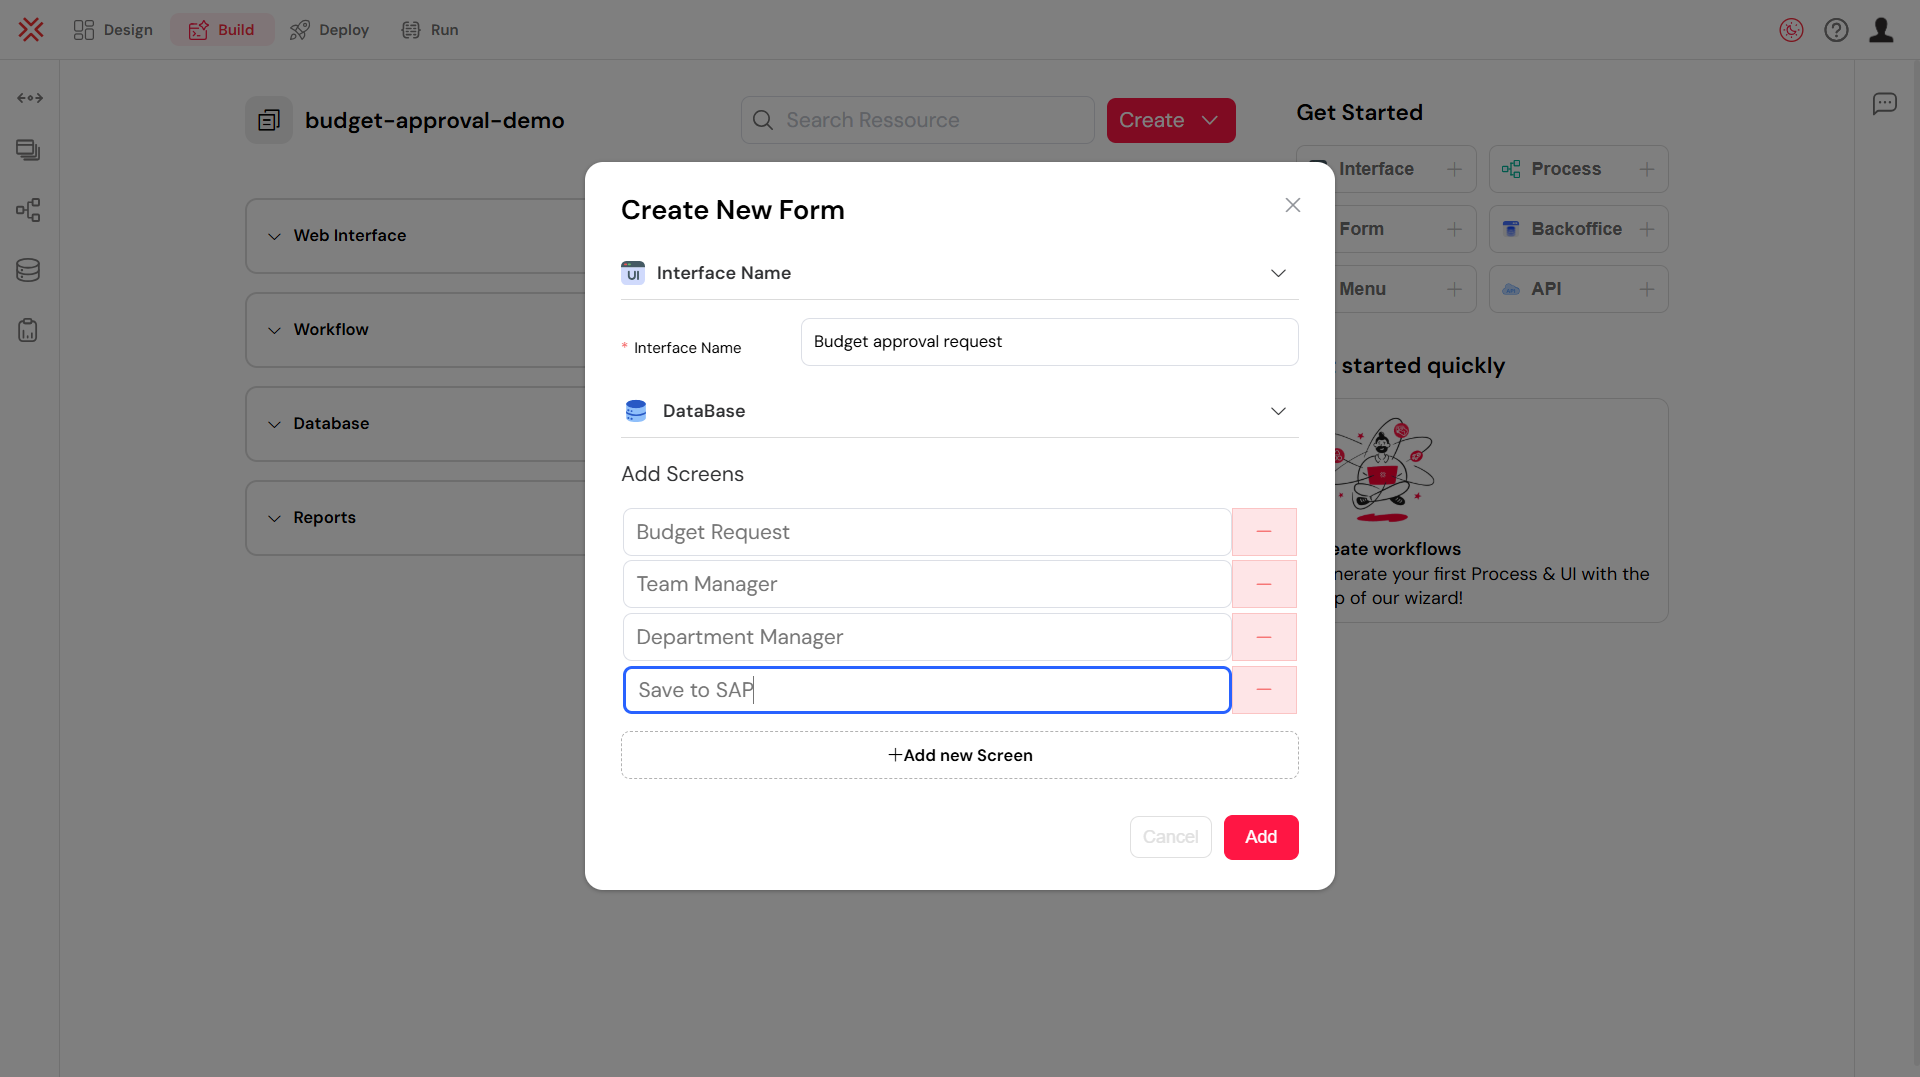
- Define Screens: This is a powerful feature! Under the "Add Screens" section, you can define multiple distinct views or "screens" within this single interface. Each screen can have a unique layout and set of visible fields, allowing different roles or workflow steps to interact with the same data in a customized way.
- For our Budget Approval App, you'll want to add screens for:
Budget Request(for the employee initiating the request)Team Manager(for the first level of approval)Department Manager(for subsequent approvals)Save to SAP(an example for a specific action screen)
- You can click "Add new Screen" to add more as needed.
- For our Budget Approval App, you'll want to add screens for:
- Click "Add" (or "Create Form") to finalize the creation and open the form builder canvas with your newly defined screens ready for customization.
Option 2: Using the "Web Interface" Shortcut
- Alternatively, while in the "Build" section of your Softyflow IDE, look at the left-hand navigation bar.
- Locate the "Web Interface" section.
- You'll see a "+" icon next to the "Web Interface" title. Click this icon.
- A dropdown menu will appear. Select "New Form" from the options.
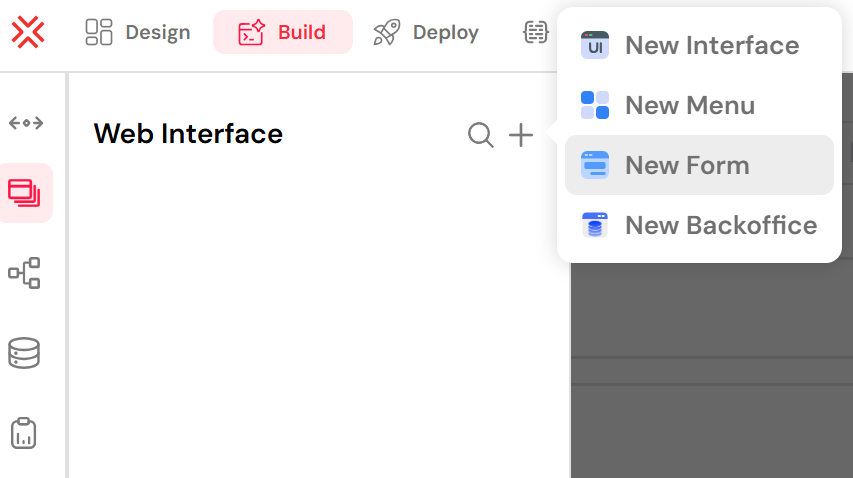
After choosing either option:
- A dialog box will appear prompting you to name your form. Enter:
budget-approval-form - Click "Create Form" (or similar button) to open the form builder canvas.
Understand the default form structure:
Upon creating your new form, you'll notice that Softyflow provides a basic layout with some pre-populated sections and fields. This serves as your foundation, allowing you to quickly modify rather than starting from scratch.

Notice the existing sections like "Information Générales" (General Information) and basic fields such as "Numéro de demande" (Request Number), "Status," "Nom" (First Name), and "Prénom" (Last Name). These are great starting points!
Customize and add required widgets:
Now, you'll modify the existing fields and add new widgets to match the requirements of our Budget Approval Request form. We'll transform the default structure into our complete form.
Let's go through the key areas you'll work on:
Modify "Information Générales" (General Information) / "Request Details":
"Numéro de demande" (Request Number): This field typically becomes
Internal Ref.as aRead-only Input. Its value will be generated automatically."Status": Keep this as a
Read-only Input. Softyflow will manage its value."Nom" (First Name) and "Prénom" (Last Name): These are already populated with
$(SF_connectedUser.lastName)and$(SF_connectedUser.firstName), which is perfect for our Requestor field. You might combine these into a singleRead-only Inputlabeled "Requestor" or keep them separate depending on your preference."Date de création" (Creation Date): Change this to
Completion Dateand ensure it's aDatepicker widget.Add/Adjust:
Department: Drag a select widget. Label it "Department" and define your department list (e.g., "Sales", "Marketing", "HR", "IT").
Request Title: Drag an input widget. Label it "Request Title".
Expenditure Type: Drag a checkbox widget. Label it "Expenditure Type". In its properties, you will define your categories (e.g., "Office Supplies", "Software License") using custom lists.
Cost Justification: Drag a textarea widget. Label it "Cost Justification".
Build "Purchase details":
- Look for a loop widget, table widget, or a similar component that allows for repeatable sections. This is crucial for adding multiple purchase items.
- Inside this loop/table, add the following widgets for each line item:
- Description: Text Input
- Category: Select widget
- Quantity: Number Input
- Unit price (€): Number Input
- VAT rate: Select widget or Number Input
- Subtotal (€): Read-only Number Input
- VAT (€): Read-only Number Input
- Total (€): Read-only Number Input
- Remember: Calculations for Subtotal, VAT, and Total will be configured in a later step using web modeler actions.
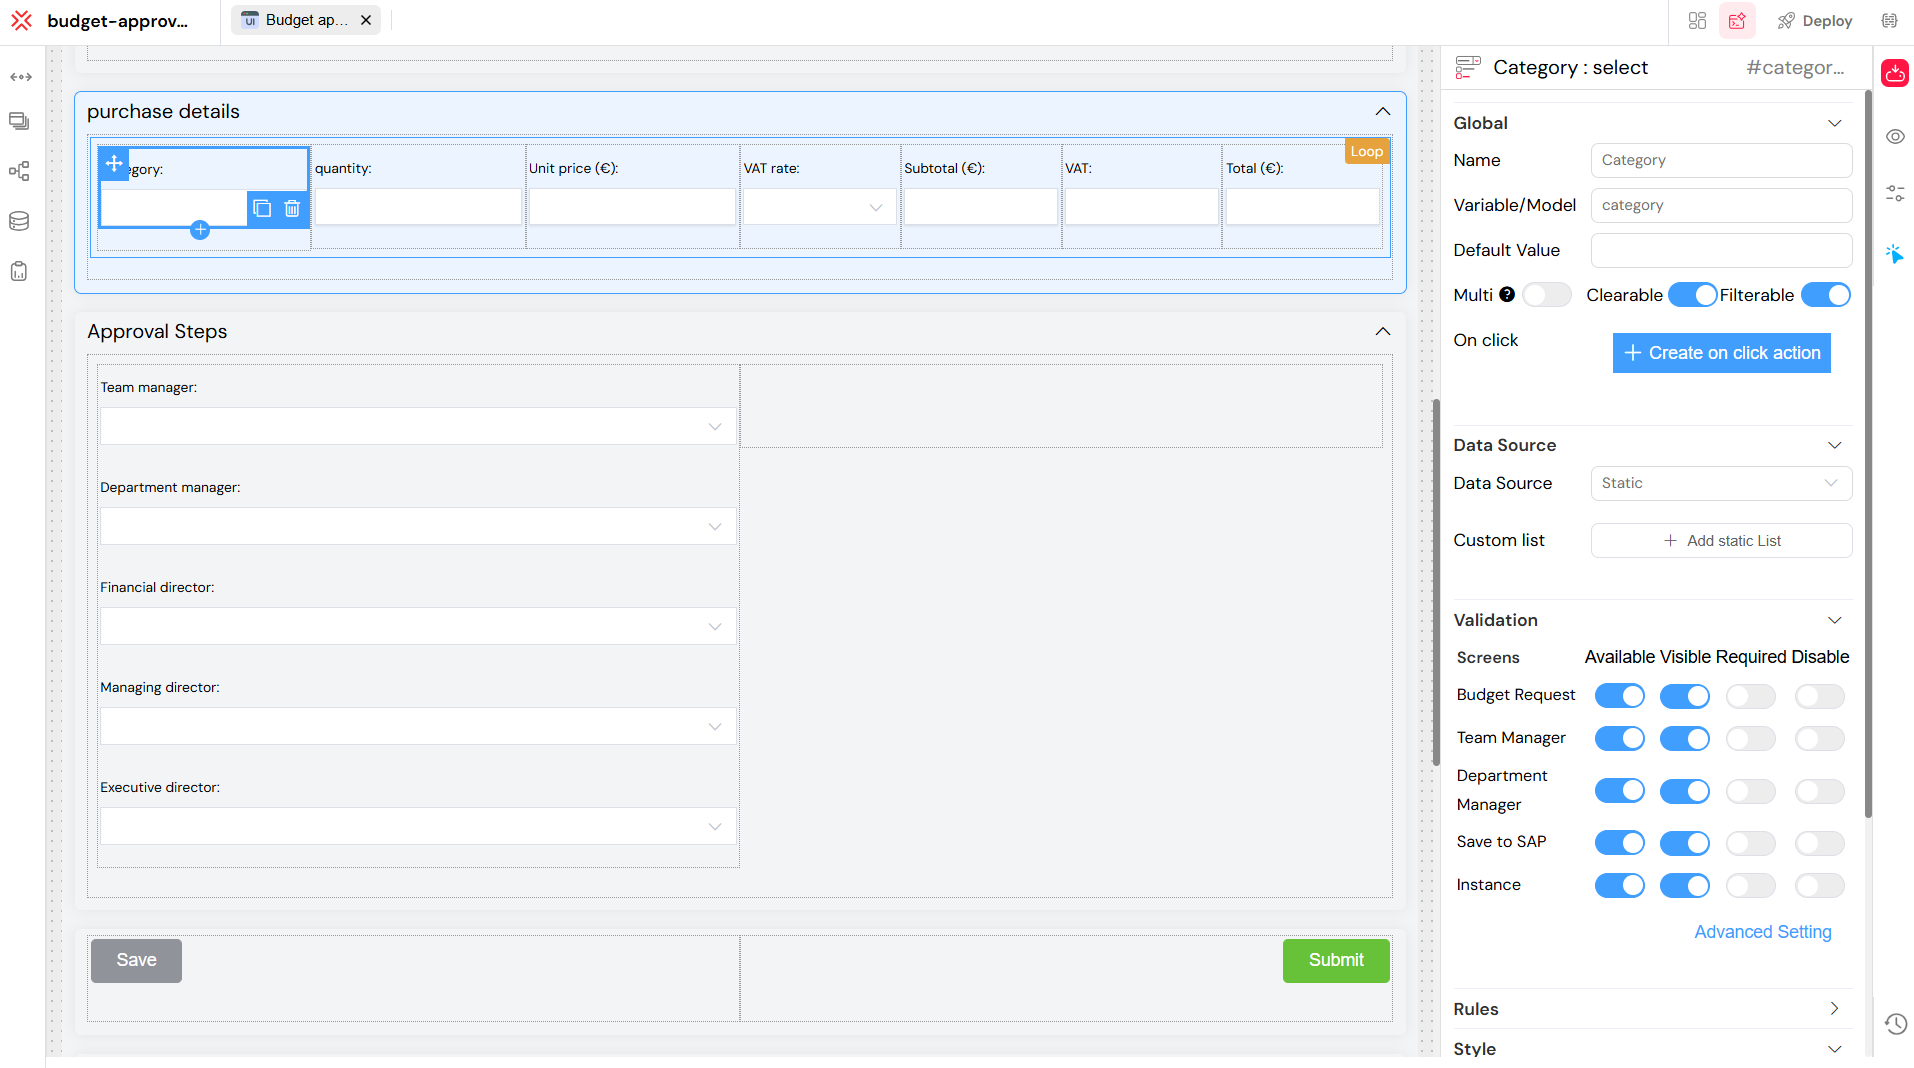
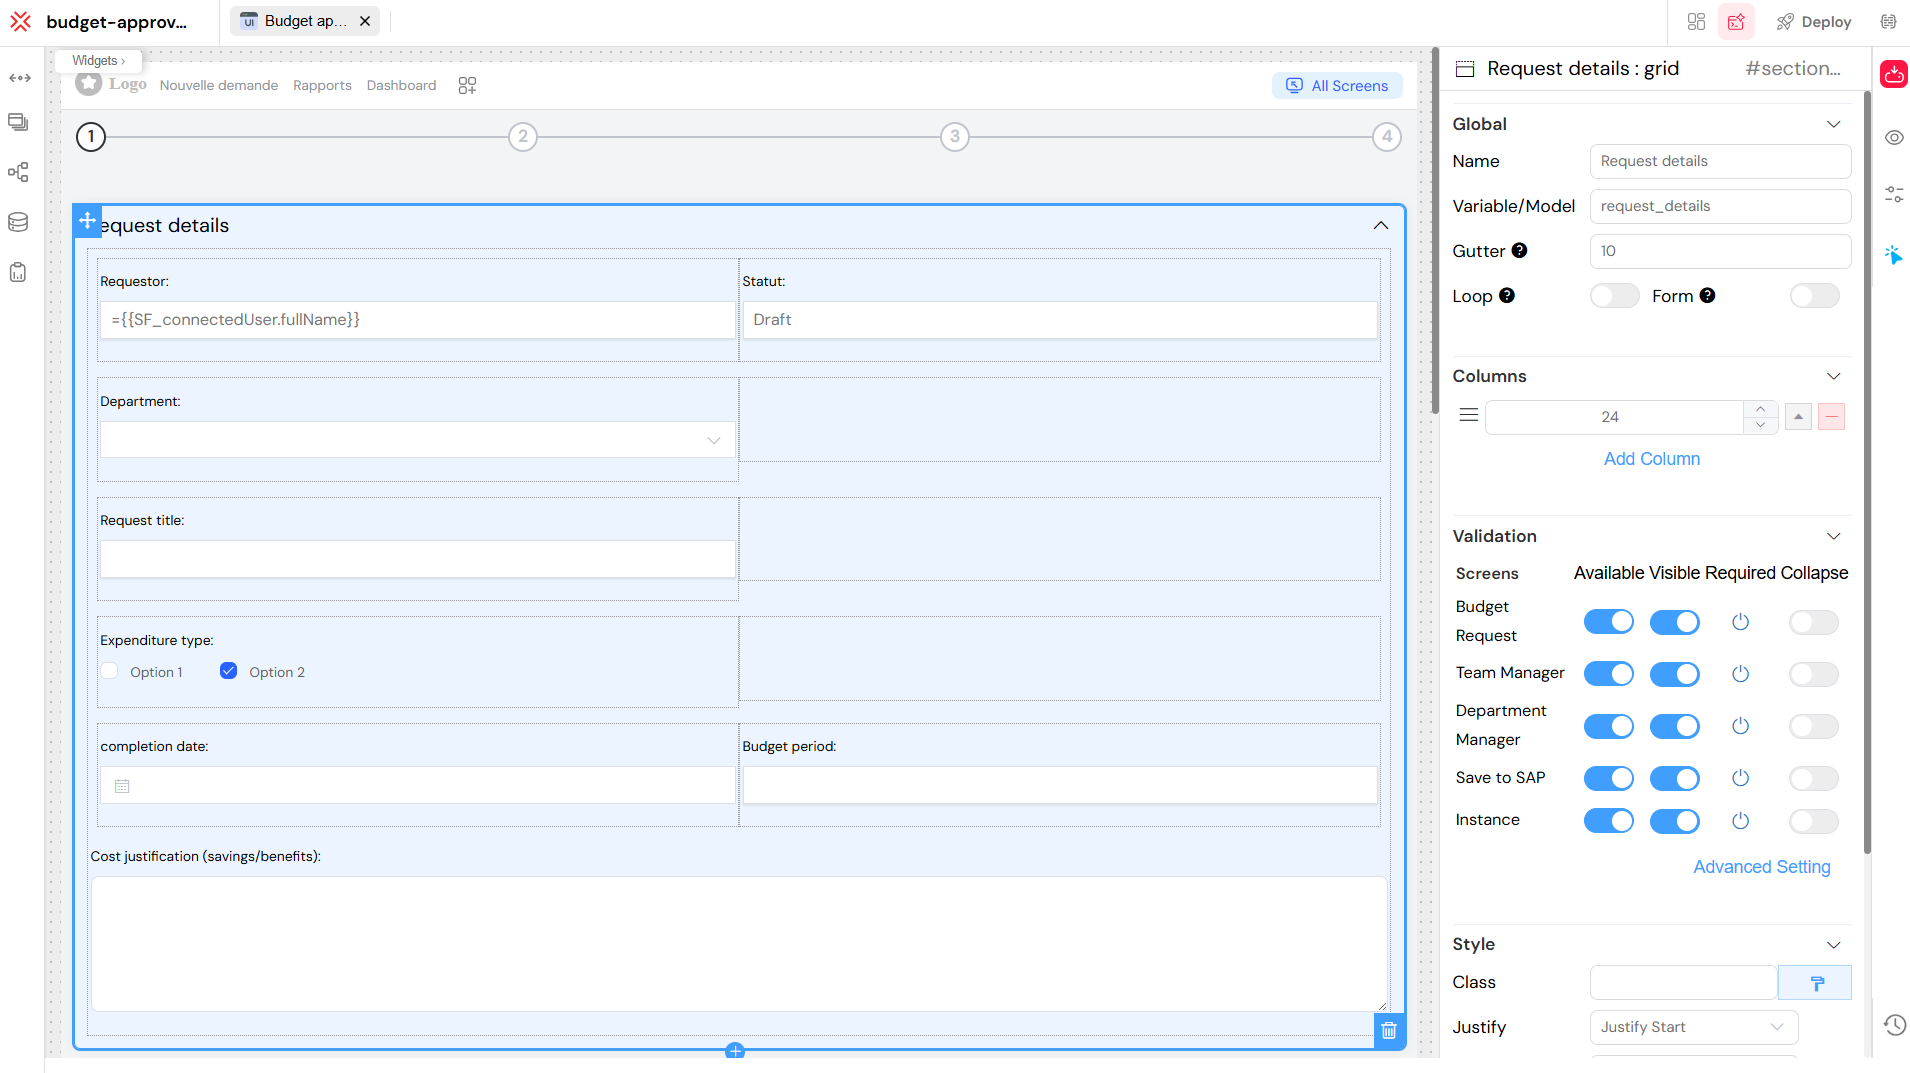
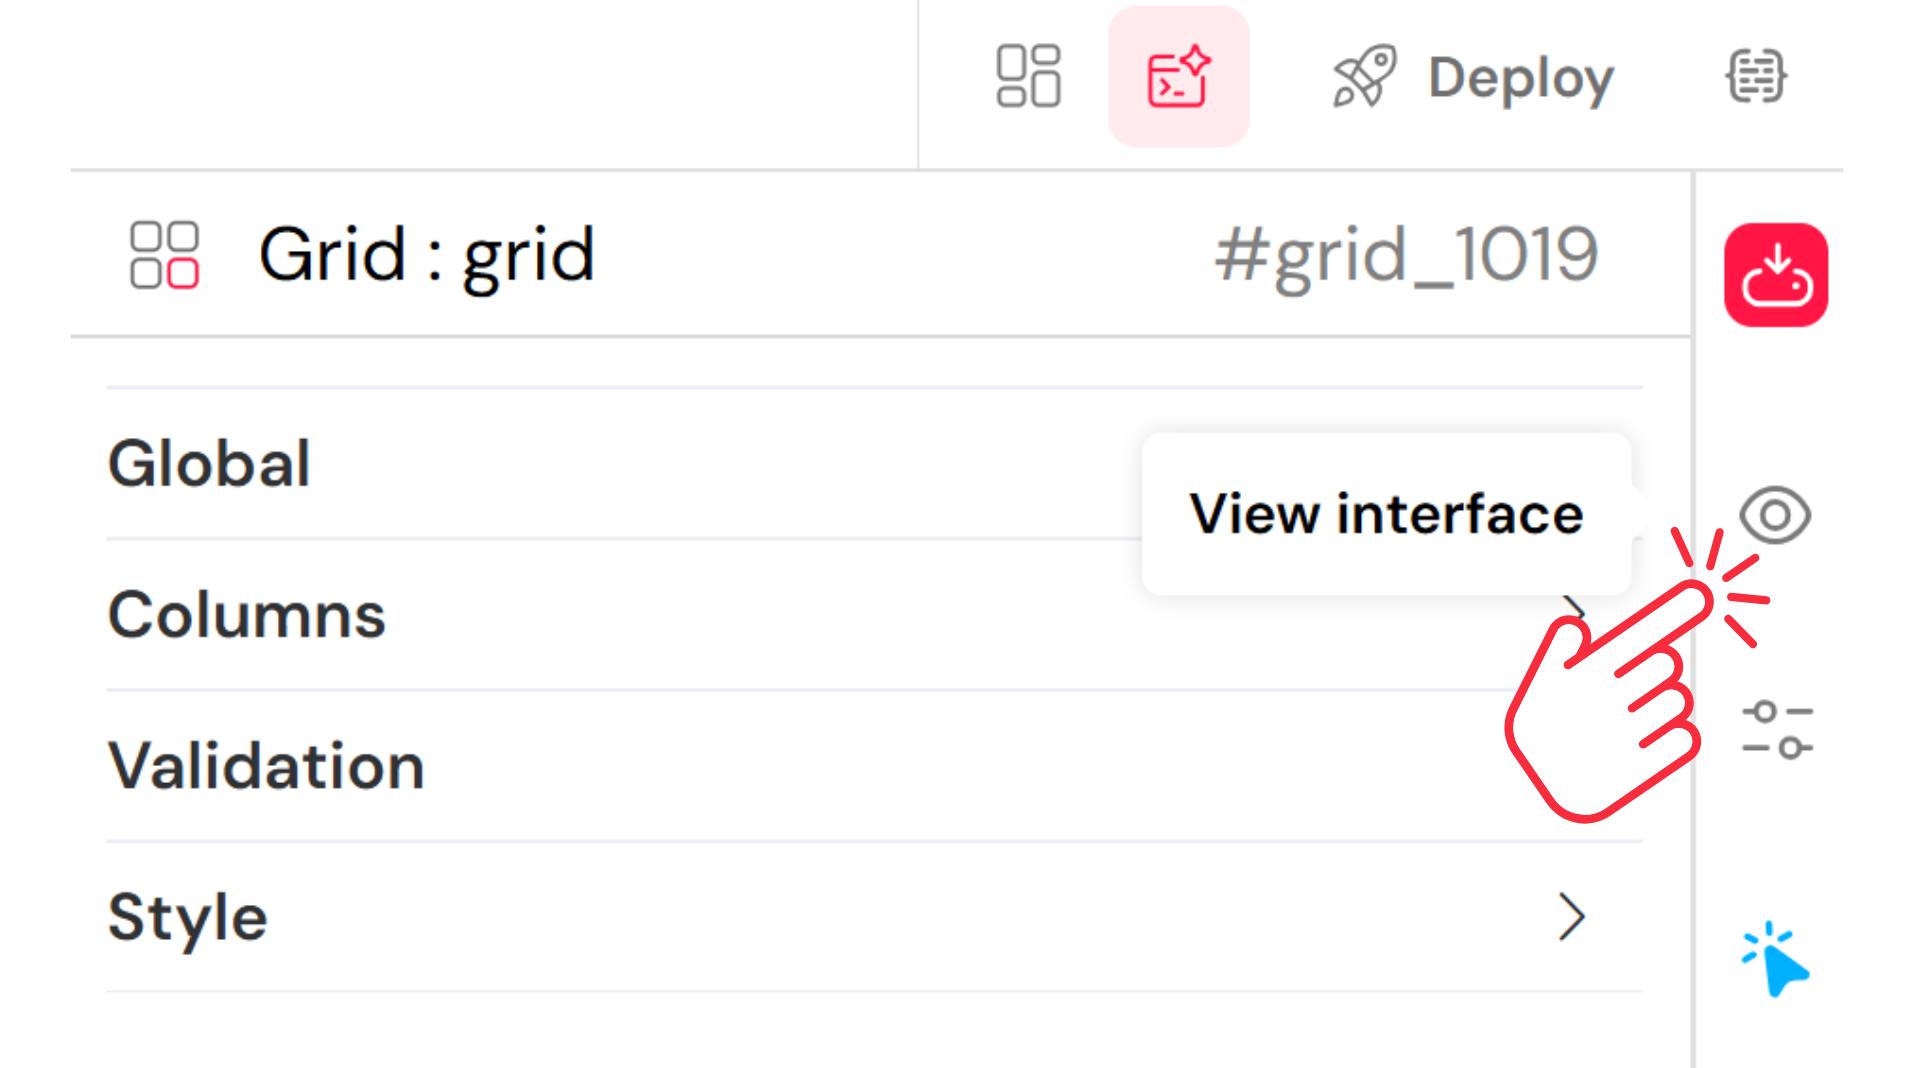
Add "Approval Steps":
- To structure the approval hierarchy, you'll first add a grid widget to your form. This provides a flexible layout for organizing your approval fields.
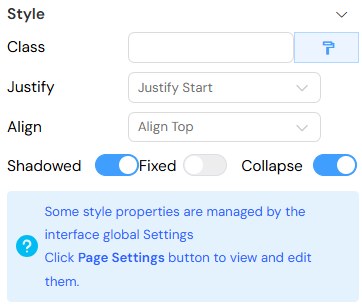
- After adding the Grid, locate its properties panel. Look for a "Collapse" option. Toggling this to "On" or checking the box will allow you to define a title for this section that can be expanded or collapsed by the user, keeping your form tidy. You can then add a title widget inside the collapsed grid, for instance, "Approval Steps".
- Within this grid, you will add user picker widgets for each of the approval roles:
- Department Manager: Drag a user picker widget and label it "Department Manager".
- Financial Director: Drag a user picker widget and label it "Financial Director".
- Managing Director: Drag a user picker widget and label it "Managing Director".
- Executive Director: Drag a user picker widget and label it "Executive Director".
- These user picker widgets will allow the system or an administrator to assign specific users to these approval roles, or for users to select them if applicable. These fields will typically be
Read-onlyfor the initial requestor but visible to show the approval chain. Learn more about user management and role management.
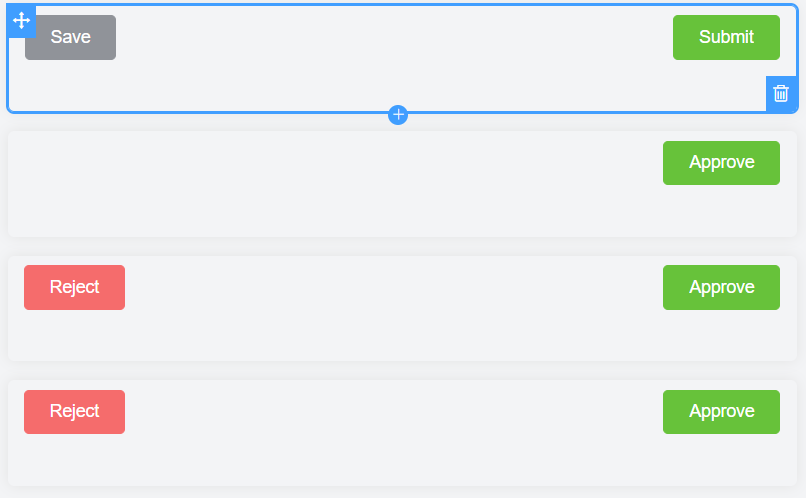
Configure actions (Buttons):
You will add various action buttons to your form. Some will be visible to the initial requestor, while others will appear dynamically for approvers based on the workflow stage.
For the Requestor (Initial Submission):
- Add a button widget. Label it: "Save (as Draft)".
- Add another button widget. Label it: "Submit for Approval".
- Note: These buttons should be configured to be visible only when an employee is creating or editing their draft request.
For approvers (conditional visibility):
- Add a button widget. Label it: "Reject".
- Add another button widget. Label it: "Approve".
- Note: These "Reject" and "Approve" buttons will typically be configured to appear only when the form is viewed by a designated approver (Department Manager, Financial Director, etc.) and the request is awaiting their specific approval. Their visibility will be controlled through workflow or form logic settings in Softyflow.
Configuring button actions ("On click" events)
Once you've added your buttons, you need to define what happens when a user clicks them. This is done by configuring their "On Click" actions. Let's focus on the "Submit" button as an example.
Select a button: Click on the "Submit" button on your form canvas. Its properties panel will open on the right.
Access Actions: In the properties panel, look for the "Actions" section and then click on the "View attached action" button (or similar, like "On Click" event handler).
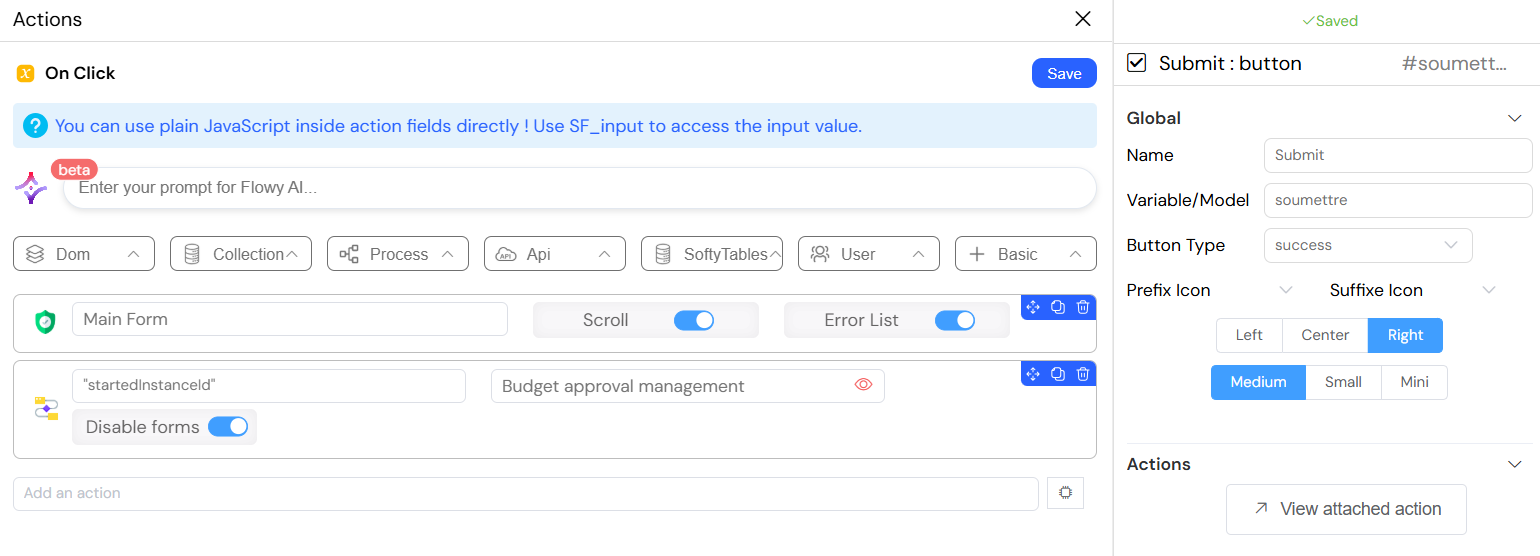
- Define the "On Click" Logic: A new panel will open, allowing you to add a sequence of actions that occur when the button is pressed. For the "Submit" button, you'll typically configure actions like:
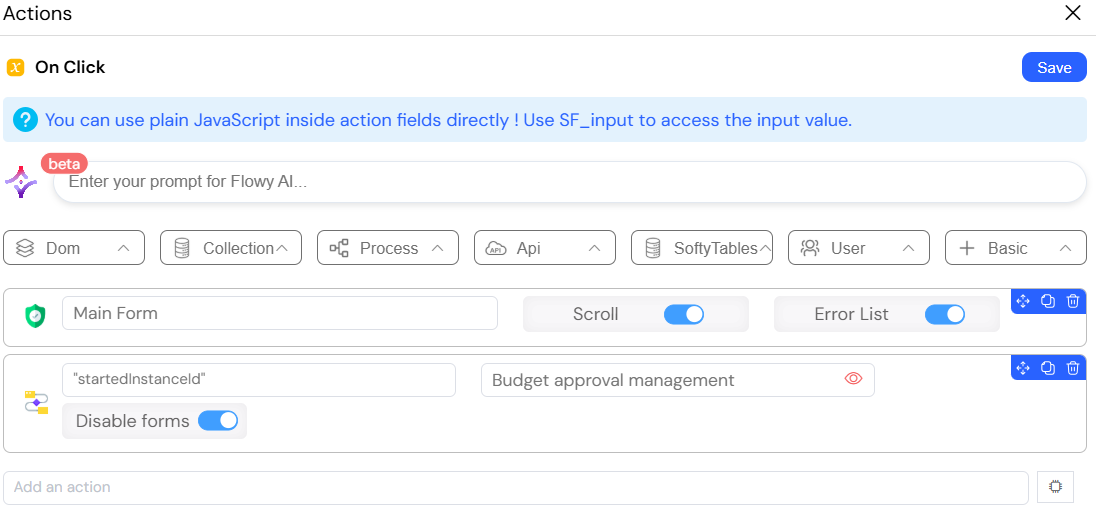
- Set Data/Status: Add an action to update a form field or a variable. For instance, you might set the
report_statusvariable (or directly the form's Status field) to"Nouvelle Demande"(New Request). This marks the request as ready for the workflow. - Trigger Workflow/Process: This is critical! Add an action to start your
Budget Approval Managementworkflow. This action tells Softyflow to initiate the process you designed in the next tutorial section. - Disable Form (Optional): You might choose to add an action to
Disable formsafter submission, preventing further edits once the request enters the workflow. - Other Actions: You can add other actions as needed, such as showing success messages, redirecting the user, or performing calculations.
You will follow a similar process to configure the "Save (as Draft)", "Approve", and "Reject" buttons, each with their own specific "On Click" logic tailored to their function (e'g., "Save" saves the data without starting a workflow; "Approve" completes the current task in the workflow and sets the status to "Approved"; "Reject" completes the current task, sets the status to "Rejected", and might require a refusal reason).
- Arrange and style your form:
- Drag and drop the widgets to arrange them logically on the form. Softyflow's drag-and-drop interface makes this easy.
- Utilize any section or column layouts provided by Softyflow to organize fields into clear, readable groups (e.g., "Request Details", "Purchase Details").
- Save your form regularly as you make changes! Look for a "Save".
- Test with Preview mode
Applying Custom CSS for Advanced Styling
While Softyflow's widgets provide many styling options, you might need to apply custom styles for specific branding or design requirements. Softyflow allows you to add your own custom CSS to your forms.
- Open the CSS Panel: In the form builder, on the right-hand properties panel, look for a "CSS" tab.
Add Your CSS Rules: You can write standard CSS rules to target elements in your form. To identify the correct selectors for form elements, you can use your browser's developer tools to inspect the form in preview mode. It is a good practice to use specific selectors to avoid unintentionally affecting other elements.
Example: To change the background color of a specific section, you could add:
#my-section-id {
  background-color: #f0f8ff;
  border-radius: 8px;
}
By using the custom CSS panel, you can achieve a pixel-perfect design that aligns with your company's branding.
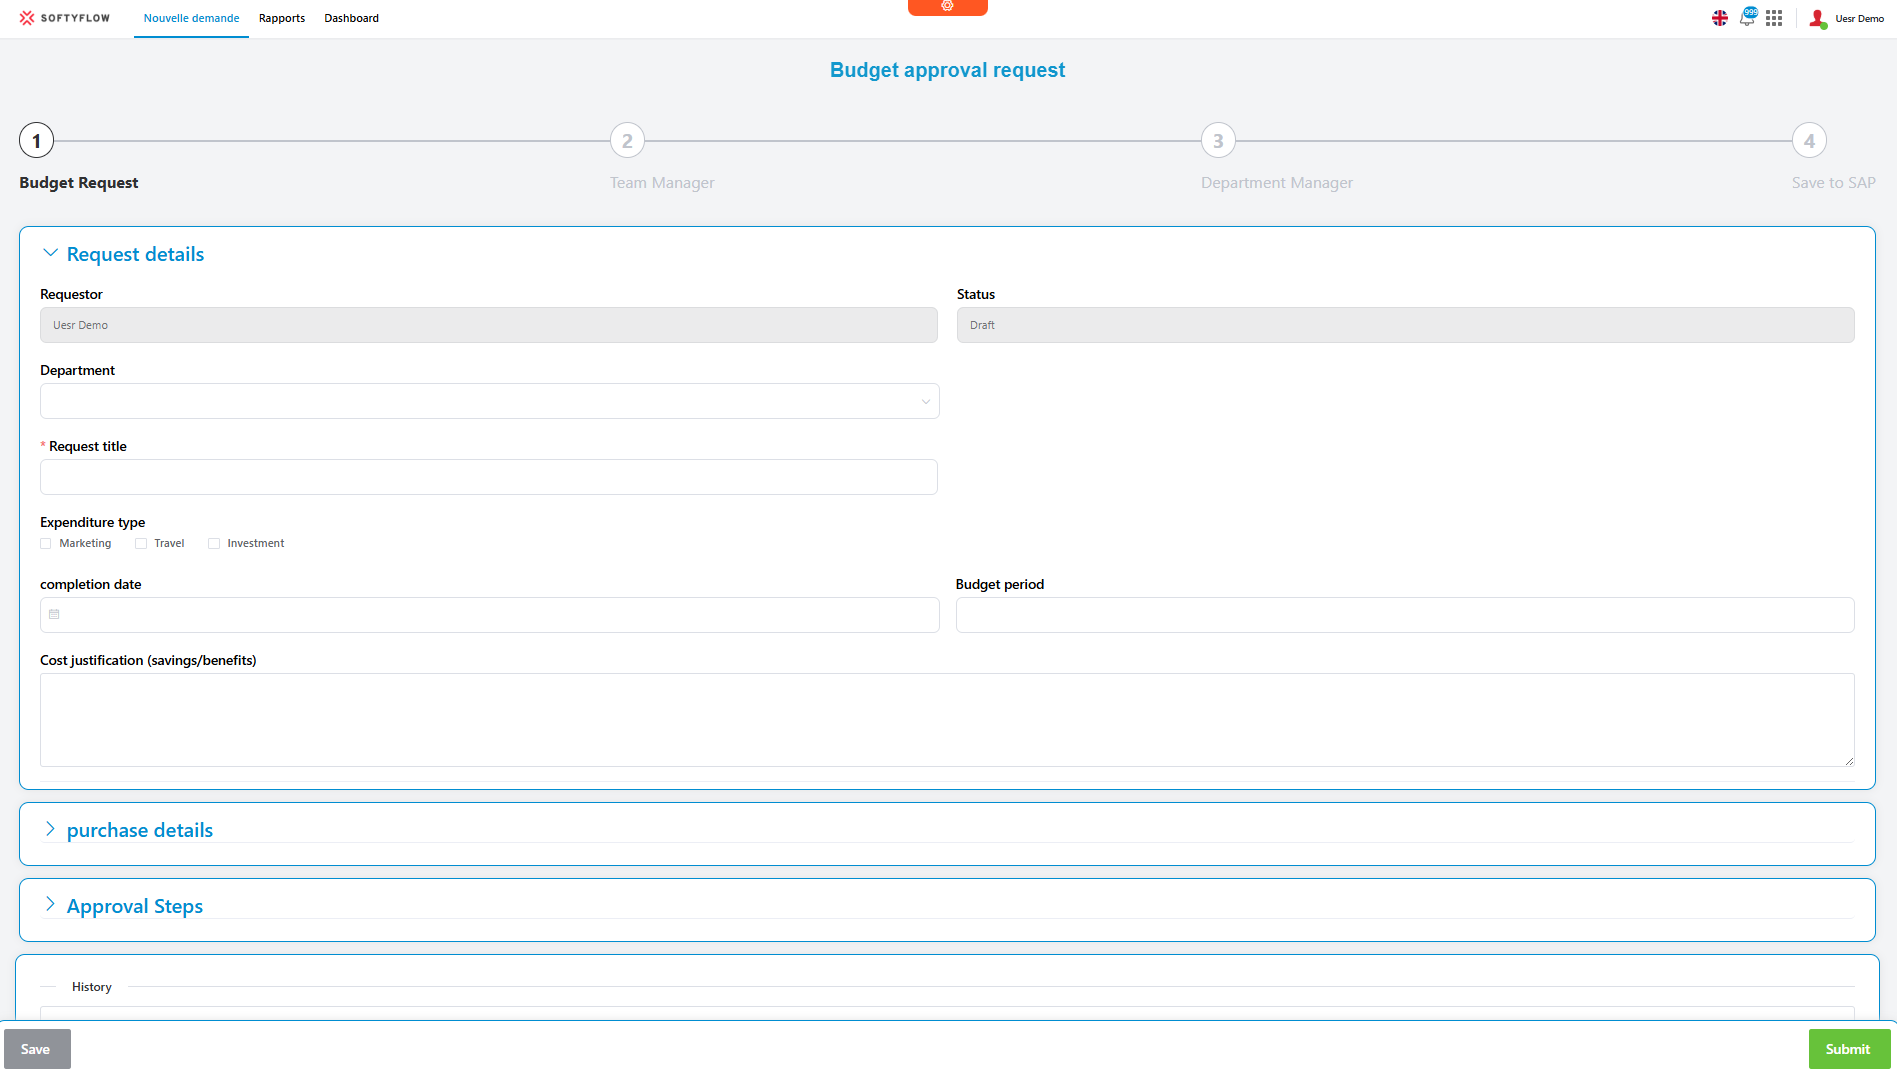
You have now successfully designed and customized the front-end for your Budget Approval Request App! Take a moment to admire your work your completed form should look similar to this:
In the next steps, we'll connect this form to data storage and define the powerful approval workflow that makes your application truly functional.
3. Build the Workflow
Now that your user interface (the form) is ready, it's time to build the "brain" of your application: the workflow. The workflow defines the sequence of tasks, decisions, and notifications that guide a budget request from its submission to its final approval or rejection. We'll use Softyflow's visual process modeler, which follows BPMN (Business Process Model and Notation) principles, to design this logic using our process design tools.
Understanding the Approval Logic and Implemented Workflow
Our workflow defines a validation flow. While a full application might have complex amount-based routing at the very beginning, for this tutorial, we will focus on the sequential approval steps and the core functionalities as depicted in the implemented BPMN diagram below, including how the approval path dynamically changes.
Key Workflow Characteristics:
- Request Initiation: Starts when a new form is submitted.
- Initial Data Processing: Automated steps for setting up the request.
- Sequential Approvals: Requests move through a defined chain of approvers (Team, Department, Financial, Managing, Executive).
- Dynamic Approval Path: After initial team validation, the subsequent approval chain is determined by the request's total amount.
- Decision Points: Each approver can
ApproveorRejectthe request. - Notifications: Automated emails will inform users about task assignments and the status of their requests.
Step-by-Step: Creating Your Budget Approval Workflow
Let's dive into the Softyflow Workflow Editor to build your process, step-by-step, matching the diagram above.
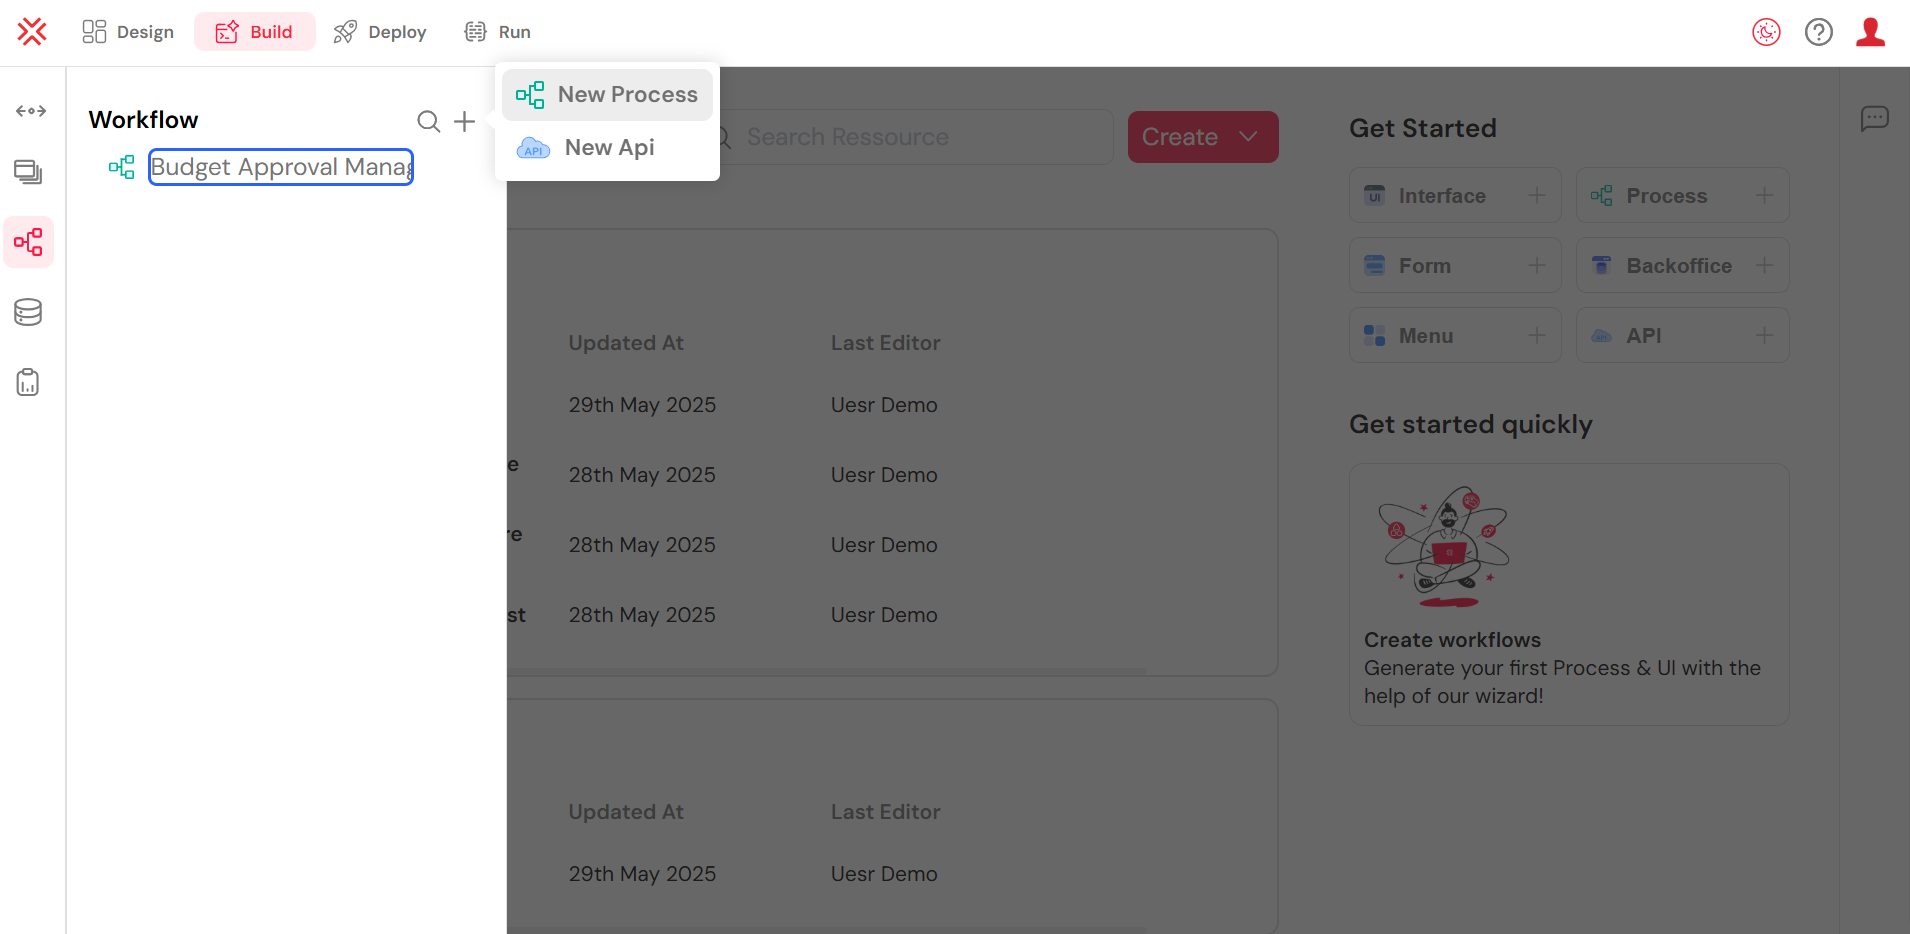
- Create a New Process:
- Navigate to the "Workflow" section within your
budget-approval-demoproject in the Softyflow IDE. - Look for the "plus icon" (
+) or a "New Process" button. Click it to start a new workflow. - When prompted, name your process:
Budget Approval Management - Click "Create Process" to open the workflow canvas.
- Navigate to the "Workflow" section within your
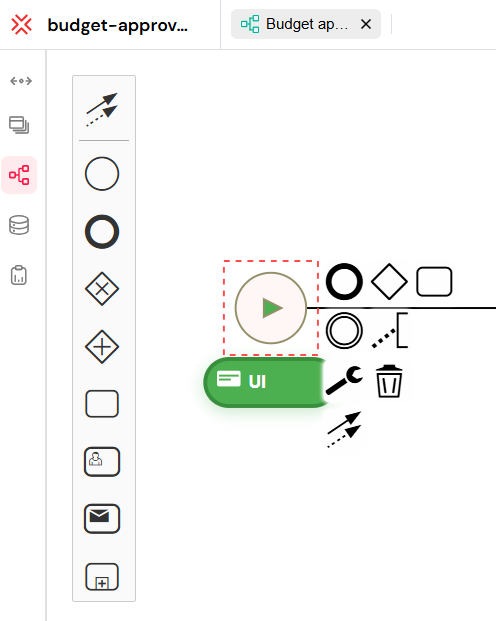
Add the Start Event ("Nouvelle demande"):
- Drag a "Message Start Event" widget (a circle with an envelope icon inside) onto the canvas. Label it:
Nouvelle demande. - Configure this Start Event to be triggered by the submission of your
budget-approval-form. This means whenever an employee clicks "Save and Submit for Approval" on the form, this workflow will begin.
- Drag a "Message Start Event" widget (a circle with an envelope icon inside) onto the canvas. Label it:
Add the Initial Data Processing Task:
- Immediately after the "Nouvelle demande" Start Event, drag a "Service Task" (a rectangle, possibly with a gear/wrench icon). Label it:
Nouvelle demande. This task will handle initial system-level actions. - Configure this task's properties :
- Name:
Nouvelle demande. - Inputs: This task is crucial for processing initial data from the form. Notice the "Input" variables like
request_id,requestor_name,requestor_mail, andglobal_status. This task typically sets initial values for these variables based on the submitted form data.
- Name:
- Immediately after the "Nouvelle demande" Start Event, drag a "Service Task" (a rectangle, possibly with a gear/wrench icon). Label it:

Model the Approval Steps (User Tasks & Gateways) and Conditional Flows: Now, let's build out the sequence of human approval tasks, their decision points, and how the workflow's path dynamically adjusts.
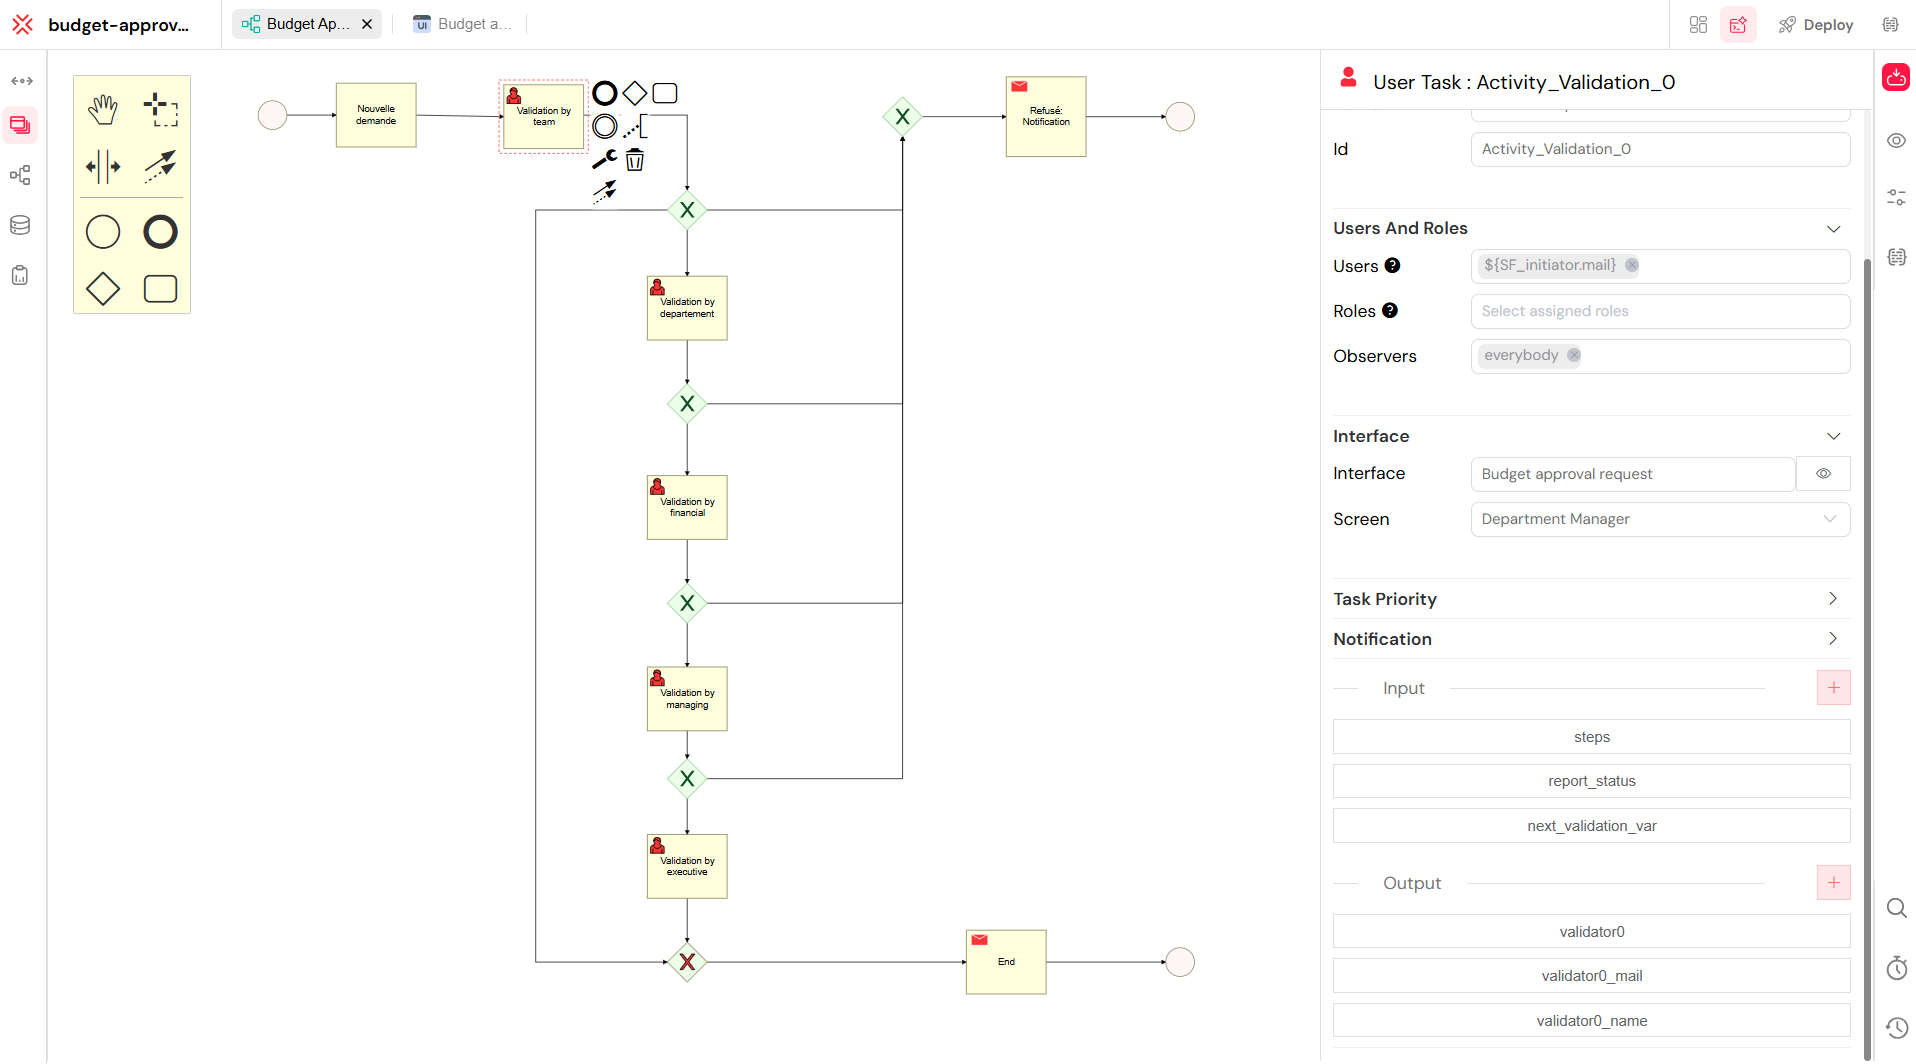
User Task: Validation by Team (
Validation by team)- Drag a "User Task" widget (rectangle with a person icon). Label it:
Validation by team. - Connect it from the "Nouvelle demande" service task.
- Configure this task's properties :
- Name:
Validation by team(ID:Activity_Validation_0). - Users/Roles: Under "Users And Roles," this task will be assigned to the relevant Team Manager. The screenshot shows
$(SF_initiator.mail), which typically indicates a dynamic assignment (e.g., resolving to the initiator's assigned team manager). - Interface/Screen: Link this task to your
budget-approval-form. TheScreenproperty (e.g.,Department Managerfrom the screenshot) indicates which specific view or configuration of your form the assigned manager will see when they open this task.
- Name:

- Drag a "User Task" widget (rectangle with a person icon). Label it:
Add an Exclusive Gateway after "Validation by team":
- Drag an "Exclusive Gateway" (diamond shape with an 'X') after the
Validation by teamtask. Label it: "Team Decision". - This gateway will have multiple outgoing "Sequence Flows" (arrows) to direct the process based on the decision made and the request's total amount.
- Drag an "Exclusive Gateway" (diamond shape with an 'X') after the
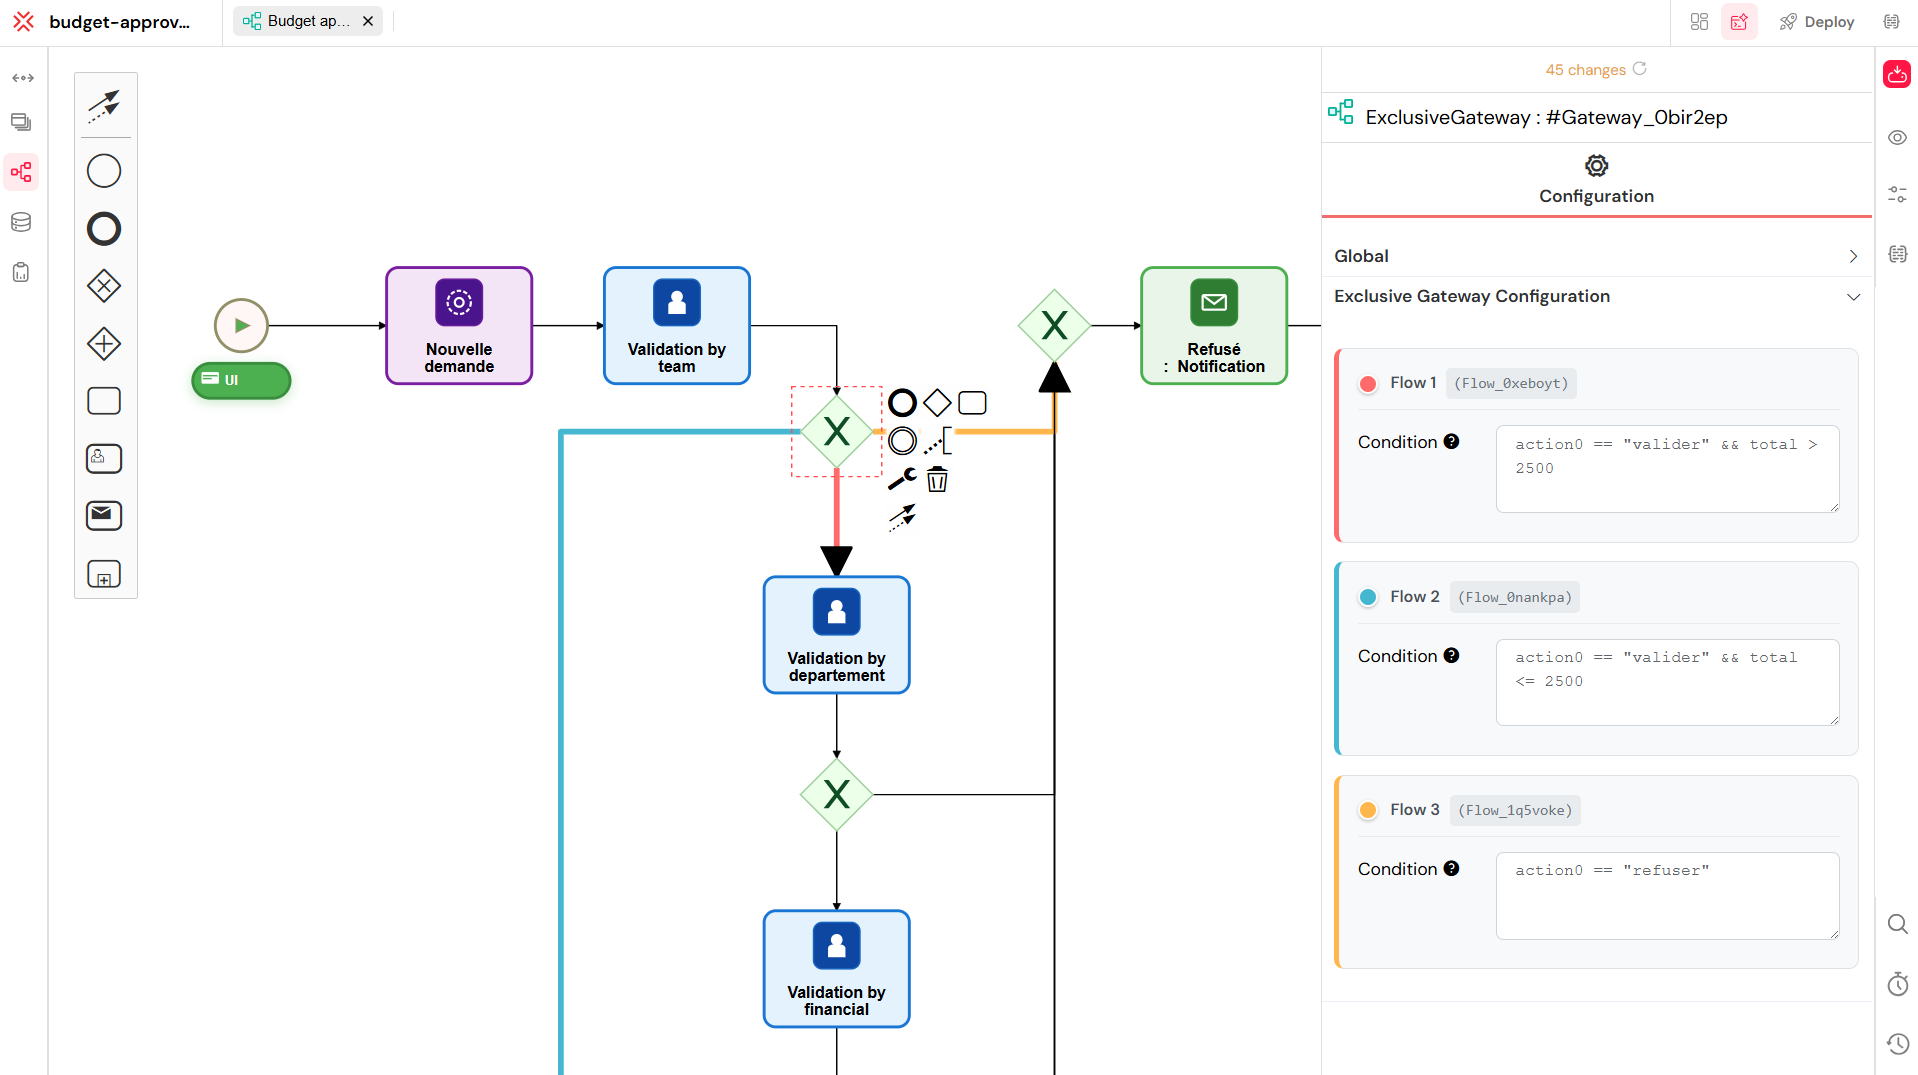
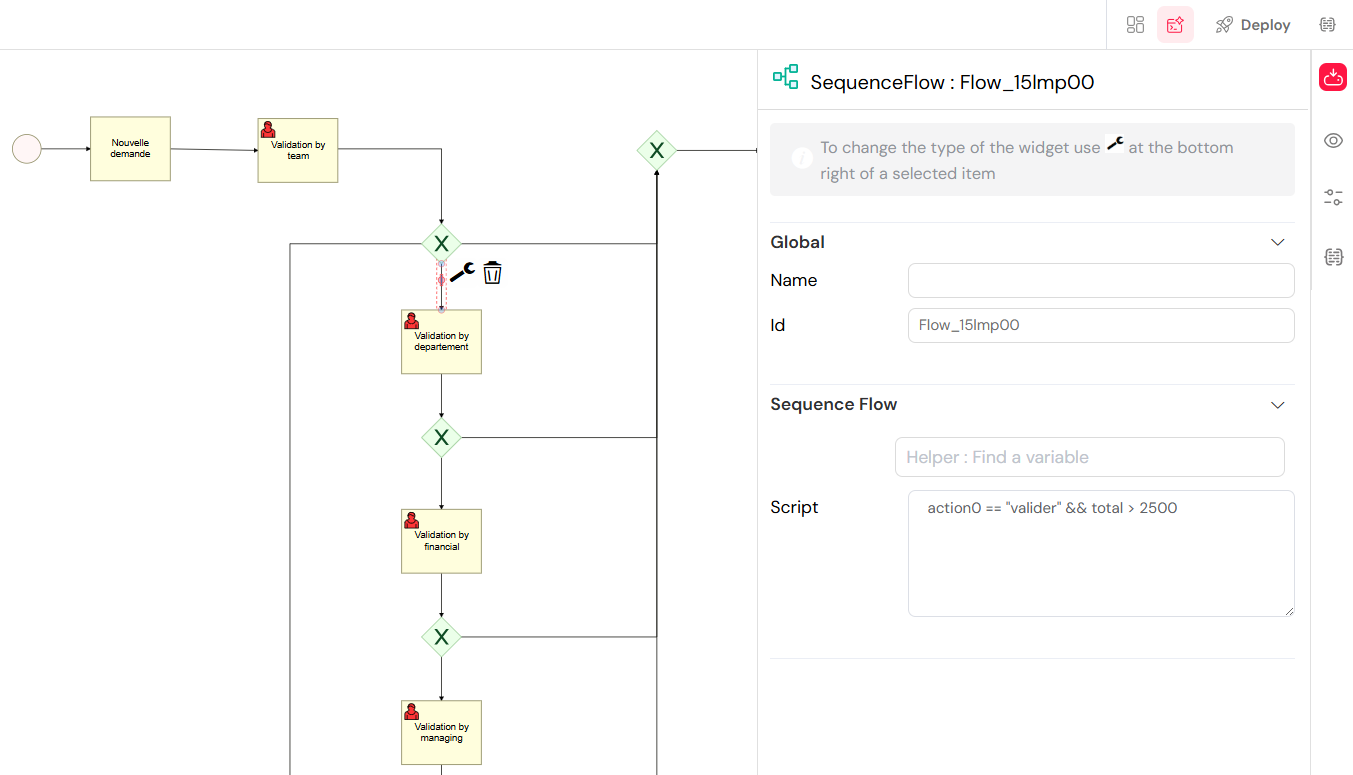
Configuring Conditional Flows (Sequence Flow Conditions): This is where the dynamic routing happens. You will click on the arrows (Sequence Flows) coming out of your gateways to define the conditions under which the workflow will follow that specific path.
- Select a Sequence Flow: Click on an arrow originating from the "Team Decision" gateway. Its properties panel will open on the right.
- Define the
ScriptCondition: In the "Script" field, you will enter a condition using variables from your form or workflow.
- Example 1: Approval for amounts
<= 2500€- On the sequence flow leading to the short approval path (or directly to the End if it's the only step), enter a condition like:
action0 == 'valider' && total <= 2500
- On the sequence flow leading to the short approval path (or directly to the End if it's the only step), enter a condition like:
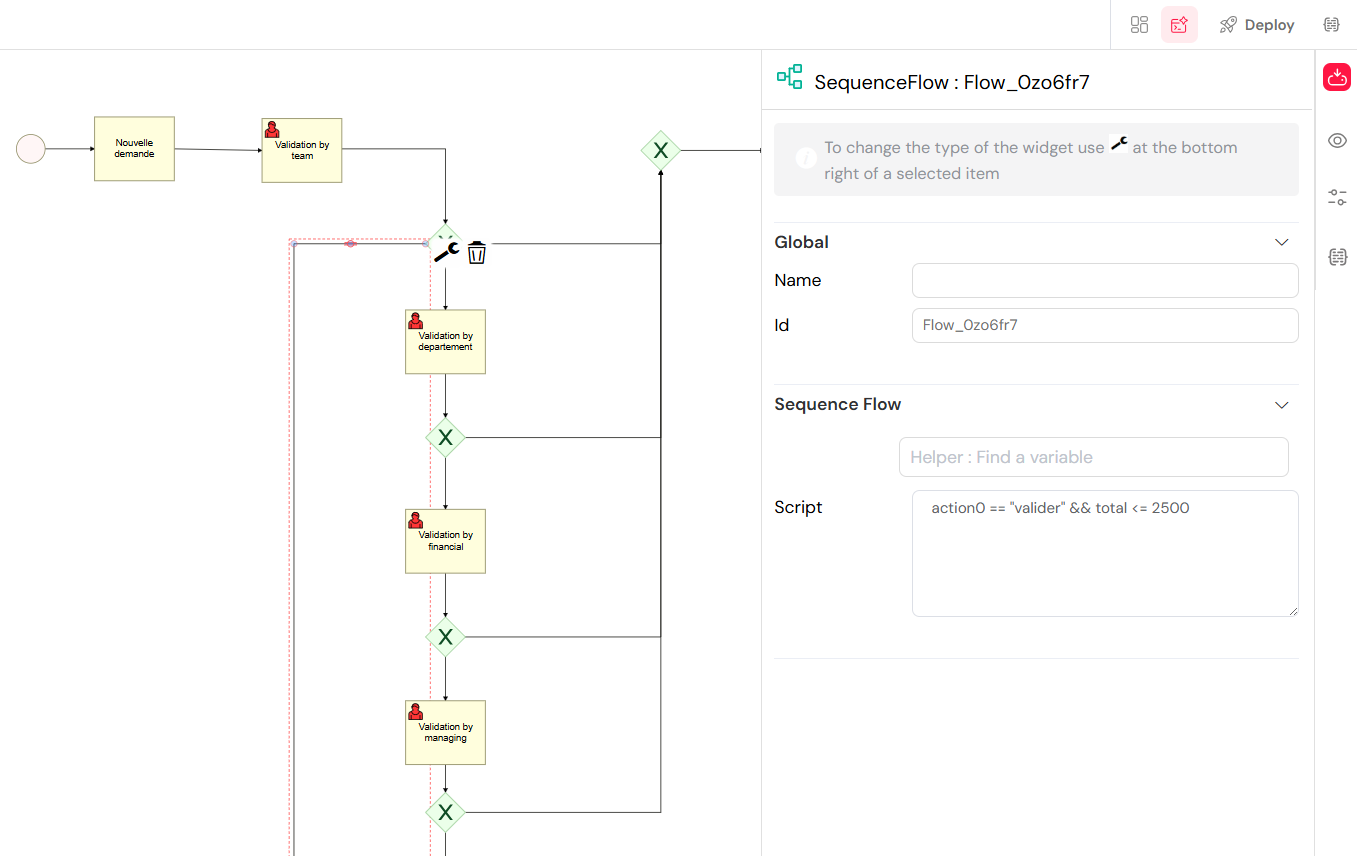
- Example 2: Approval for amounts
> 2500€- On the sequence flow leading to the next approval task (e.g., "Validation by department"), enter a condition like:
action0 == 'valider' && total > 2500
- On the sequence flow leading to the next approval task (e.g., "Validation by department"), enter a condition like:
Explanation:
action0 == 'valider': This checks if the user clicked the "Validate" or "Approve" button (thisaction0variable captures the outcome of the user task).total <= 2500andtotal > 2500: These conditions check the value of thetotalvariable (which holds the total amount from your form).These conditions ensure that the workflow takes the correct path after the team's validation, directing it to the appropriate sequence of subsequent approvals based on the request amount.
Add a Notification Task after Team Approval (if Approved and routed):
- After the specific "Approved" sequence flows (e.g., for
total > 2500), you might include a "Send Task" labeledNotification. - Configure this task's properties (referencing
image_6cef82.png): - Name:
Notification. - To Users/Roles: The screenshot shows
[[SF_initiator.mail]], indicating that the original requestor will receive an email. - Mail Configuration: Set the "Mail Subject" and link an "Mail template" to inform the initiator that their request has passed this stage.
- After the specific "Approved" sequence flows (e.g., for
Continue with Subsequent Approval Steps:
- Continue from the conditional flows with "User Task: Validation by department", followed by its own "Exclusive Gateway" for decision.
- Repeat this pattern for the remaining approval levels:
Validation by financial,Validation by managing, andValidation by executive. Each will have a User Task followed by a gateway. - Each "Approved" path from a gateway connects to the next User Task in the sequence, continuing until the final approval.
- Define the Rejection Path:
- From any "Rejected" sequence flow coming out of an
Exclusive Gateway, connect it to a central rejection process.
- From any "Rejected" sequence flow coming out of an
- Send Task: Refusal Notification (
Refus: Notification)- Connect all "Rejected" paths to a "Send Task" labeled
Refus: Notification. - Configure this task to send a notification email to the original Requestor, informing them that their request has been rejected. The email content should ideally include the refusal reason provided by the approver.
- Connect all "Rejected" paths to a "Send Task" labeled
- End the Process:
- End Event: After the final approval step (from the "Validation by executive" gateway) or after the "Refusal Notification" task, add an "End Event" (a red circle with a thick border).
- Label it appropriately (e.g., "End"). This signifies the completion of the workflow.
Here's a comprehensive look at your complete Budget Approval Workflow:
Key Workflow Actions and Data Flow
- Button Actions: The "Submit", "Approve", and "Reject" buttons on your form will be linked to specific actions within this workflow. "Submit" will trigger the "Nouvelle demande" Start Event. "Approve" and "Reject" buttons, appearing conditionally for approvers, will complete the current User Task and activate the corresponding outgoing sequence flow from the gateway based on its configured conditions.
- Status Updates: As the request moves through the workflow, the
Statusfield on your form will be automatically updated by Softyflow (e.g., from "Nouvelle Demande" to "Waiting for Department Manager Approval" to "Approved"). - User Assignment & Notifications: User tasks are assigned to specific users or roles, and notification tasks (like "Notification" and "Refus: Notification") are configured to send emails. (More detailed explanations of user/role management and email notification setup can be found in our dedicated sections on [User Management] and [Notifications]).
- Data Passing: The "Input" and "Output" sections visible in task properties indicate how data from the form is passed through and updated by the workflow tasks.
By visually modeling these steps in Softyflow's Workflow Editor, you create a robust and automated process that requires no coding. You are literally drawing your business logic!
4. Run the Budget Approval Report Web Interface
The Budget Approval Report Web Interface is a crucial component that allows managers (and other relevant users) to effectively monitor, track, and filter approval requests. This interface provides a centralized view of all requests—whether they are pending, ongoing, or already completed—based on the user's role and the workflow status. Here's how you'll configure and use it.
Step-by-Step: Setting Up Your Report Interface
- Create a Report
First, you need to create the report itself within Softyflow, which will serve as the data source for your web interface.
- Navigate to the Reports Section:
- In your
budget-approval-demoproject within the Softyflow IDE, locate the "Reports" section in the left-hand navigation panel (it might be represented by an icon like a document with a chart).
- In your
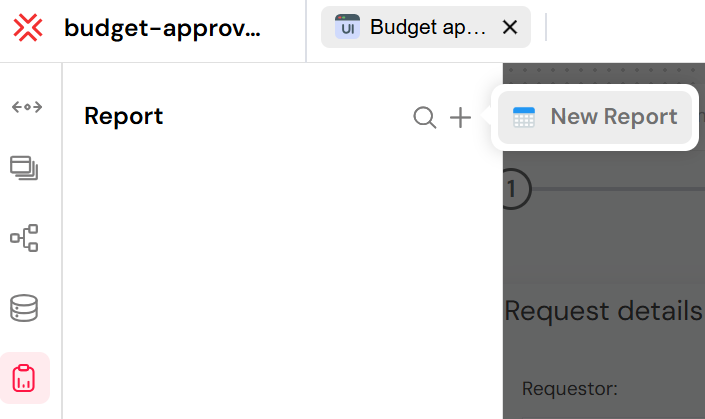
- Start a New Report:
- Click on the "+" icon located next to the "Reports" title in the left panel. A dropdown menu will appear.
- Select "New Report" from the options.
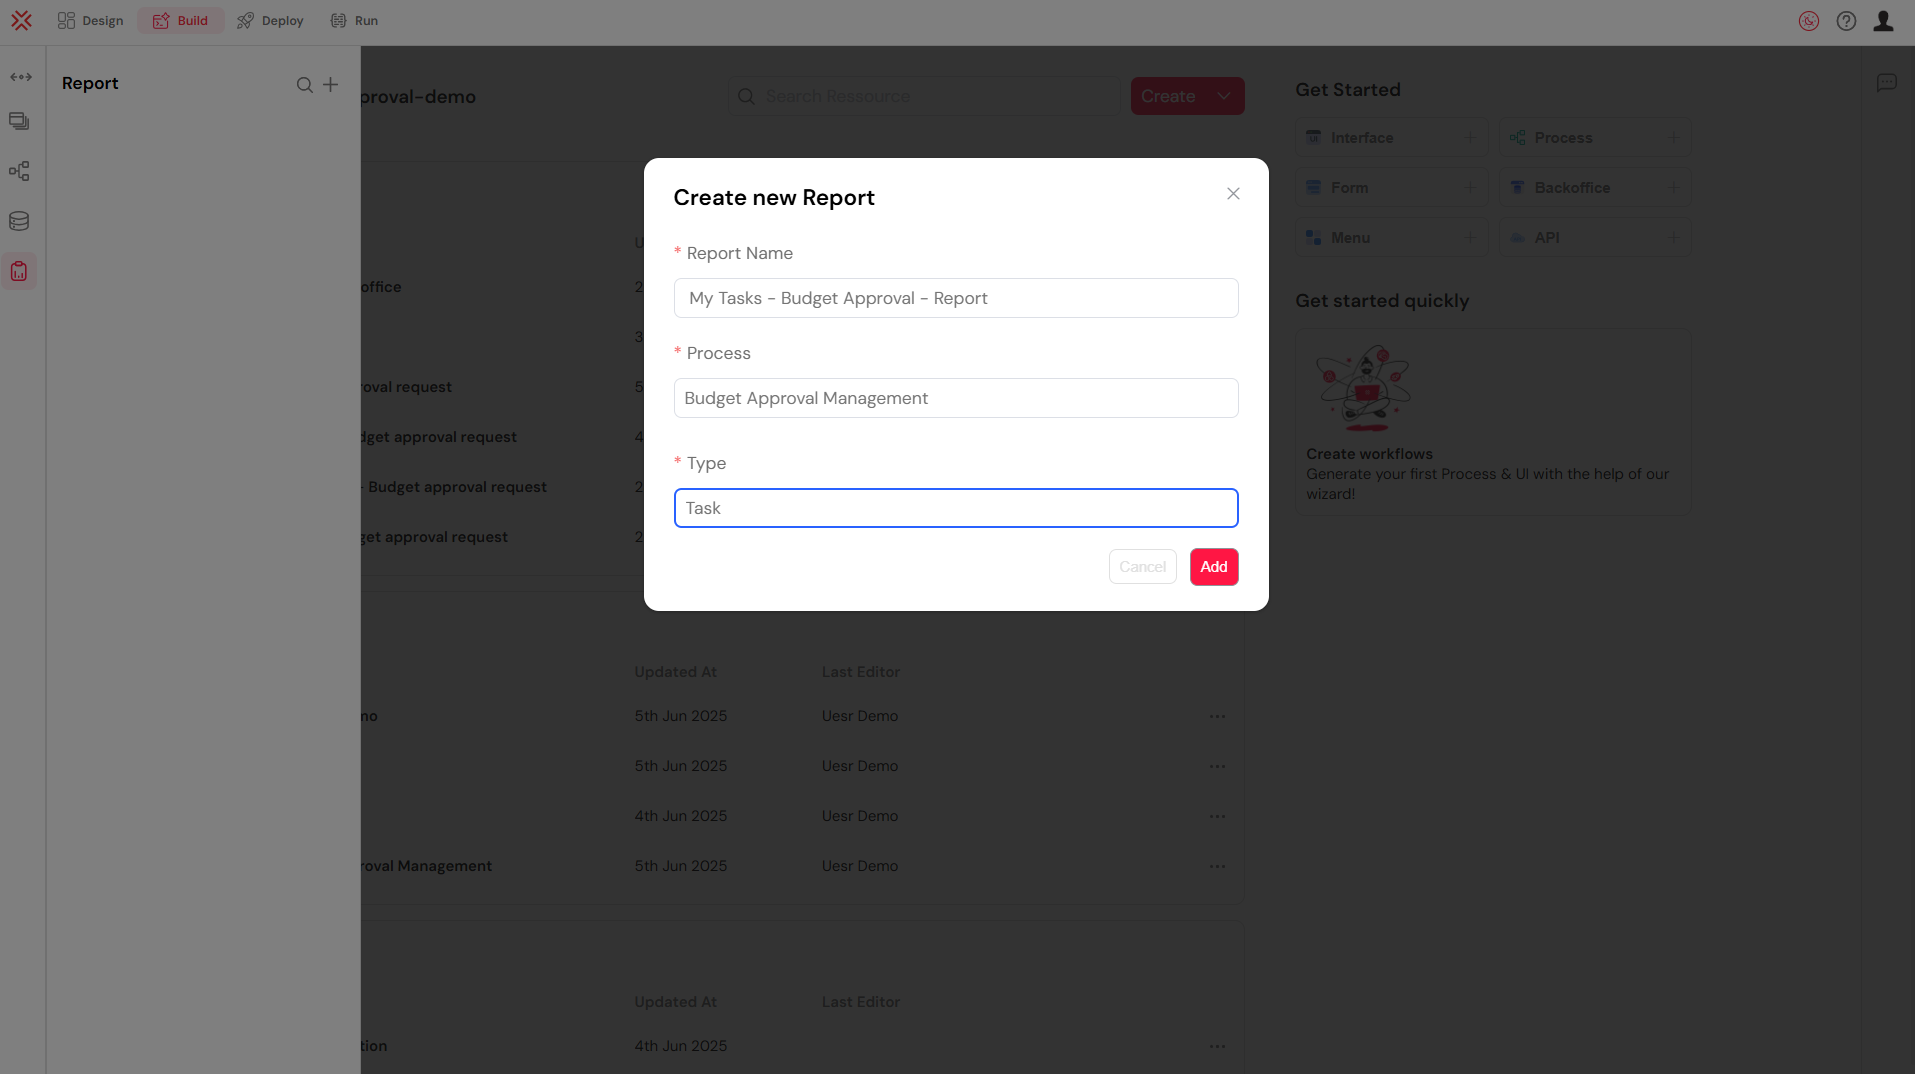
- Fill in Report Details:
- A "Create new Report" dialog box will appear. Fill in the following information:
- Report Name: Enter a descriptive name, such as
My Tasks - Budget Approval - Report. - Process: From the dropdown, select your previously created workflow:
Budget Approval Management. This links the report directly to the data generated by your workflow. - Type: Choose
Task. This type of report is ideal for displaying active manual steps (tasks) within your workflow, making it perfect for managers to see pending approvals.
- Report Name: Enter a descriptive name, such as
- Click "Add" to create the report.
- A "Create new Report" dialog box will appear. Fill in the following information:
- Configure the Report
Once the report is created, you need to configure its content, including the data you want to display and any necessary filters.
Define Measures in Your Workflow
Before you can add columns to your report, you must define "Measures" within your workflow.
What are Measures?
Measures are the specific data points (fields) from your form or workflow variables that you want to make available for reporting. Think of them as a "whitelist" of data you explicitly choose to expose for reports and analysis. By defining a variable as a measure, you are telling Softyflow that this piece of information is important and should be queryable when building reports.
For more details, you can refer to the Measures documentation.
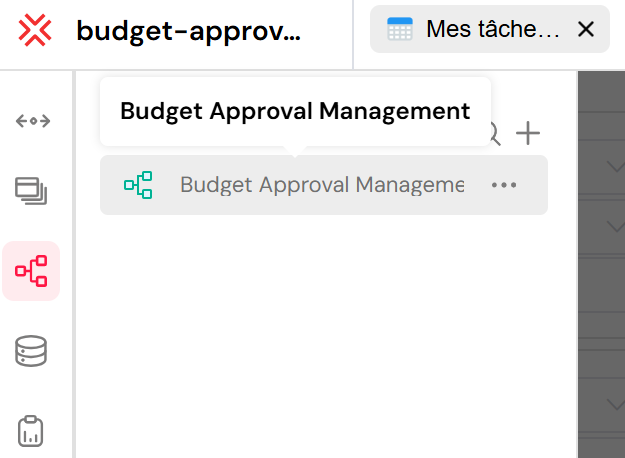
- Navigate to Your Workflow:
- Go back to the "Workflow" section in the left panel and open your
Budget Approval Managementworkflow.
- Go back to the "Workflow" section in the left panel and open your
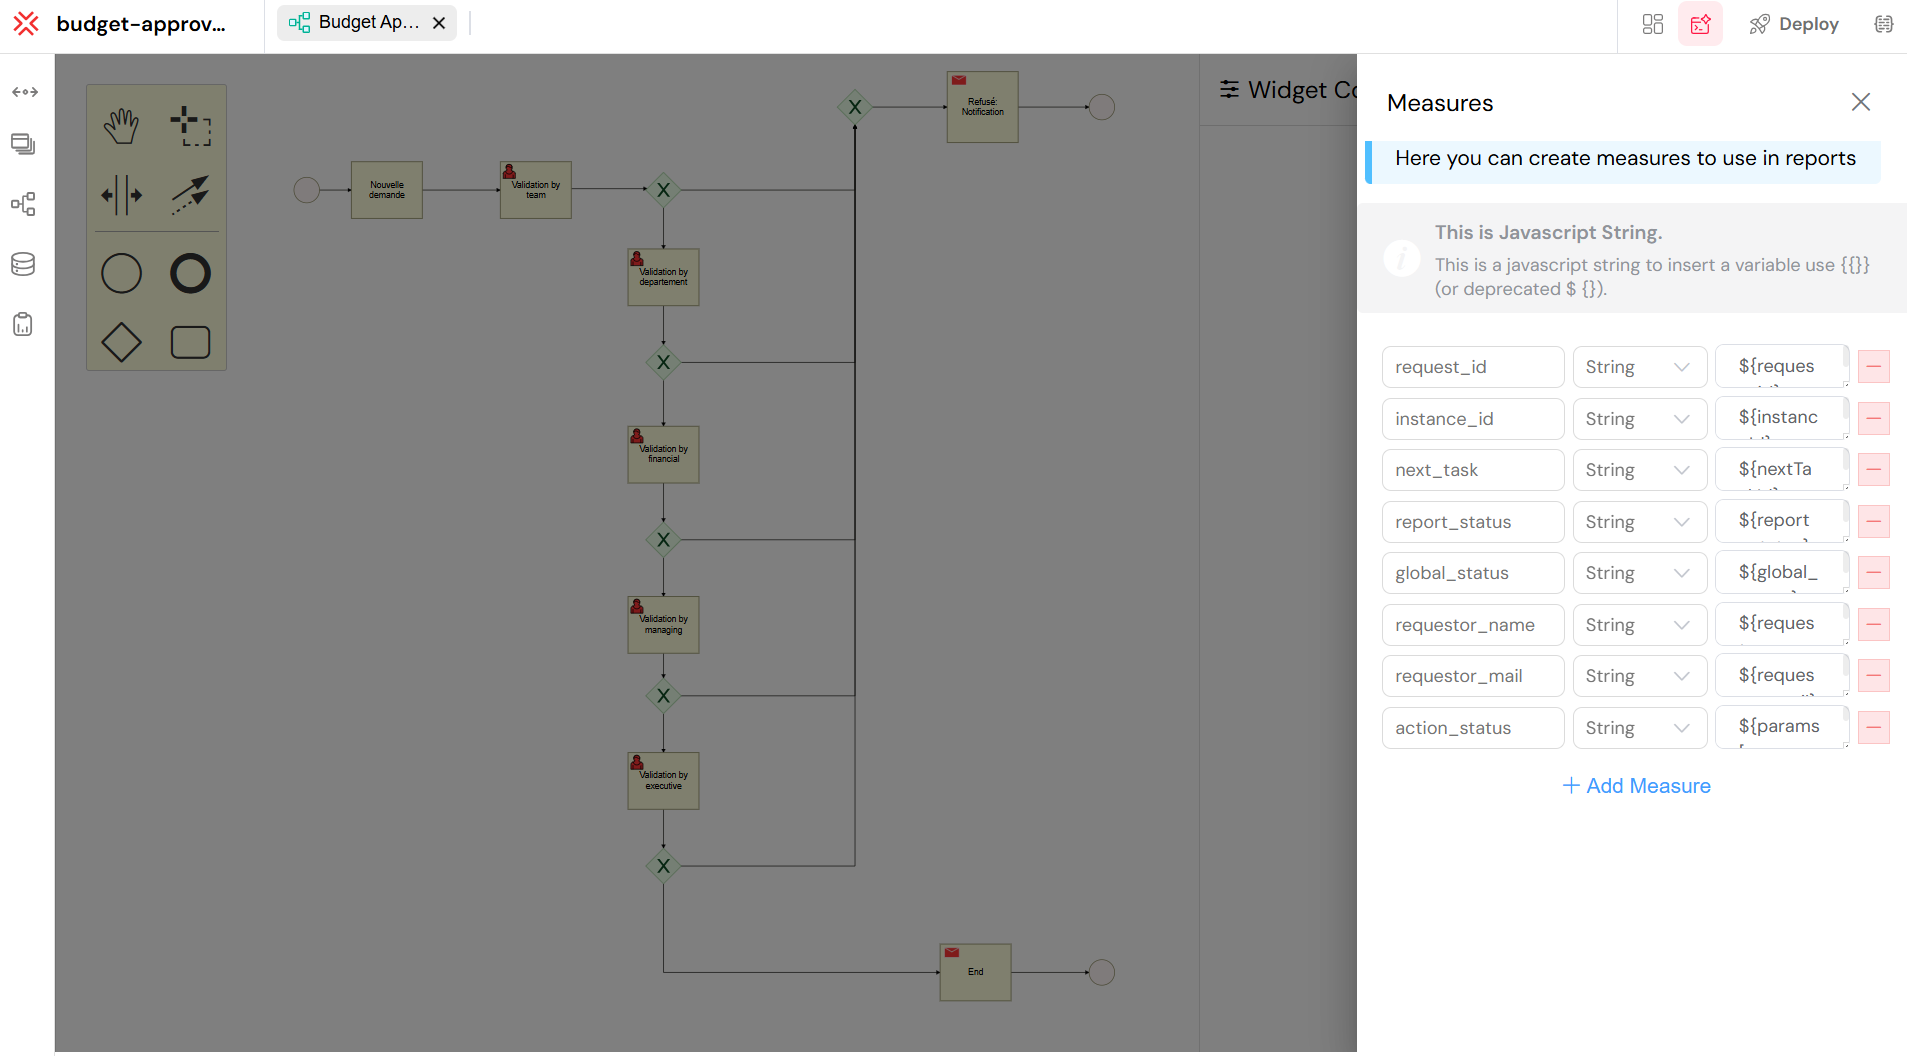
- Open the Measures Panel:
- On the right-hand side of the Workflow Editor, locate and open the "Measures" panel (it might be an icon like a ruler or a chart).
- Define Fields:
- Here, you will define all the desired fields using JavaScript strings that reference your form fields or workflow variables. For example:
request_id(e.g.,${request_id})instance_id(e.g.,${instance_id})created_at(e.g.,${created_at})global_status(e.g.,${global_status})next_task(e.g.,${next_task_name})requestor_name(e.g.,${requestor_name})total_amount(e.g.,${total})- And any other relevant fields from your
budget-approval-formsuch asdepartment,request_title, etc.
- Here, you will define all the desired fields using JavaScript strings that reference your form fields or workflow variables. For example:
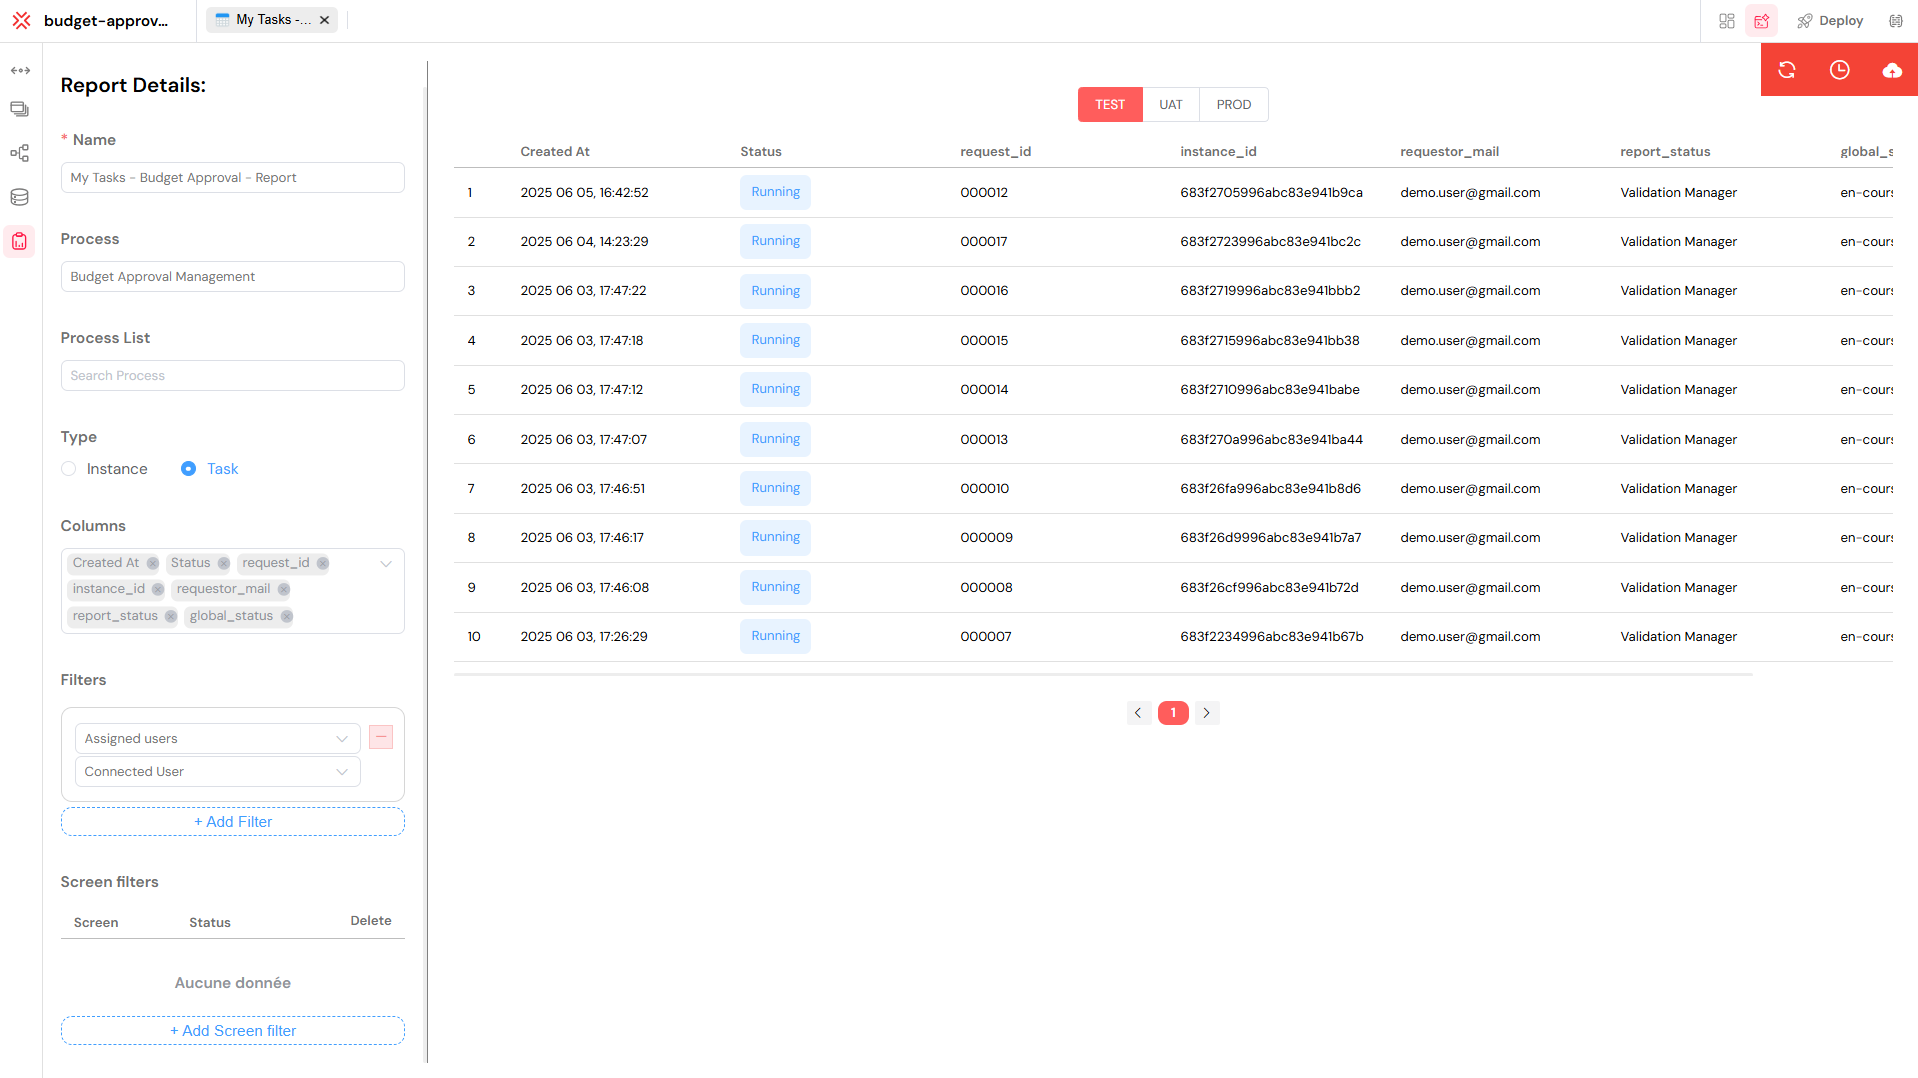
Define Report Columns (in Report Details)
Now, within the "Report Details" panel, you will specify which of these defined measures appear as columns in your report table.
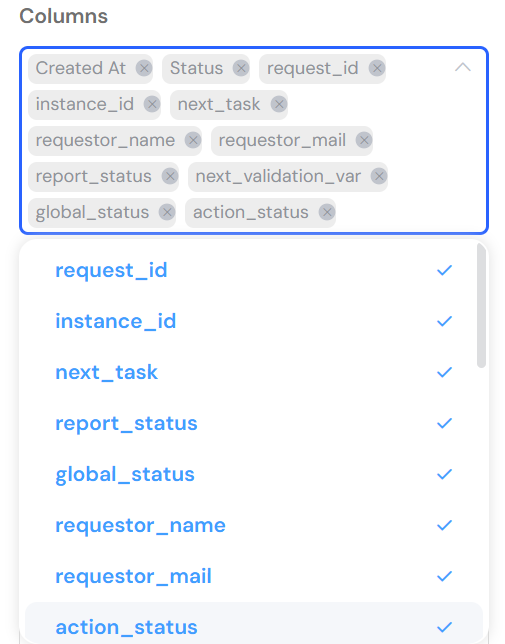
Locate the "Columns" Section: In the "Report Details" panel, find the "Columns" section.
Add/Select Columns:
- Click on the input field within the "Columns" section, or on the dropdown/plus icon, to reveal a list of all available measures.
- The fields you previously defined as "Measures" in your workflow are automatically listed here, ready for you to select and add as columns to your report.
- Select the desired fields to include as columns in your report. For instance, you would select
Created At,Status,request_id,instance_id,requestor_name,requestor_mail,report_status,global_status,next_validation_var,action_status, andnext_task.
Configure Column Display: Once added, you can further configure each column (though not fully visible in the provided screenshots, this is a standard feature):
- Labels: Change the user-facing label (e.g., from
request_idto "Request ID"). - Visibility: Hide or show columns.
- Formatting: Apply specific formatting (e.g., date formats for
Created At).
- Labels: Change the user-facing label (e.g., from
Apply Filters
Filters are essential for restricting the data displayed to users, ensuring they only see information relevant to them (e.g., their own requests, or requests assigned to their department).
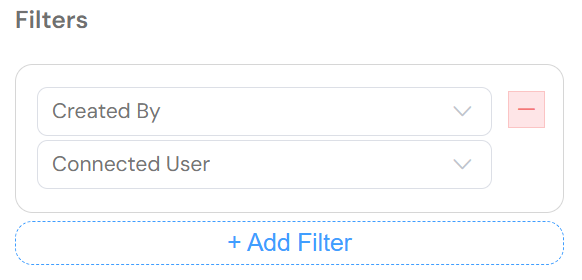
Go to the Filters Section:
- Once you are in your newly created report's configuration (after creating it in step 1), locate the "Filters" section.
Add a Filter Rule:
- Click "+ Add Filter" to create a new filtering rule.
Configure the Filter:
- For example, to show only data relevant to the currently logged-in user (e.g., tasks they created or are assigned to):
- Select the field "Created By".
- Choose the condition "equals".
- Select the value "Connected User".
- This ensures that data visibility is scoped per user and UI context.
- For example, to show only data relevant to the currently logged-in user (e.g., tasks they created or are assigned to):
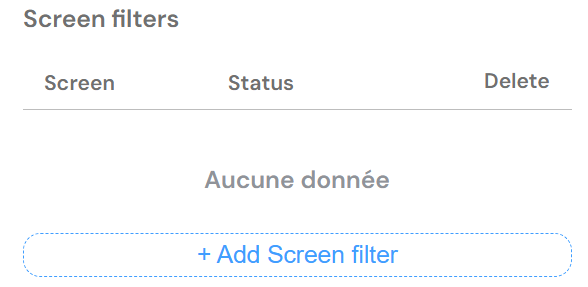
Screen Filters (Optional Information)
You can also add Screen Filters to dynamically adapt the dataset shown depending on which screen (or tab within a web interface) is opened. For instance, you could define a filter that only shows "pending tasks" when a user navigates to a "My Tasks" tab, and "completed tasks" on a "History" tab. This provides a dynamic and user-friendly experience.
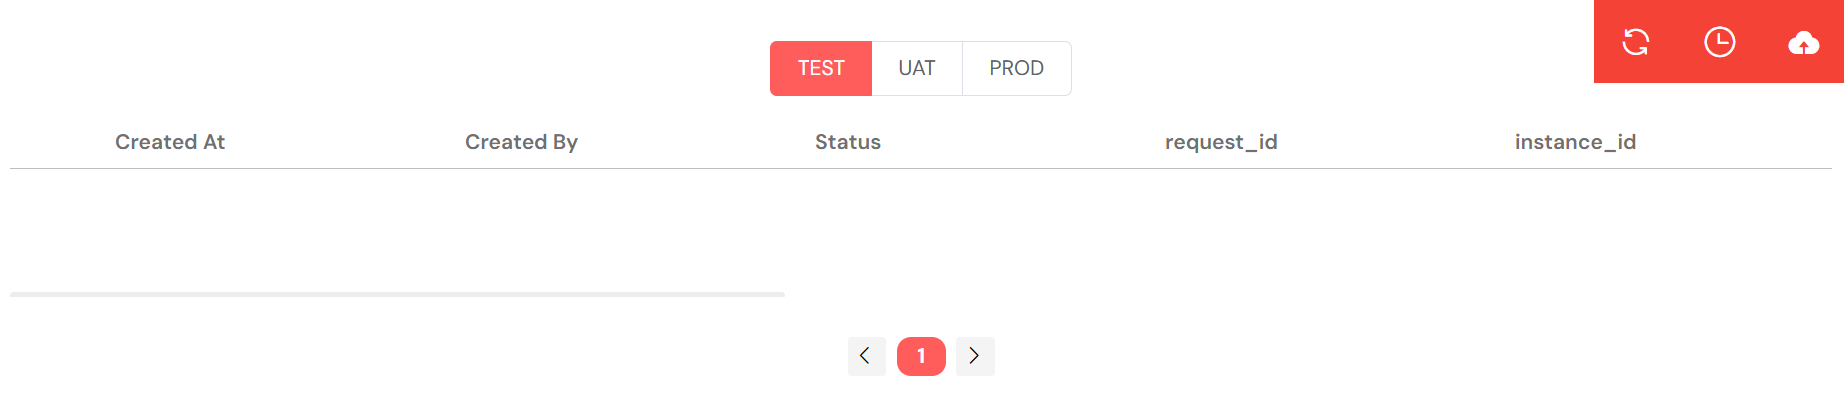
Managing Reports
As your application matures, you will manage its lifecycle across different environments, such as TEST (for development), UAT (for user acceptance testing), and PROD (the live production environment).
Softyflow supports this by allowing you to deploy or "migrate" your reports between environments. This ensures that a report built and verified in a test environment can be reliably promoted to production without being rebuilt.
The interface shown below illustrates how you can manage these deployments for a consistent and controlled release process.
- Link the Report to a Web Interface
To make your report visible and interactive for users, you need to embed it within a Web Interface.
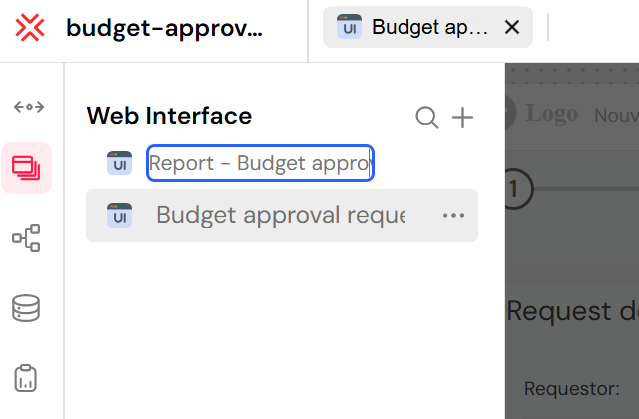
- Create a New Web Interface (or reuse existing):
- Navigate to the "Web Interface" section in the left panel (or use the "+ Interface" button in "Get Started ").
- Name it accordingly, for example:
Report - Budget Approval.
- Add a Table Widget:
- Once inside your Web Interface's canvas, drag and drop a "Table widget" onto the layout.
- Link it to your report: In the properties of the Table widget, select your
My Tasks - Budget Approval - Reportas its data source.
- Configure the Table
A data table will be added to your web interface layout. This table acts as the visual representation of your report data, and now we'll connect it to your report and define its basic behavior.
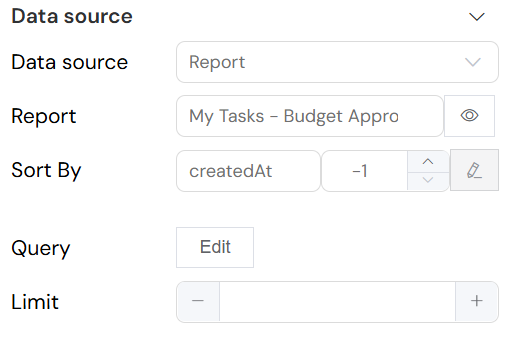
- Select the Table Widget: Click on the "Table" widget you dragged onto your Web Interface canvas. Its properties panel will open on the right side of the screen.
- Link Data Source:
- In the properties panel, locate the "Data source" section.
- Ensure the "Data source" dropdown is set to "Report".
- Next to the "Report" field, select "My Tasks - Budget Approval - Report" (the report you created in Step 1). This is how the table knows where to pull its data from.
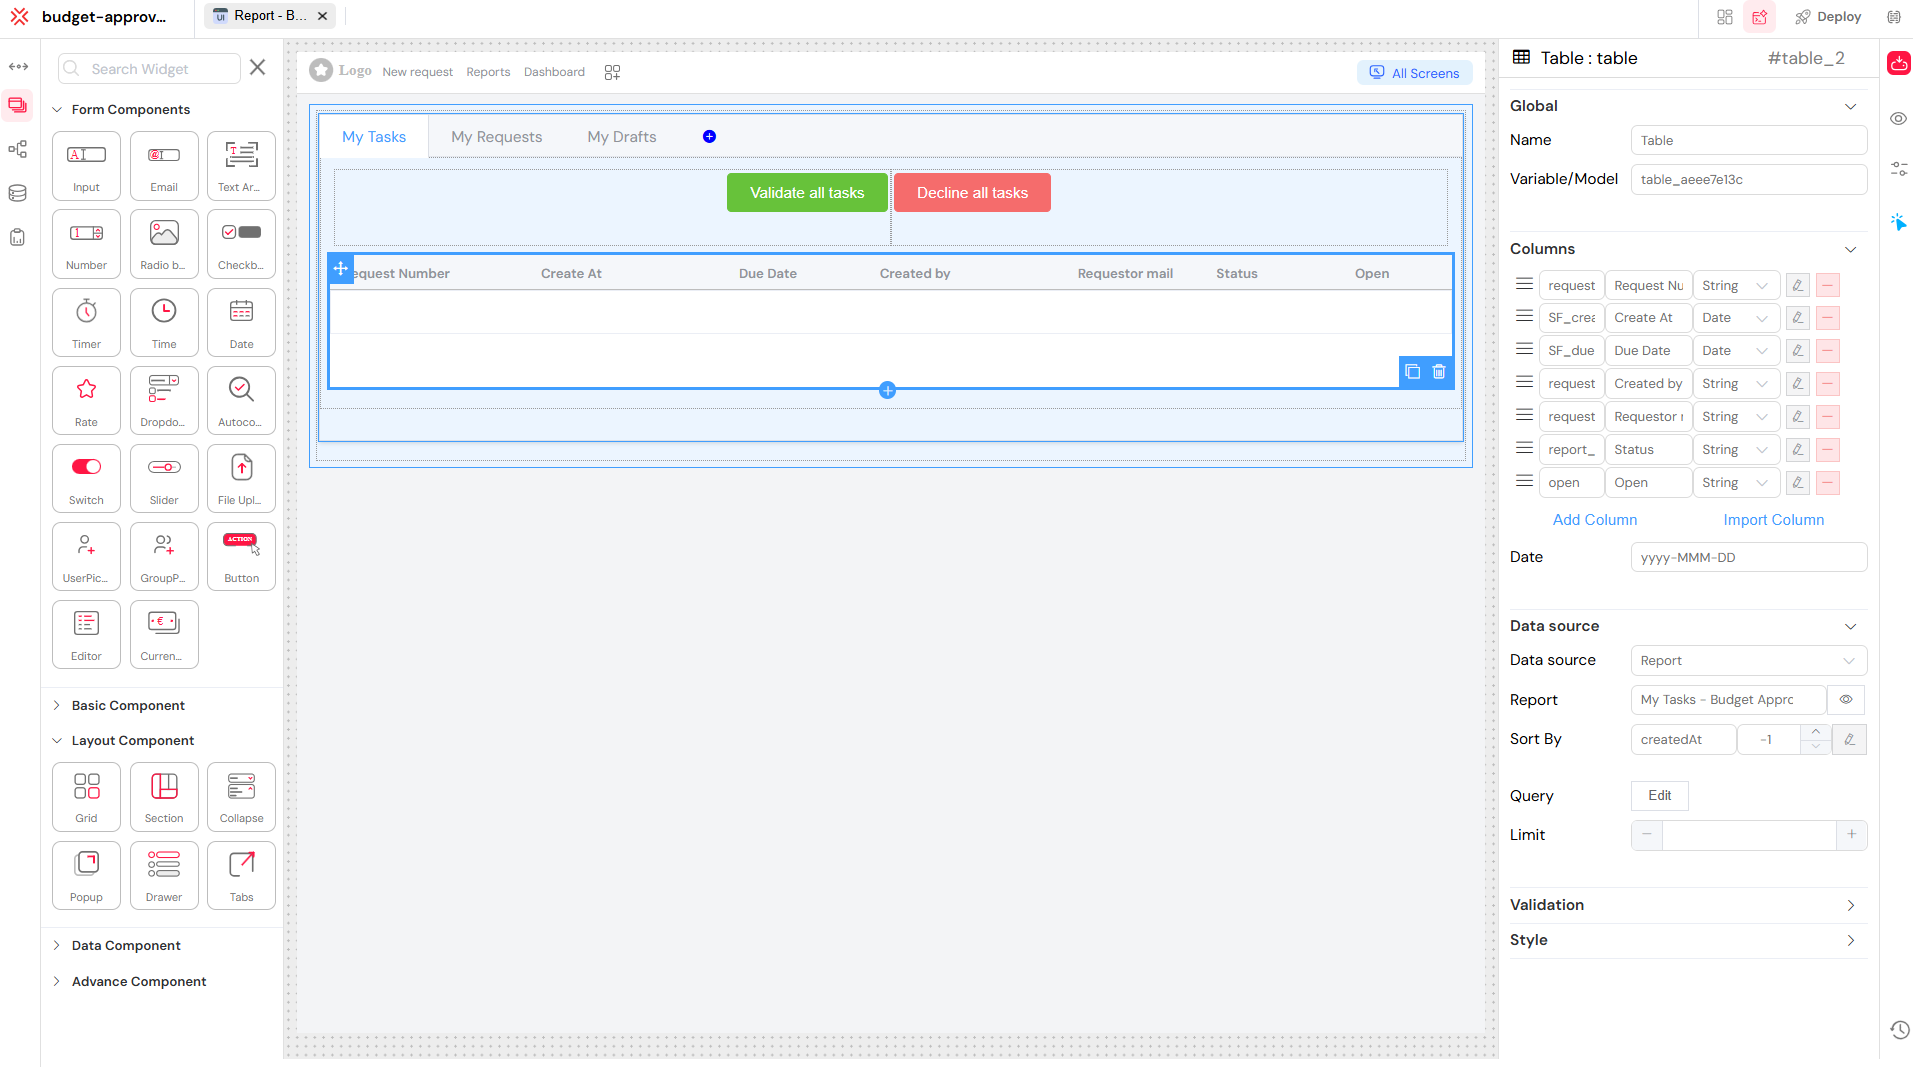
- Define Report Columns
This is where you specify exactly which pieces of information from your report you want to display in the table, and how they should look.
- Locate the "Columns" Section: In the Table widget's properties panel (the same one open from Step 4), scroll down to find the "Columns" section. Here, you'll see a list of rows, each representing a column in your table.
- Add and Configure Columns:
- You can click "Add Column" to add a new empty column.
- The fields you defined as "Measures" in your workflow (in Step 2) are automatically available for you to select and configure as columns here.
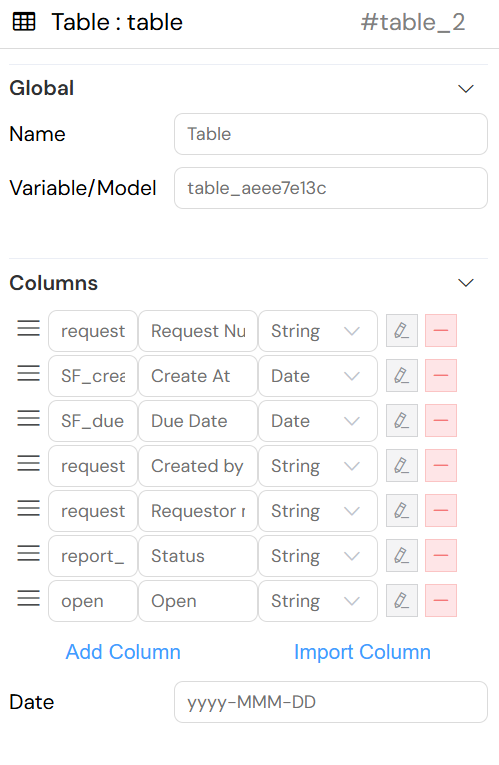
- For each column, you will configure:
- Field/ID (leftmost field): This is the internal ID of the measure from your workflow (e.g.,
request,SF_create,report_status). - Label (middle field): This is the user-friendly name that will appear as the column header (e.g., "Request Number", "Create At", "Status").
- Type (dropdown): The data type of the column (e.g.,
String,Date,Number).
- Field/ID (leftmost field): This is the internal ID of the measure from your workflow (e.g.,
- Example Columns to Add (as seen in the screenshot):
requestas "Request Number" (String)SF_createas "Create At" (Date)SF_dueas "Due Date" (Date)request_created_byas "Created by" (String)request_requestoras "Requestor" (String)report_statusas "Status" (String)openas "Open" (String)
- Date Formatting:
- At the bottom of the "Columns" section, you'll find options for Date formatting (e.g.,
yyyy-MMM-DD), ensuring dates are displayed in a consistent and readable manner.
- At the bottom of the "Columns" section, you'll find options for Date formatting (e.g.,
- Customize Display (Optional)
Softyflow provides extensive customization options to enhance the user experience of your report.
- Styling: Apply custom styling to the table or its cells.
- Additional Widgets: Add other widgets like search bars, advanced filters, tags, or colored status indicators next to or within the table.
- Conditional Formatting: Apply conditions to highlight certain values (e.g., color rows red for "Rejected" status, or green for "Approved").
- Save and Preview the Interface
It's crucial to regularly save and preview your work to ensure everything looks and functions as expected.
- Save the Web Interface: Use the save icon (typically a floppy disk icon) in the top bar of the IDE to save your web interface.
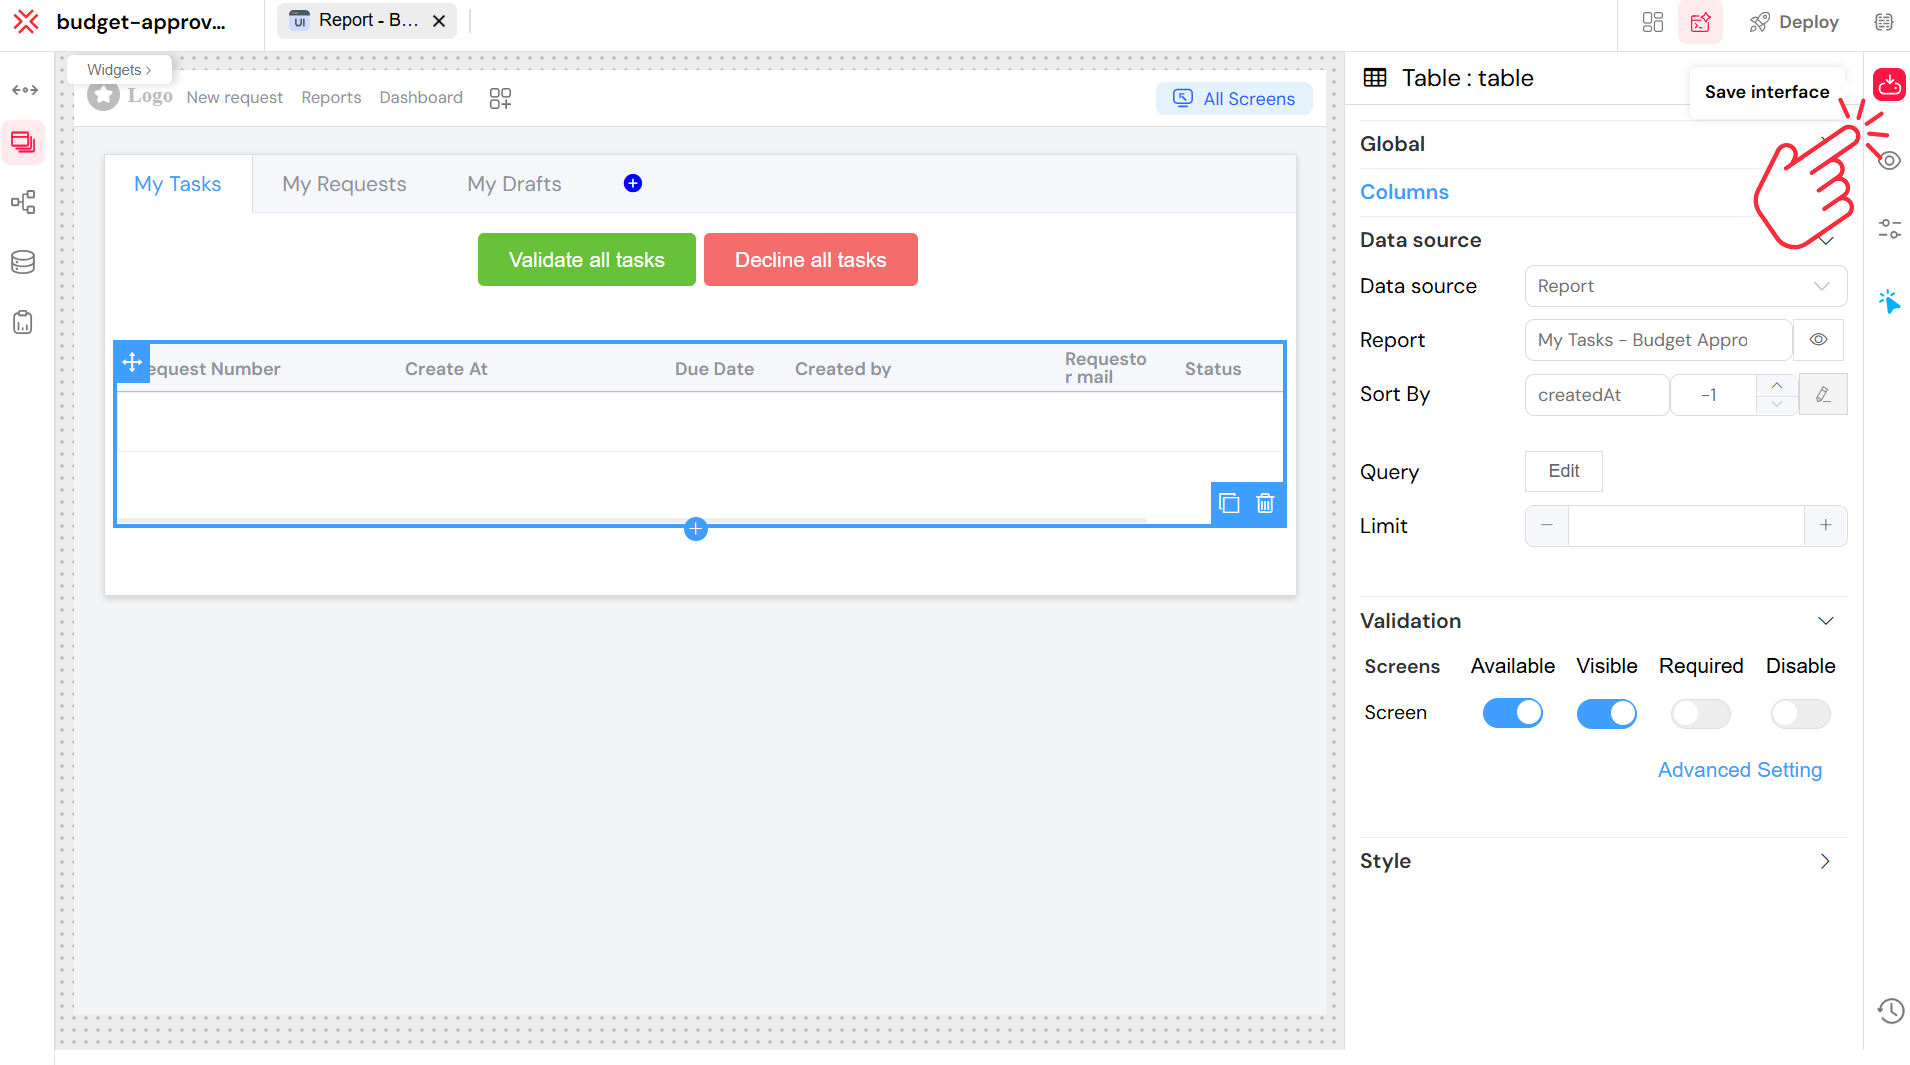
- Preview as End-User: Click the "eye" icon (or "Preview" button) to open the interface in a new browser tab. This allows you to test the layout, responsiveness, and data correctness exactly as an end-user would see it.
- Final Report View
The final user view of your report web interface will show a dynamic table populated with live data from your budget approval requests. The tabs and filters you configured will enable users to efficiently access pending tasks, their own requests, or review historical completed requests. Everything is visible and interactive directly within the Softyflow platform UI.
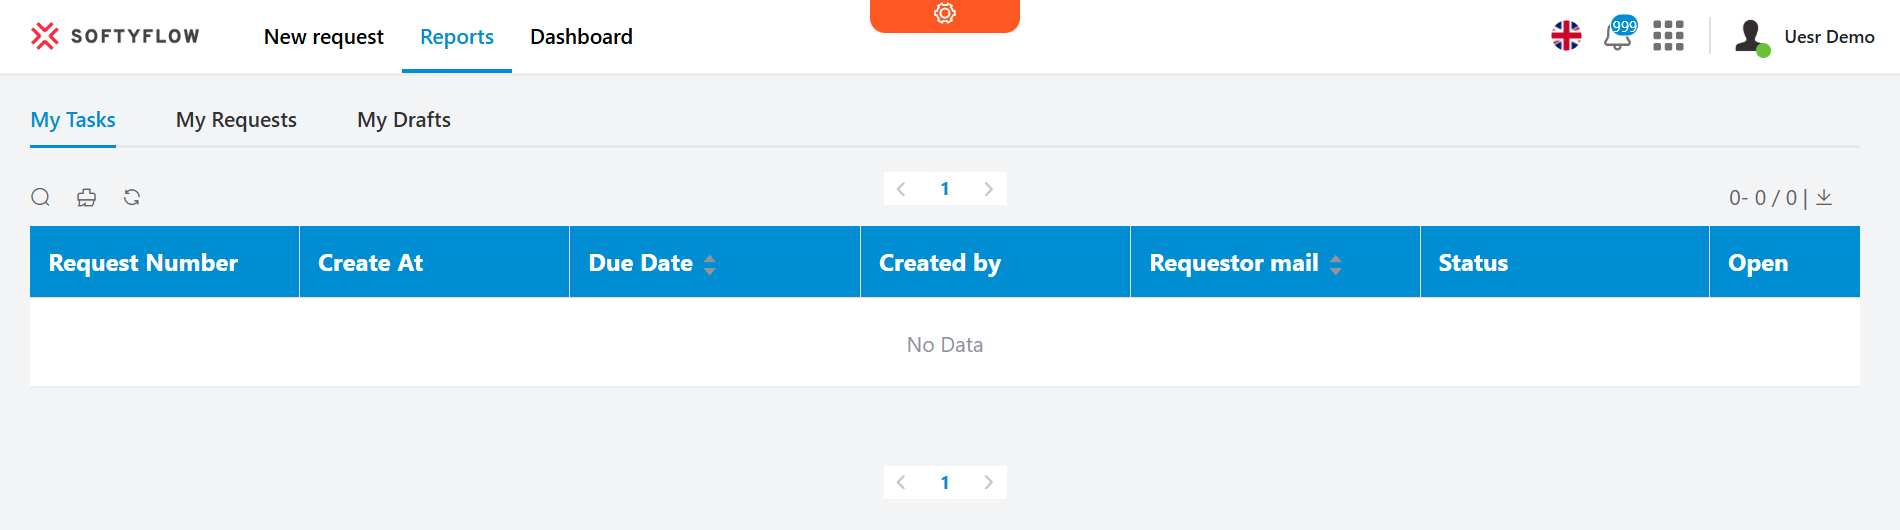
This completes the setup of a report interface that allows managers to view and interact with budget requests in a user-friendly, segmented layout, greatly enhancing the usability of your Softyflow application. Learn more about reporting and explore our reports documentation.
5. Create a Backoffice
To effectively manage and store all the budget approval requests, and the data associated with them, you can create a dedicated Backoffice using Softyflow. A Backoffice provides a user-friendly interface for administrators or specific roles to directly view, add, edit, and delete records within your application's database collections. Learn more about database integration.
Step-by-Step Guide: Building Your Backoffice
Access Web Interface Section:
- From the left-hand navigation panel in the Softyflow IDE, locate and click on the "Web Interface" section. This is where all your forms, menus, and backoffices are managed.
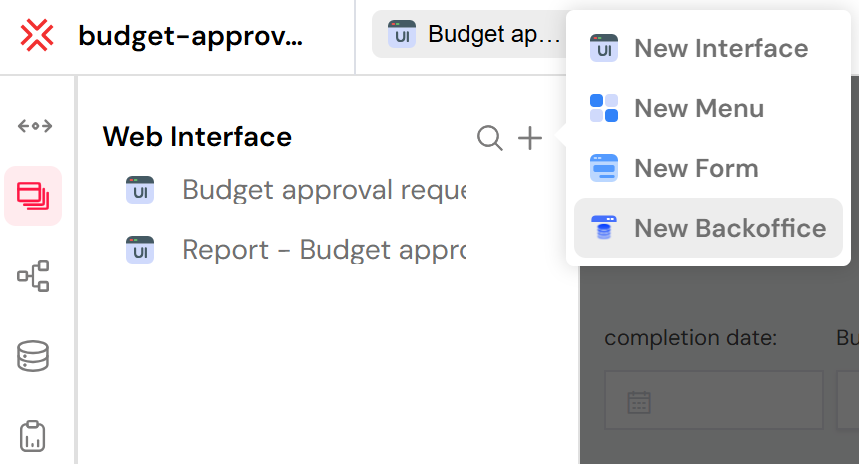
Create a New Backoffice:
- In the "Web Interface" section, look for the "+" icon (plus sign) next to the "Web Interface" title.
- Click this "+" icon, and a dropdown menu will appear.
- From the options, select "New Backoffice".
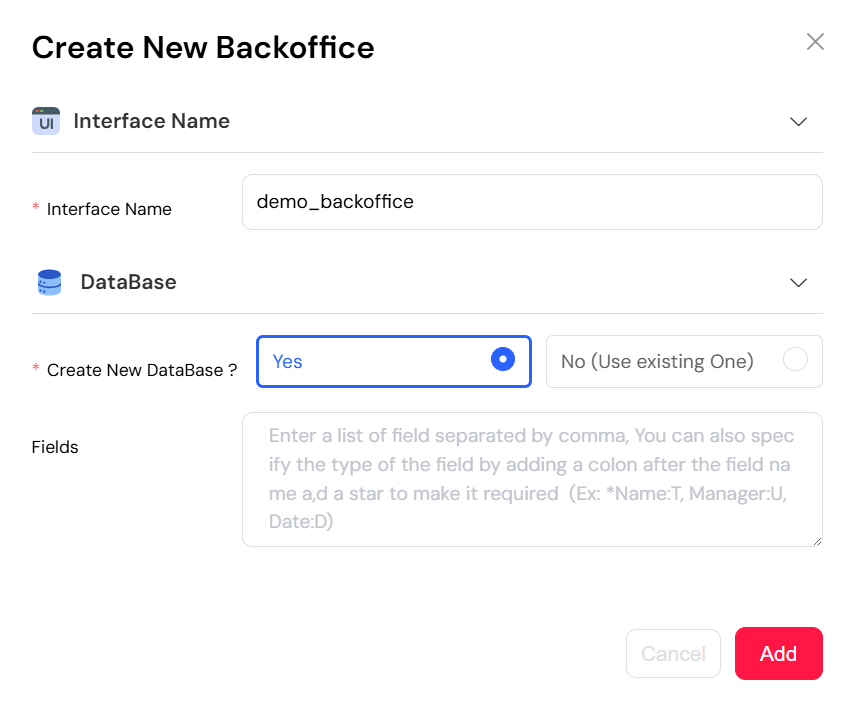
- Backoffice Setup (Configure Database Connection):
- A popup window titled "Create New Backoffice" will appear. This is where you'll define the core of your backoffice, including its connection to a database collection.
- Enter a Name: In the "Backoffice Name" field, provide a clear name, for instance:
budget-approval-backoffice.
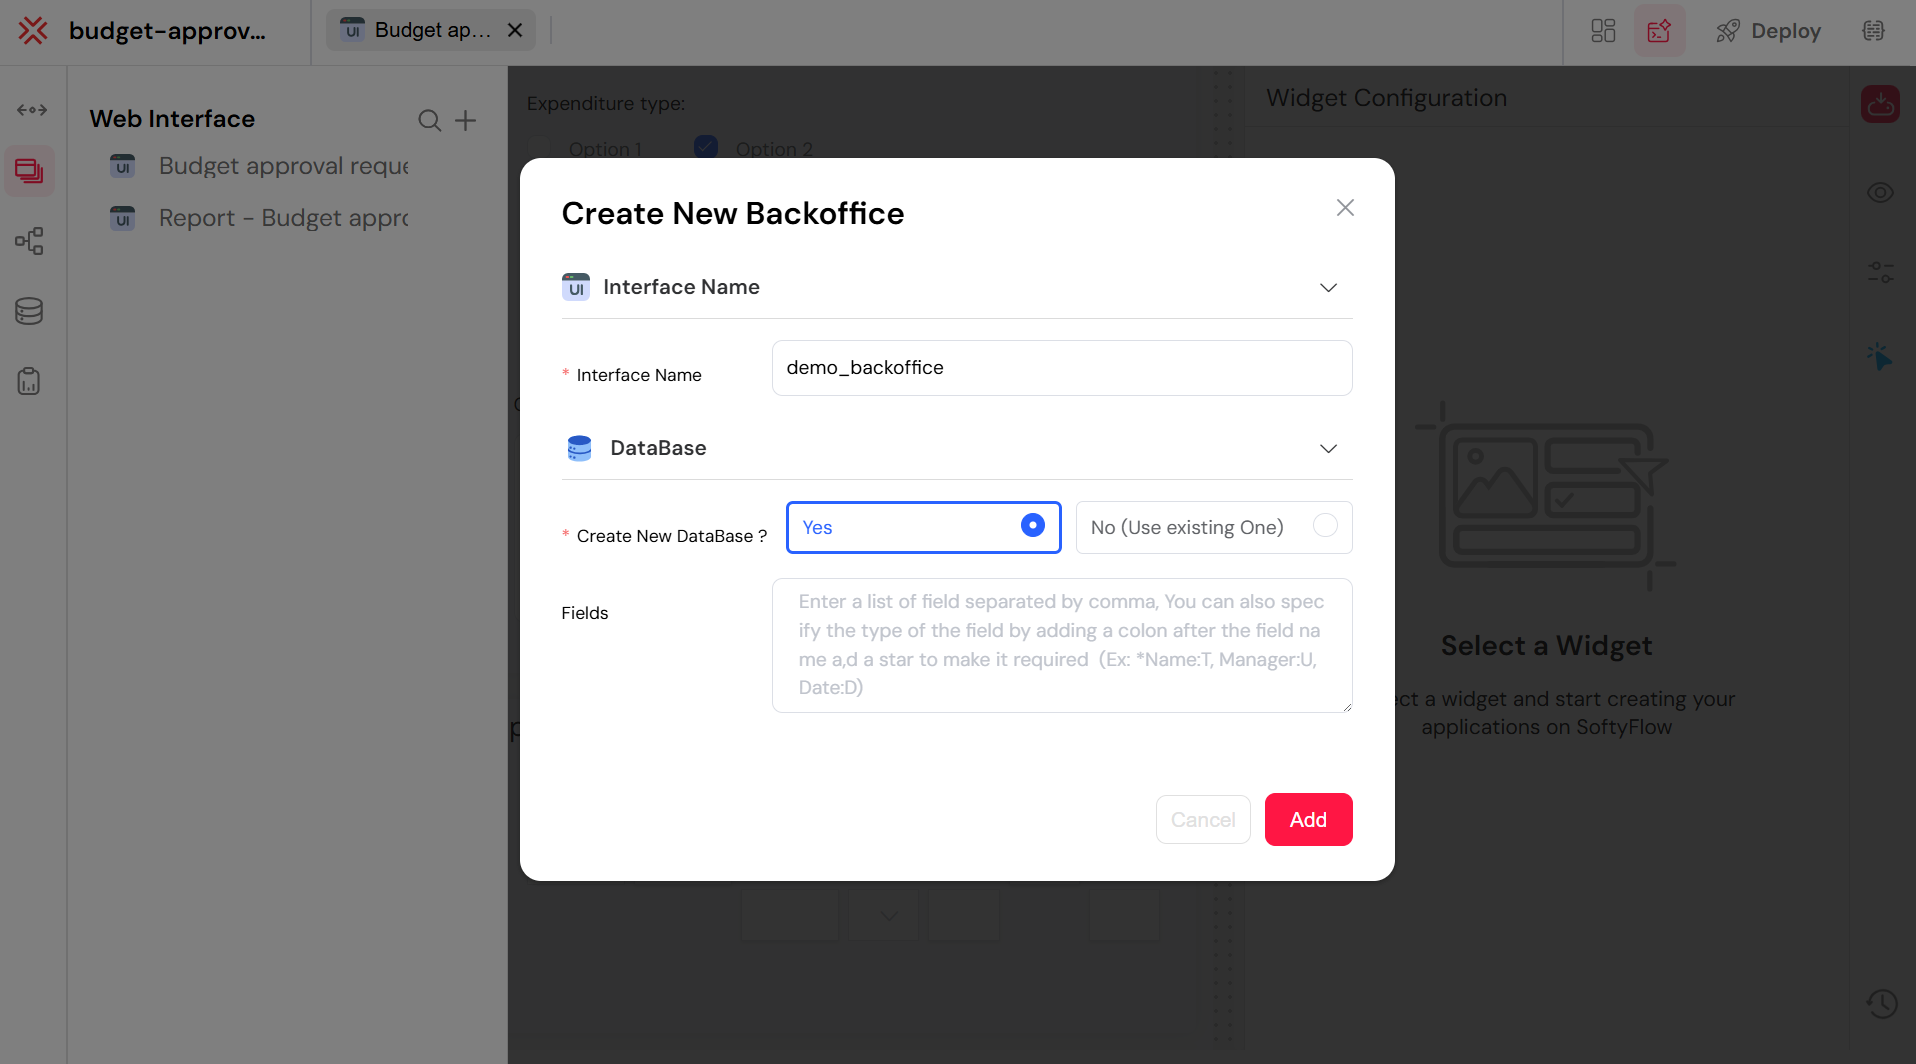
Connect to a New or Existing Database: This is a crucial choice:
Select "Yes" (Connect to a new database): If you choose "Yes", Softyflow will automatically create a new database collection for this backoffice. You will then be prompted to define the initial fields (schema) for this new collection directly in the popup. For our
budget-approval-backoffice, you would define fields like:Name(Type: String)Manager(Type: User)Date(Type: Date)
This means your new collection will start with these predefined columns.
- Select "No" (Connect to an existing collection): If you already have a collection (e.g., if you had already manually created one for your budget requests), you would select "No" and then choose your existing collection from the dropdown list.

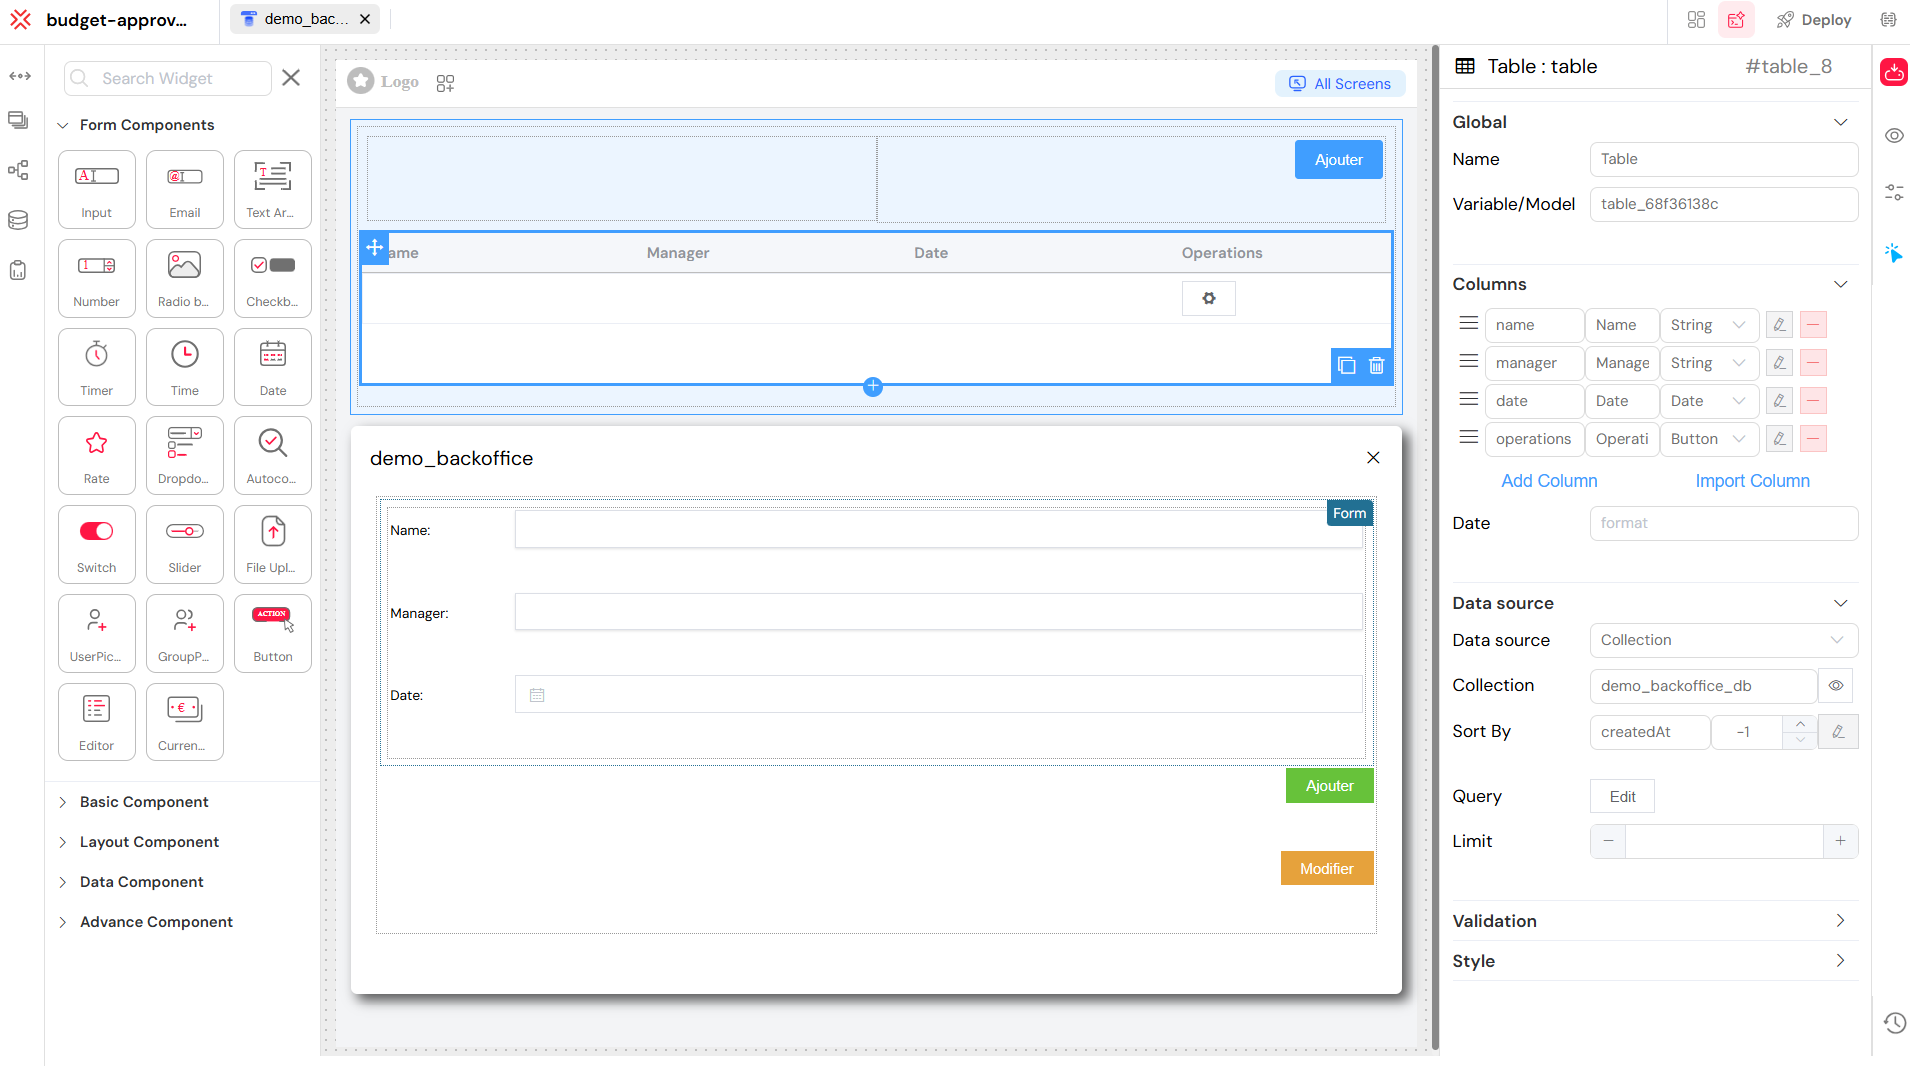
- Configure the Backoffice Table:
- After the initial setup, a new screen will open, displaying the main view of your newly created backoffice. This screen automatically includes a table that is connected to your selected (or newly created) database collection.
- Add/Edit Columns: The table will initially show columns based on your database schema. You can now further customize which columns are displayed and how they appear.
- In the table's properties panel (usually on the right), you can add, edit, or remove columns. Ensure your table displays relevant fields like:
name(String)manager(String)date(Date)- And importantly, fields like
request_id,status,total,request_titlefrom your budget request data.
- You can often drag and drop to reorder columns, change their display labels, and adjust their data types or formatting.
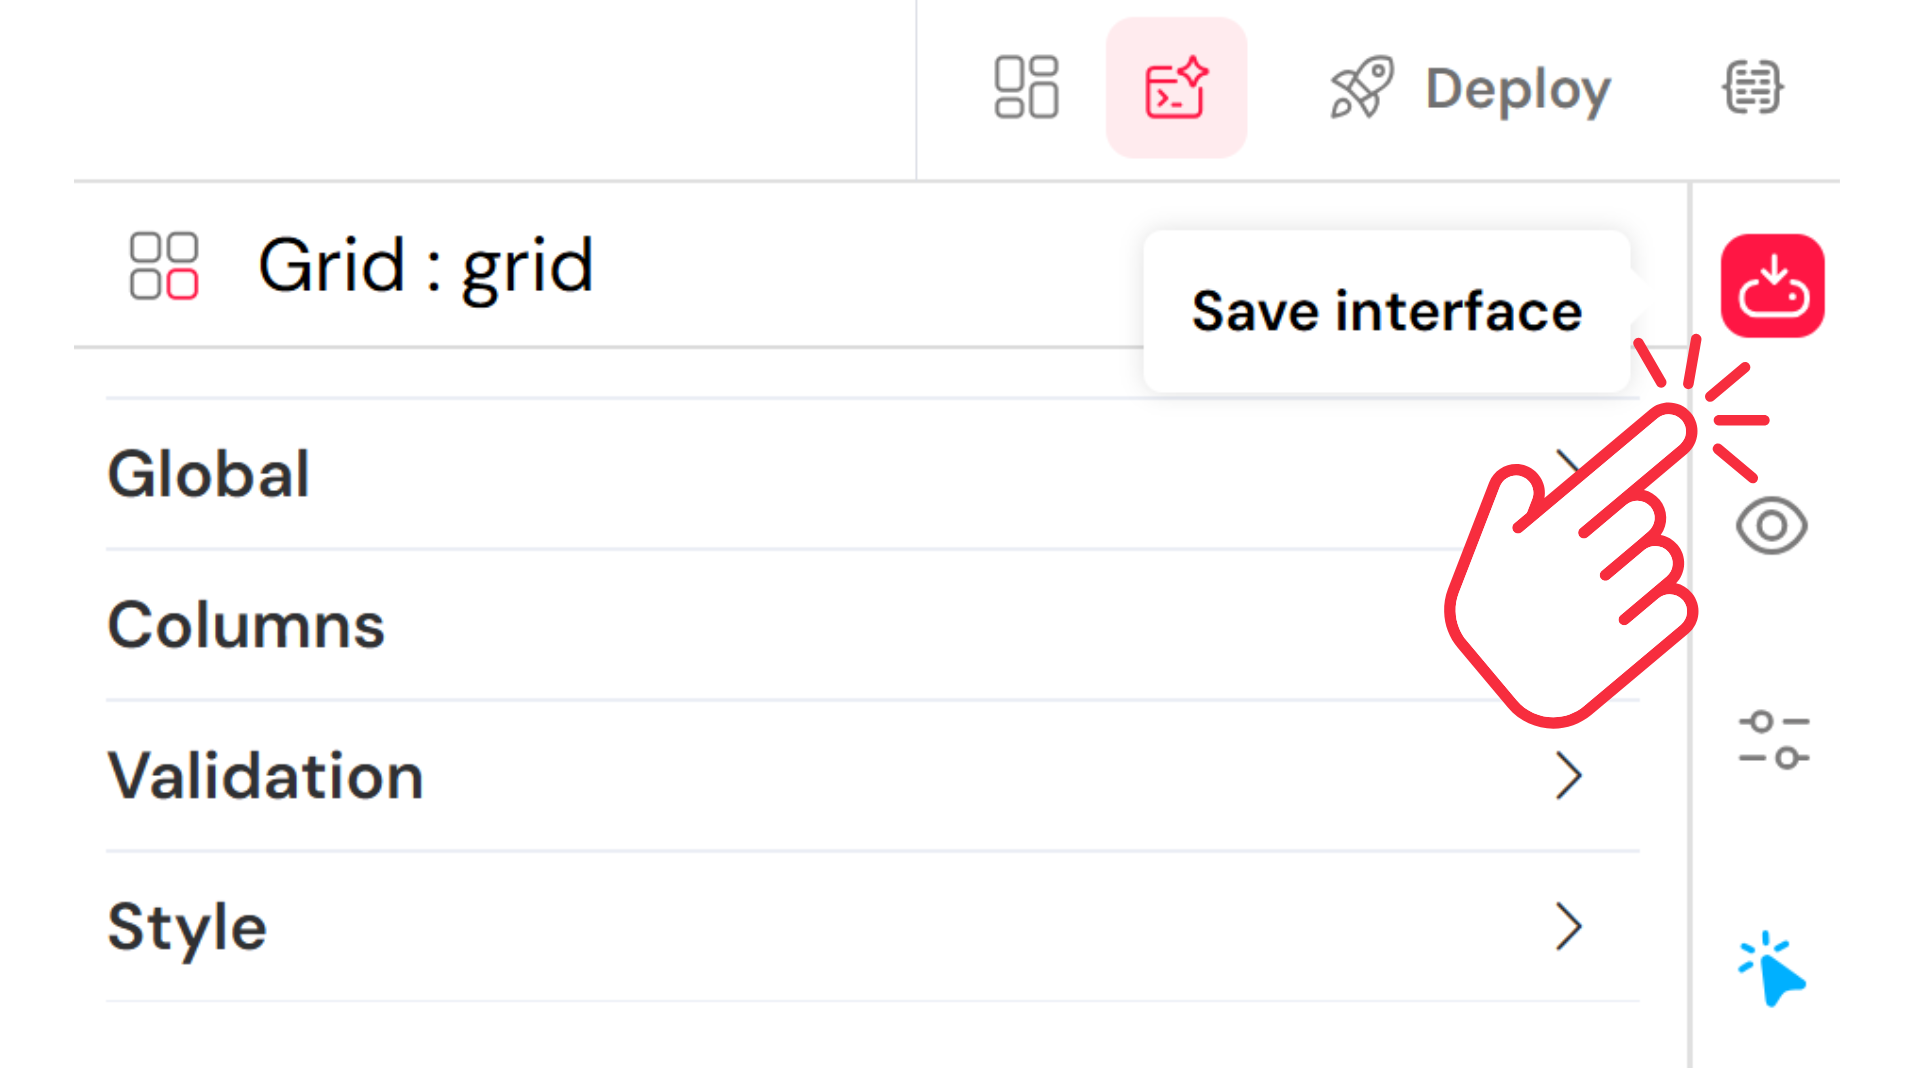
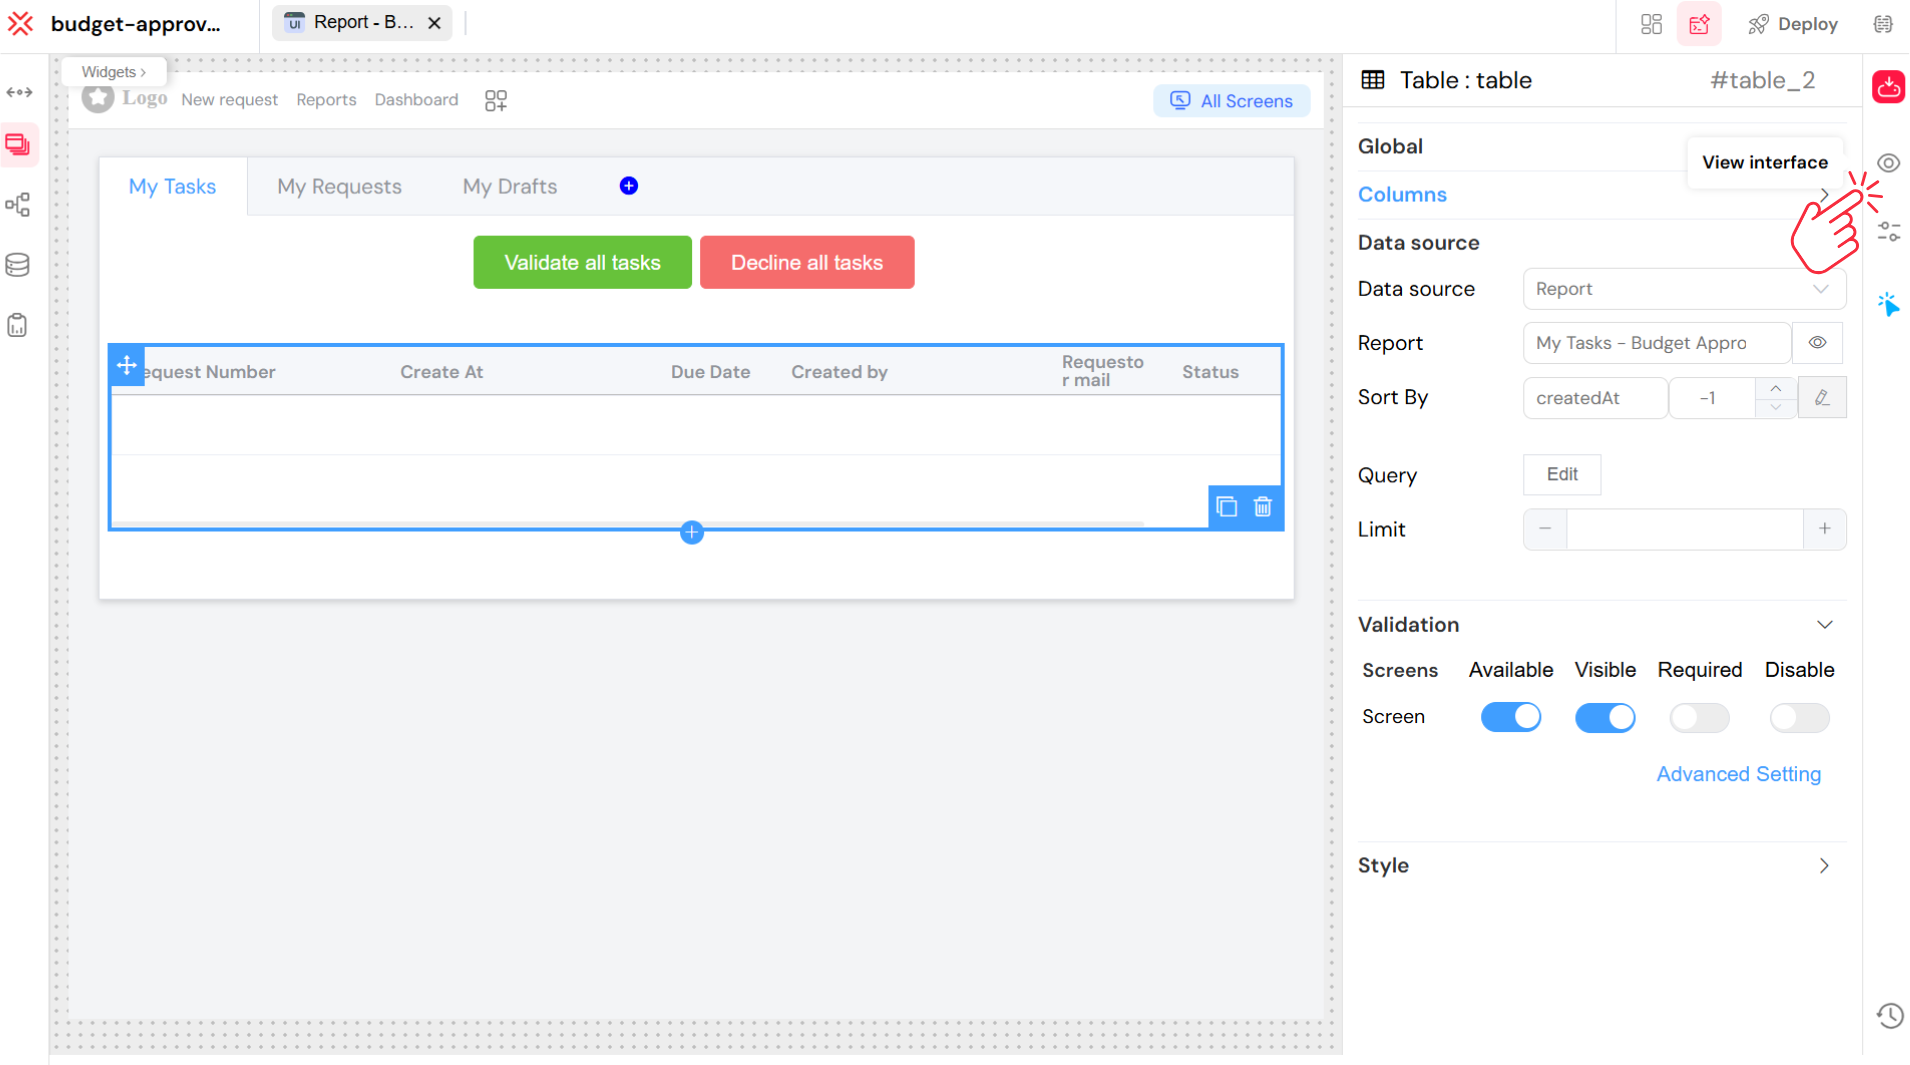
- Save and Run Your Backoffice:
- Save Interface: Click the "Save Interface" icon (typically a floppy disk icon) in the top bar of the IDE to save all your backoffice configurations.
- View Interface: Then, click the "View Interface" icon (often an "eye" icon or "Run" button) to preview your backoffice in runtime mode. It will open in a new browser tab.
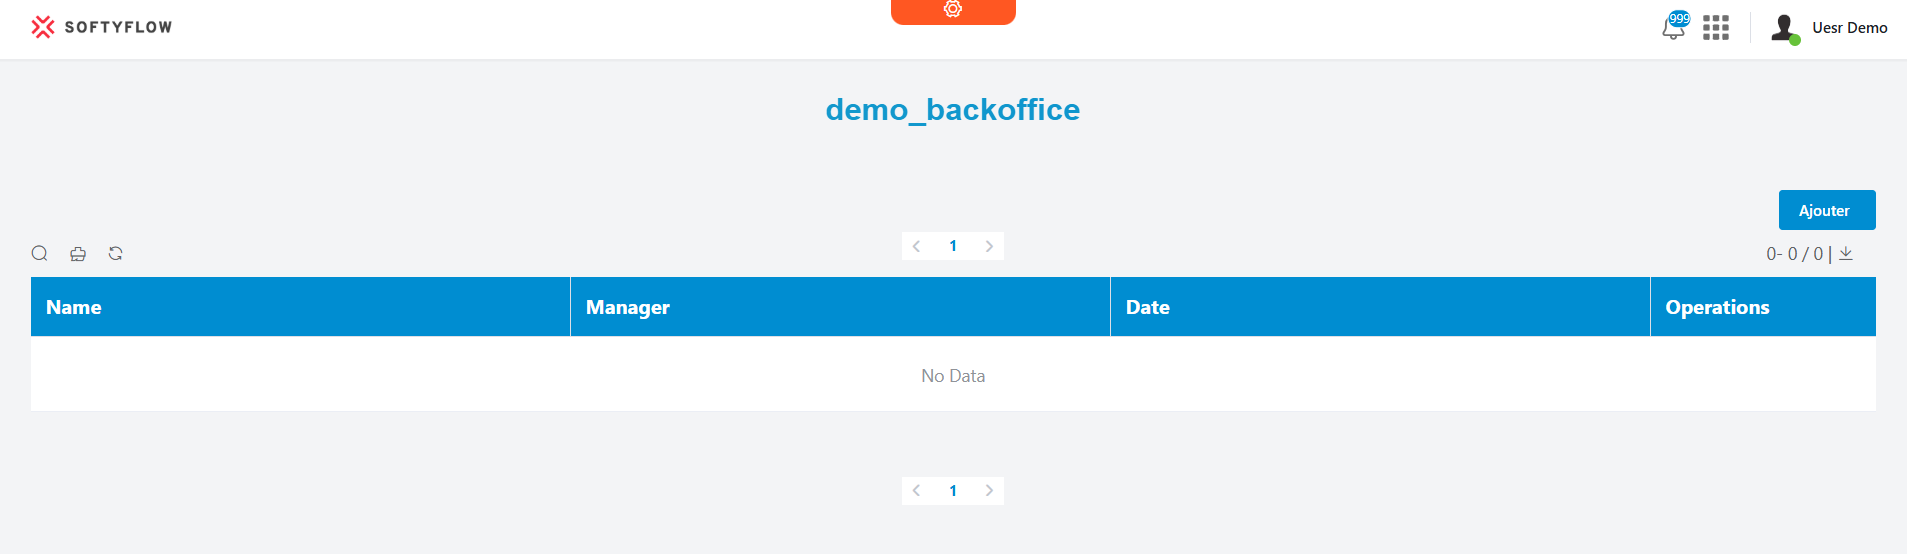
- Backoffice Preview (Runtime View):
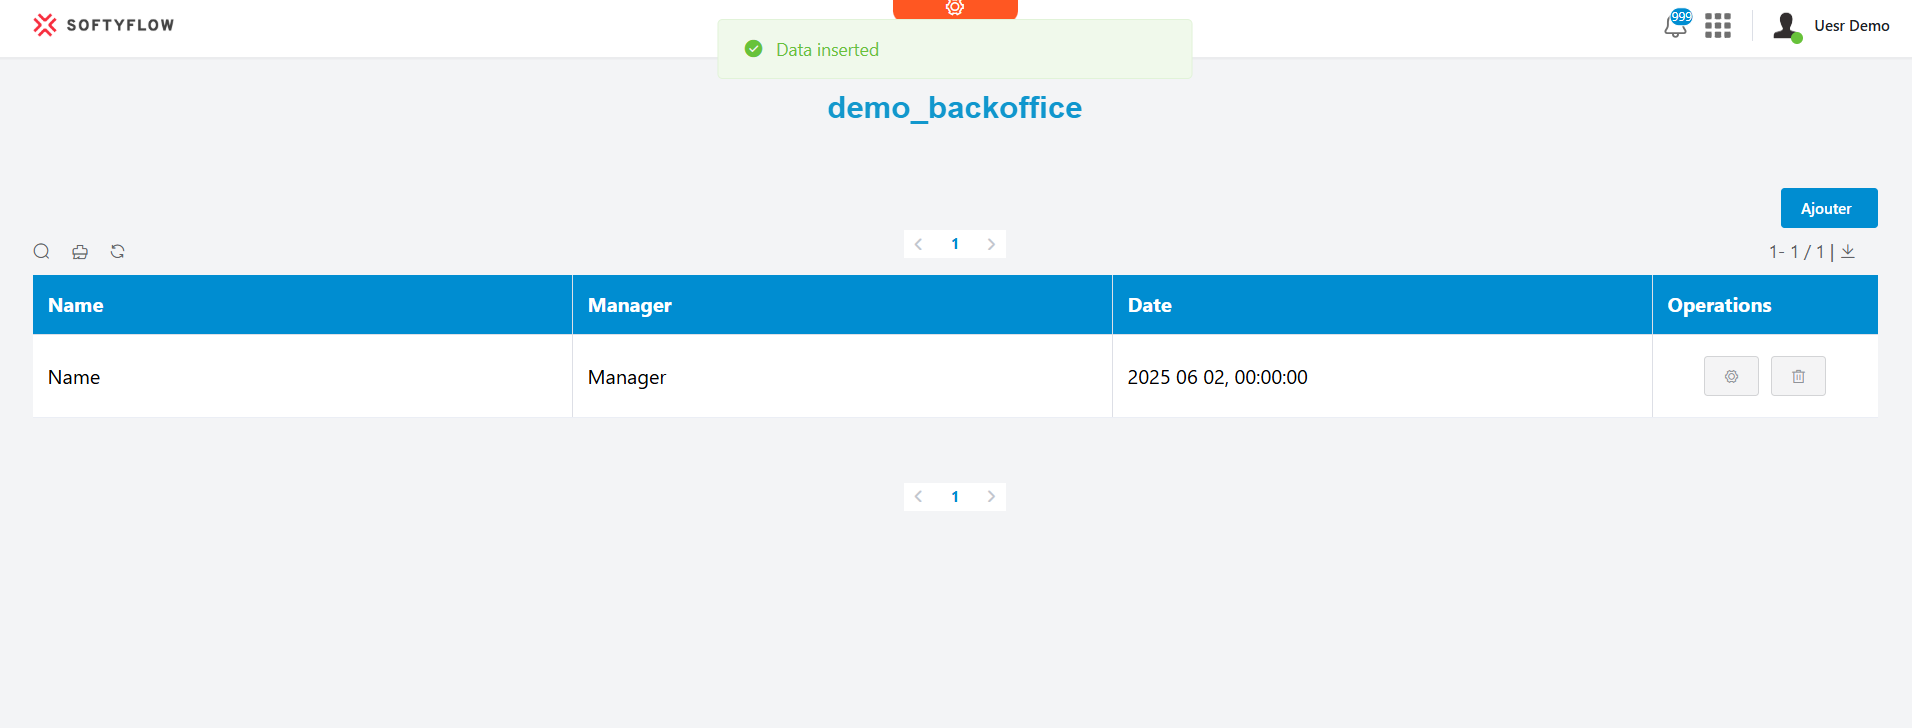
- In the runtime view of your backoffice, you can now interact with your data:
- See the list of entries: All records currently in your connected database collection will be displayed in the table.
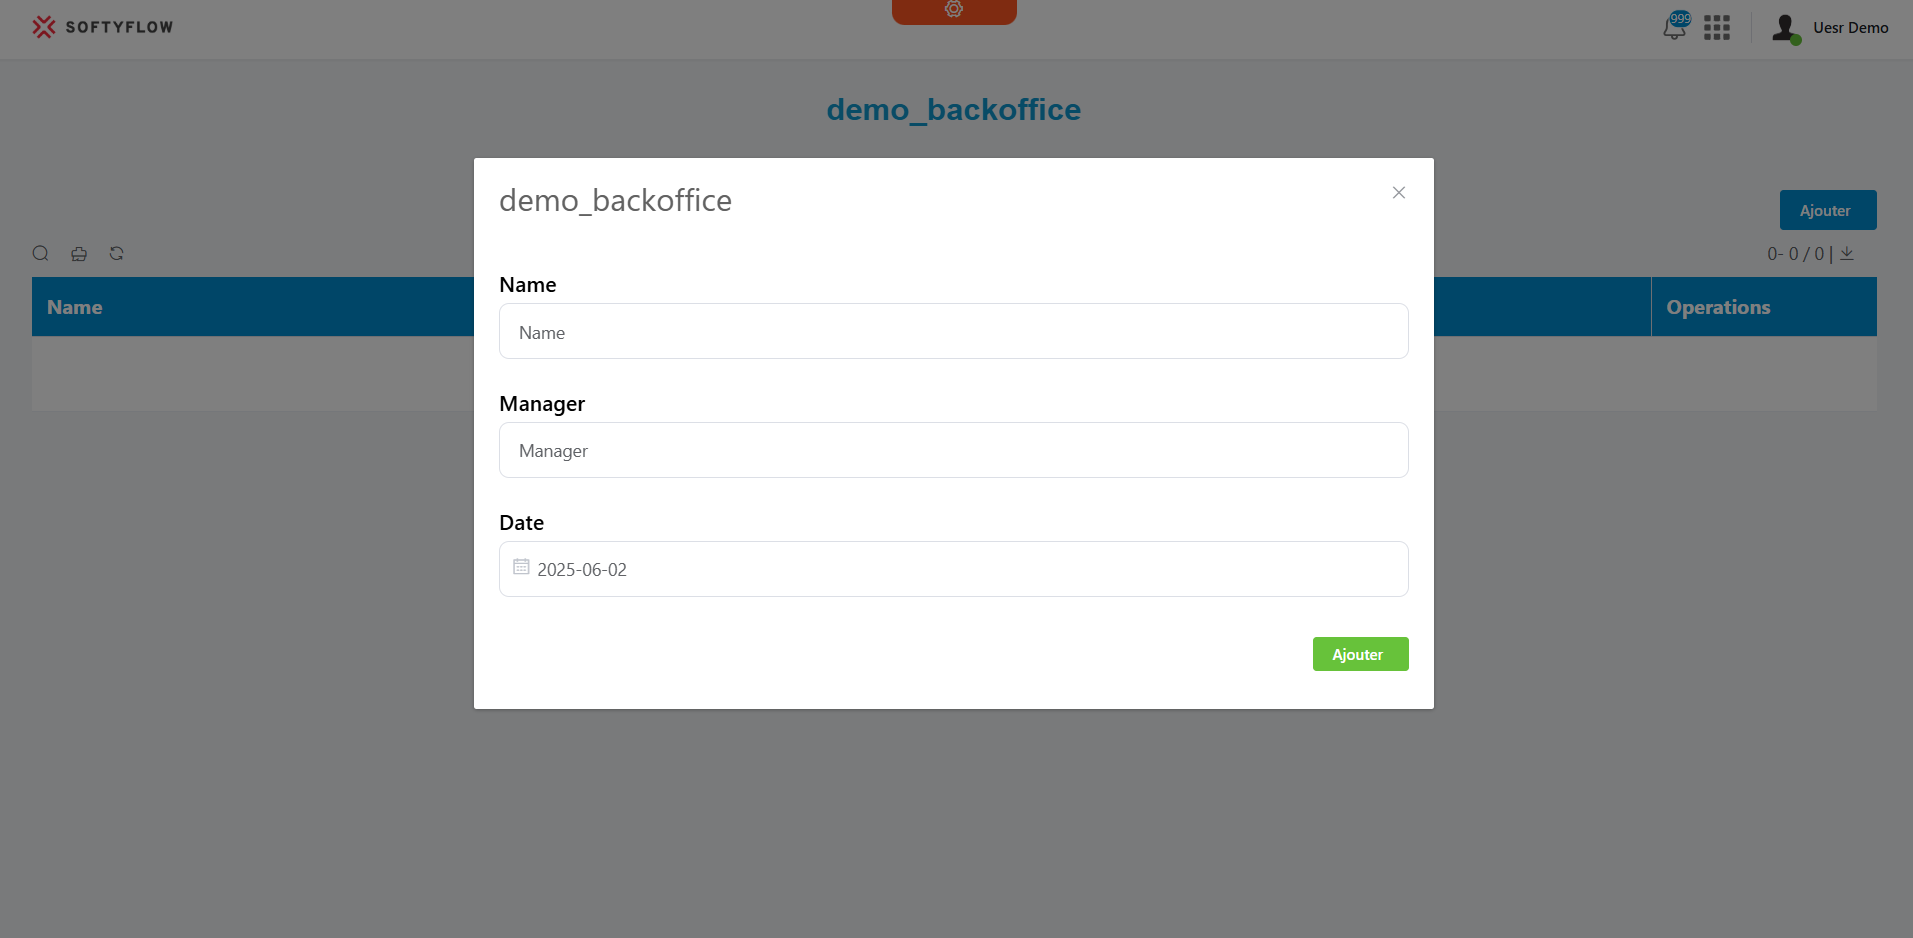
- Add New Entry: Click the "Ajouter" (Add) button (usually found above the table) to manually add a new record to your collection. This can be useful for testing or manual data entry.
- Edit or Delete Entries: Within the operations column (often the last column in the table), you'll find buttons or icons to edit an existing entry or delete it.
- In the runtime view of your backoffice, you can now interact with your data:
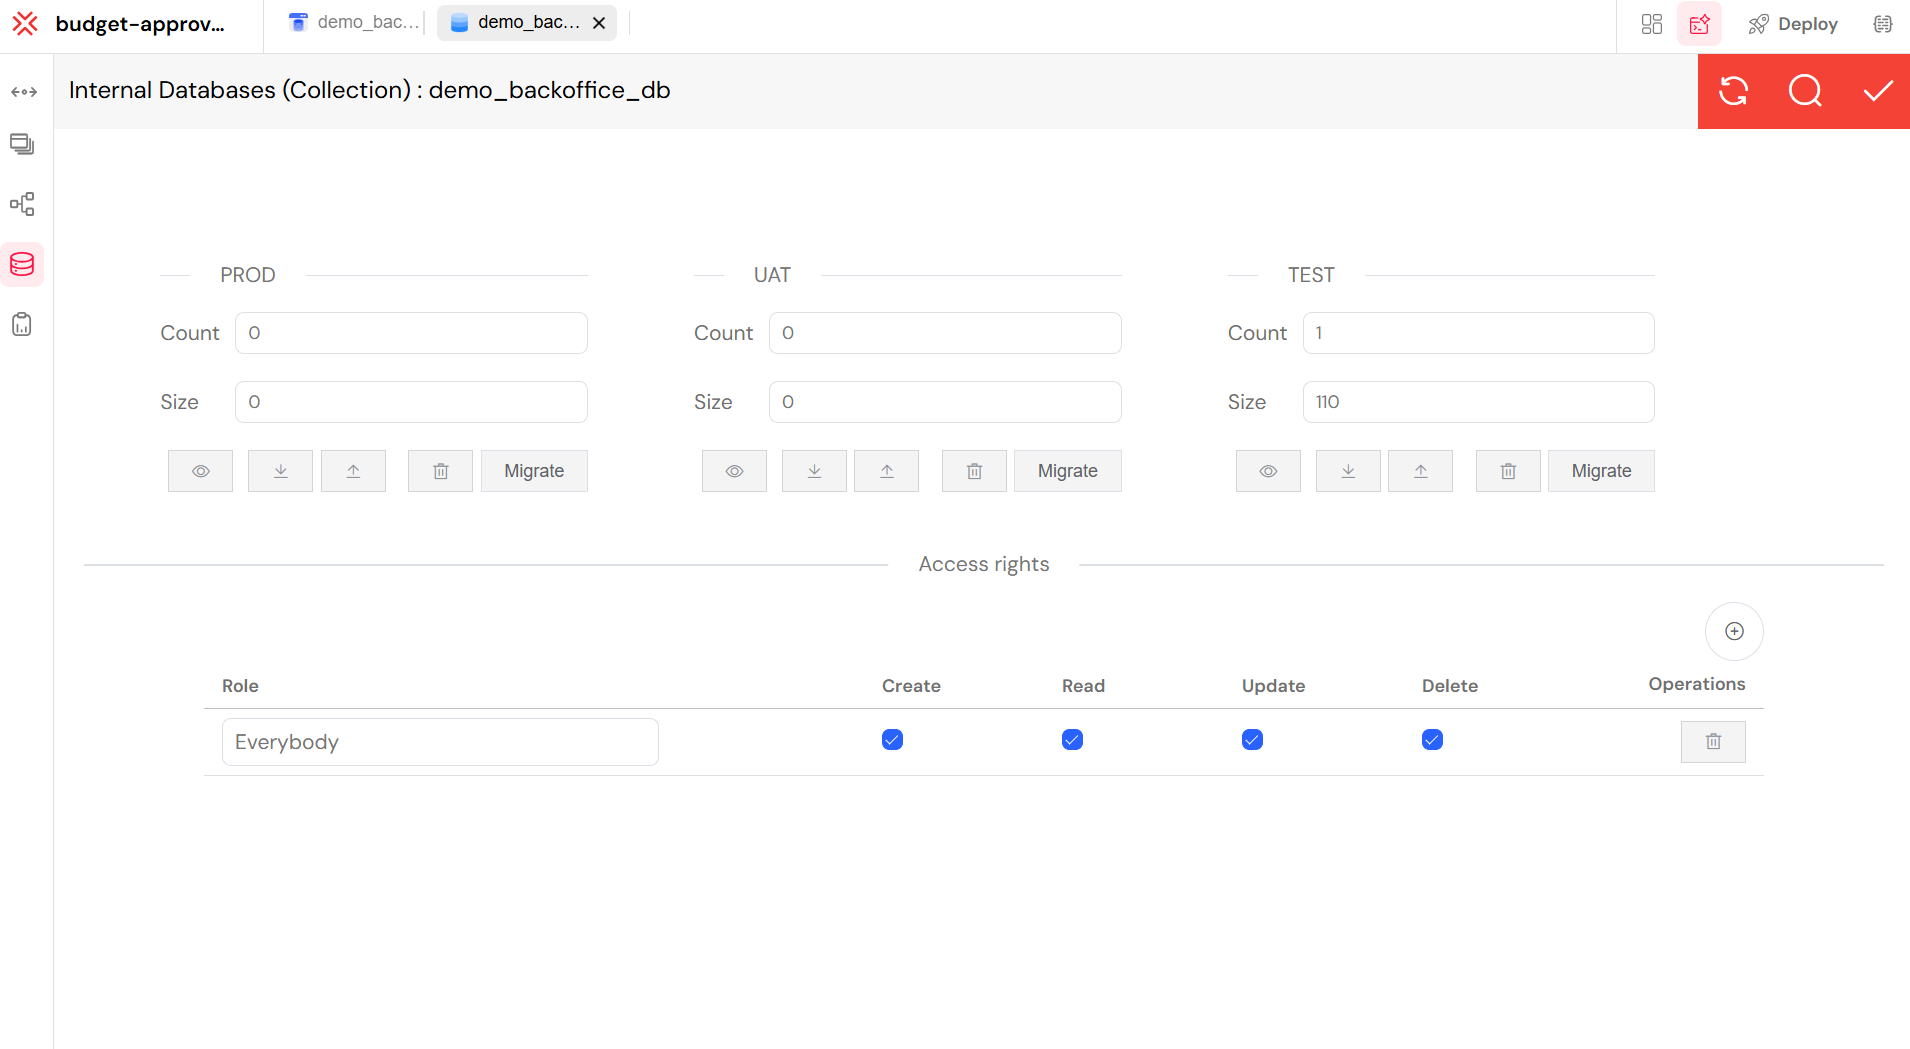
Verify Database (Optional but Recommended)
It's good practice to verify your database collection directly:
- Go to the Data Base Tab: In the Softyflow IDE, navigate to the "Database" tab (usually represented by a database icon) in the left-hand panel.
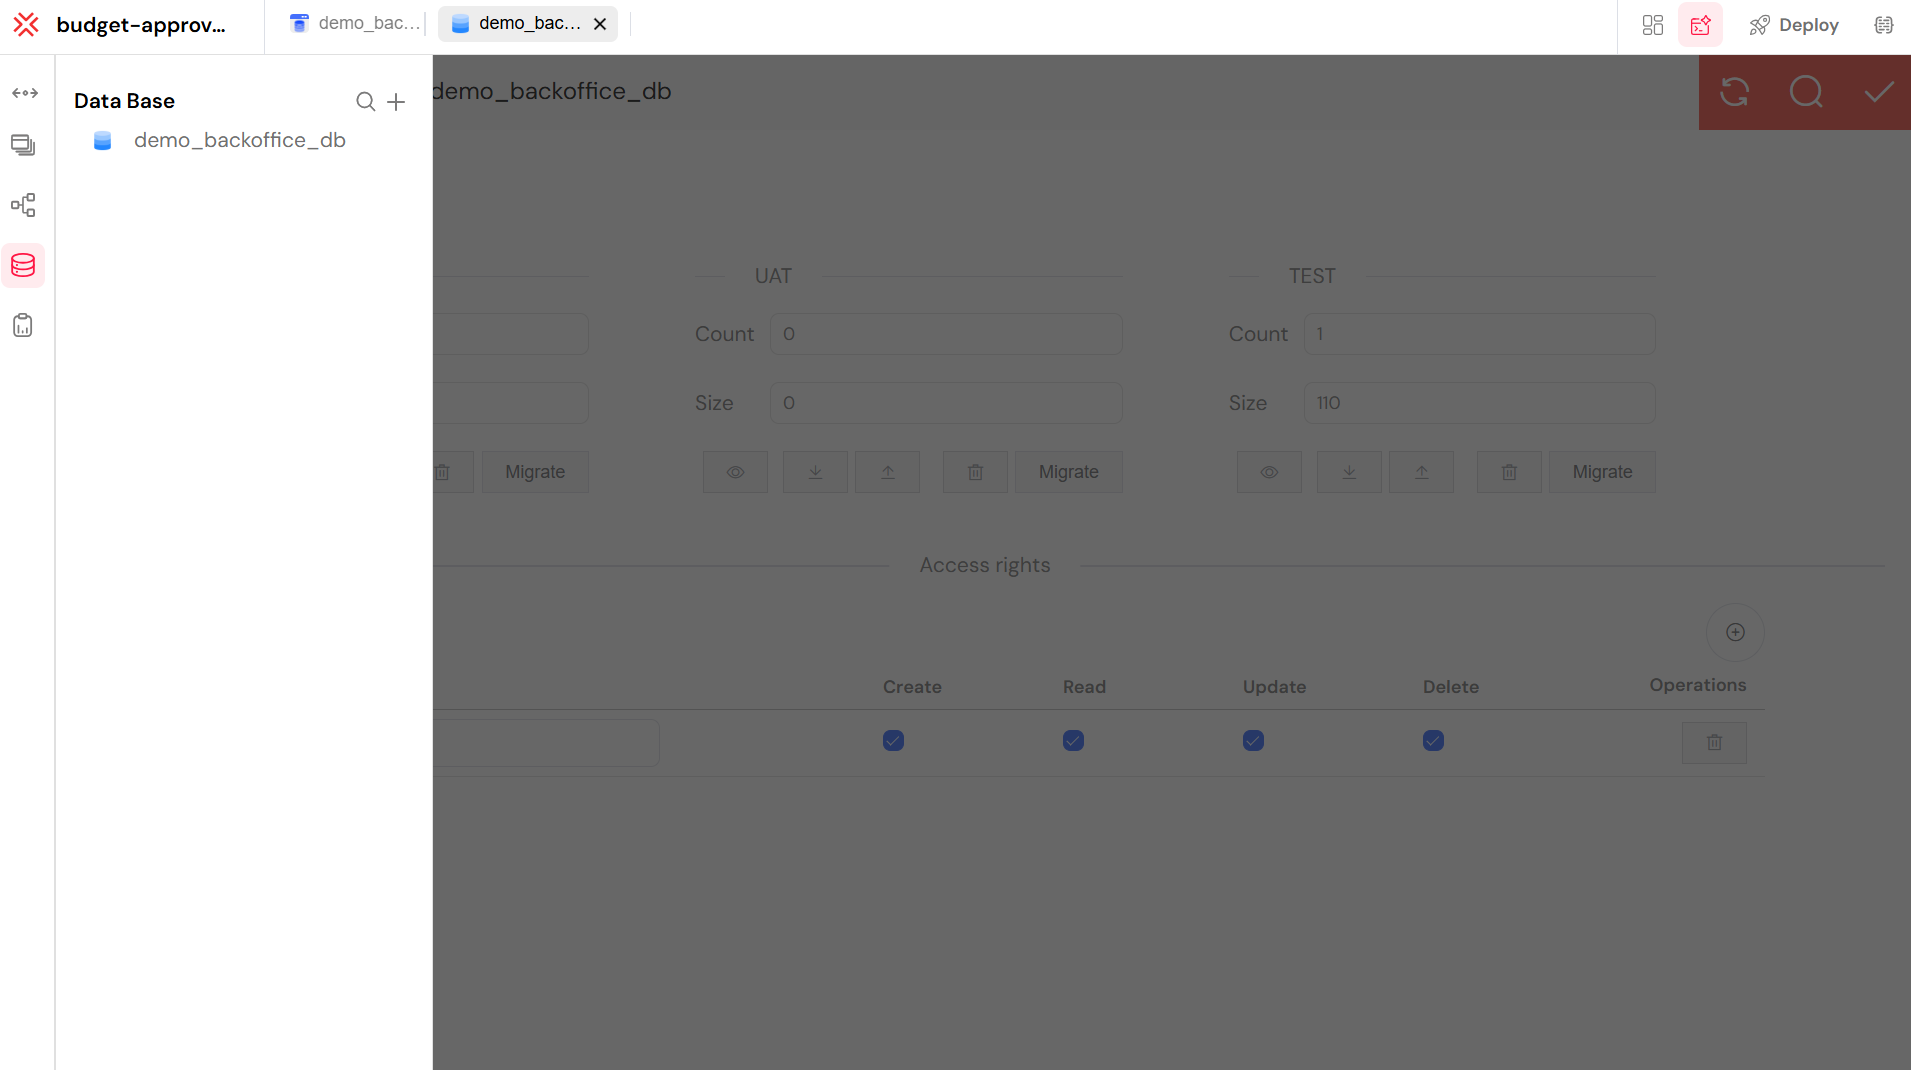
- Locate Your Collection: Find your newly created (or connected) collection (e.g.,
budget-approval-backoffice_dbif you created a new one, or the name of your existing collection). - Check Access Rights: Ensure that the necessary access rights (Create, Read, Update, Delete - CRUD operations) are properly set for relevant user roles. This controls who can perform what actions on the data.
- Use Migrate (if needed): If you make schema changes (add/remove fields) to your collection, you might use the "Migrate" feature to push these schema changes across different environments (TEST, UAT, PROD) if your Softyflow instance supports this.
This completes the backoffice setup, providing you with a central interface to manage and audit your budget approval request records efficiently.
Congratulations! 🎉
You've successfully built your first complete Softyflow application! Your Budget Approval Request Application now includes:
- ✅ User-friendly form with web interface design
- ✅ Automated workflow using process design
- ✅ Data storage with MongoDB collections
- ✅ Interactive reports with reporting tools
- ✅ Administrative backoffice for data management
Next Steps
Now that you've mastered the basics, here are some ways to expand your knowledge:
Explore Advanced Features
- Integration - Connect to external APIs and systems
- Authentication - Set up SSO and user management
- Mail Configuration - Configure email notifications
- Scheduling - Automate tasks and processes
Learn More About Development
- Test and Deploy - Best practices for deployment
- Monitor and Run - Track your applications in production
- SDK Documentation - Advanced customizations
- Node.js Integration - Server-side programming
Watch Video Tutorials
- Web Modeler Videos - Visual interface design
- Process and Reports Videos - Workflow automation
- Database Videos - Data management
Administration and Security
- User Management - Manage users and permissions
- Role Management - Define access controls
- Settings - Configure your environment
- Logs - Monitor and troubleshoot
Keep Learning
- Review the core concepts to deepen your understanding
- Check out the getting started guide for more comprehensive information
- Stay updated with our latest release notes
You're now ready to build more complex applications with Softyflow. Happy building! 🚀