Integration Guide
Softyflow provides comprehensive integration capabilities that allow you to connect with external systems and services. This guide covers the three main integration methods available in Softyflow.
Before diving in, we recommend you have a solid understanding of your project setup, are familiar with database concepts in Softyflow, and have some experience with the web interface designer and process modeler. This foundational knowledge will help you get the most out of this guide.
1. EDS API Integration (Outgoing Integrations)
The External Data Source (EDS) feature is Softyflow's declarative approach to API integration. It allows you to connect to external REST APIs and treat them as if they were local data sources. This is the perfect starting point for most integration tasks, as it is powerful, configurable, and does not require writing complex code.
1.1. API EDS Configuration
Configure API EDS to connect with external REST APIs:
The following view illustrates the first step in configuring a new External Data Source (EDS) to connect to an external API. The user has entered 'Google Calendar API' as the name and is selecting 'Api' from the 'EDS Type' dropdown menu. This is the initial step to connect Softyflow to an external REST API.

Initial configuration of an API-type External Data Source.
Here’s a breakdown of the initial setup:
- Name: Always use a clear and descriptive name. We've used
Google Calendar APIto make it easily identifiable. - EDS Type: This is a crucial setting. By selecting
Api, you unlock the configuration options specific to REST and SOAP web services.
1.2. Securing Your Data Source
Security is a critical aspect of integration. Softyflow allows you to define granular access rights for each data source, ensuring that only authorized users and roles can perform specific operations.
The image below illustrates how you can configure role-based access control. By defining which user groups have create, read, update, or delete permissions, you can enforce your organization's security policies at the data source level. In this example, we are granting full permissions to administrators, while restricting other users to read-only access.
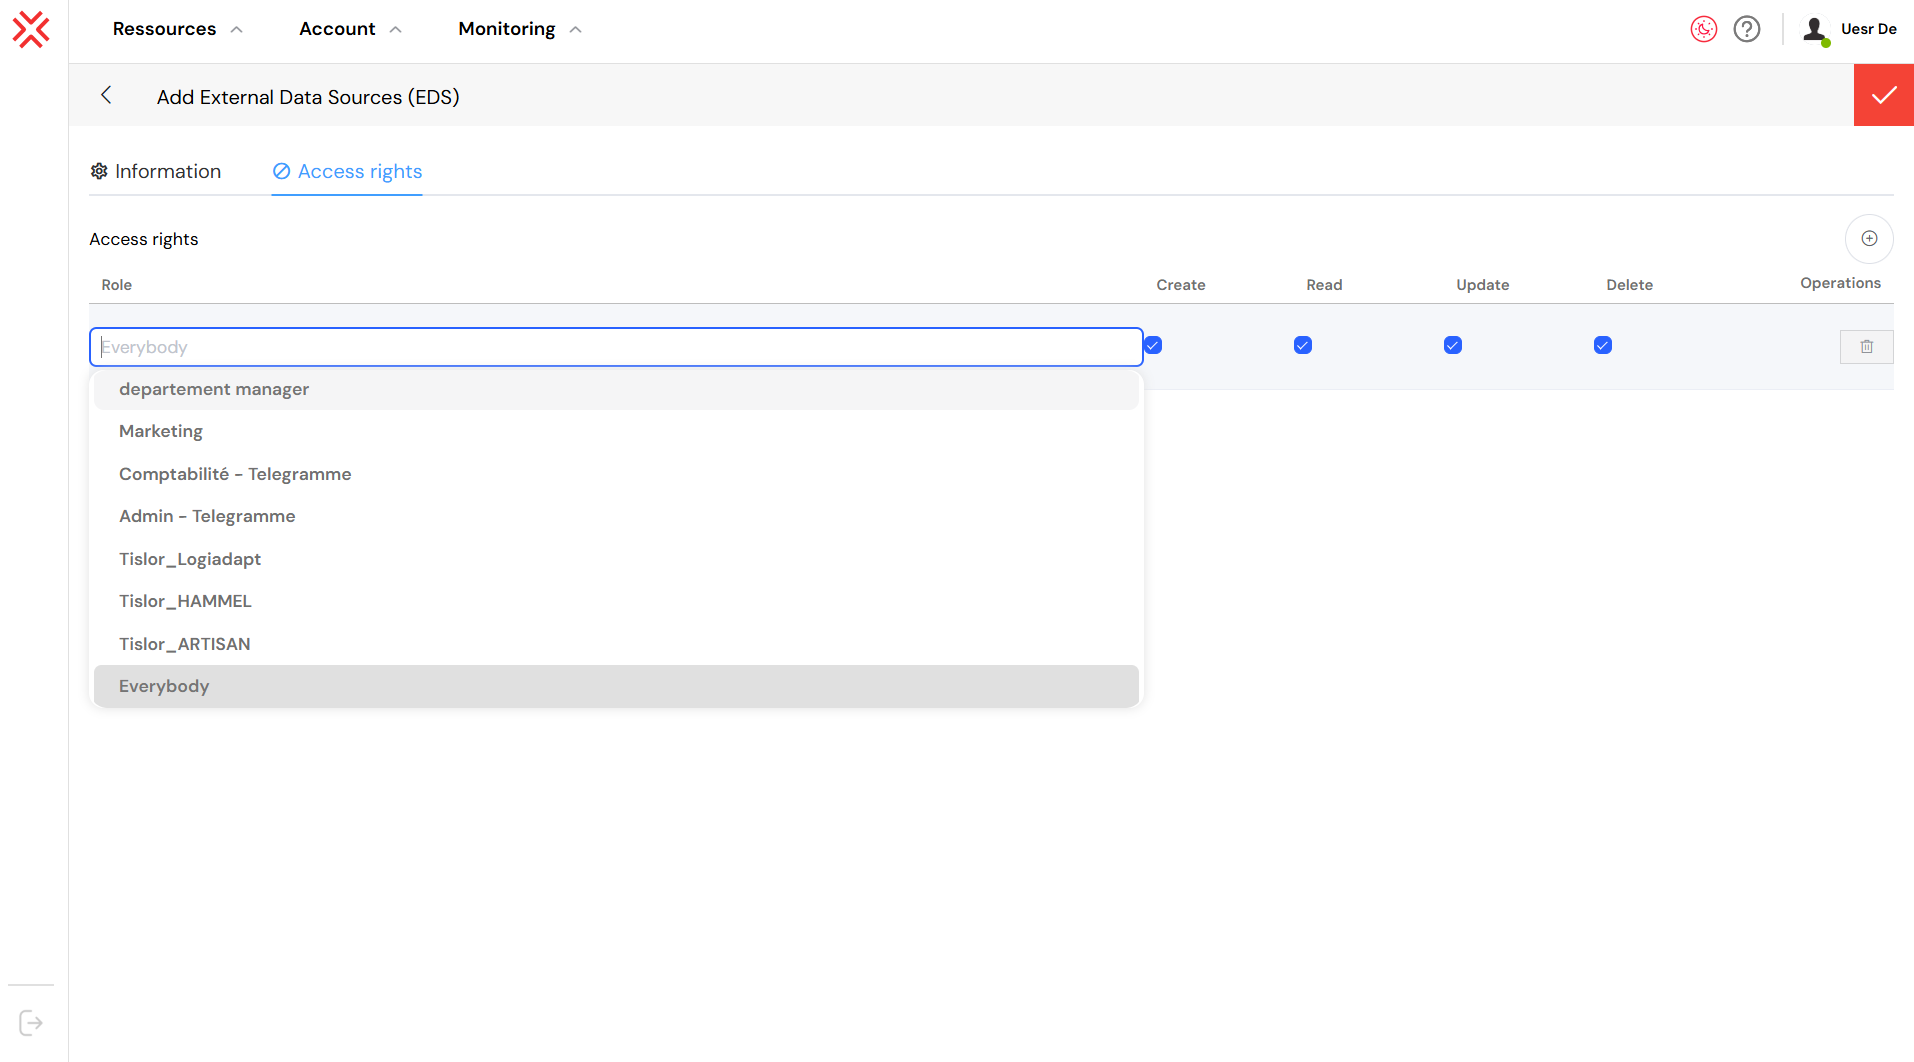
Configuring role-based access for the EDS.
1.3. Defining API Operations: Endpoints and Scripts
Once the basic configuration is in place, it's time to define the actual operations your application will perform. This is done by configuring Endpoints. Each endpoint represents a specific action, such as retrieving a list of items, creating a new one, or deleting an existing record.
Softyflow's EDS feature provides a set of standard endpoint types that cover the most common CRUD (Create, Read, Update, Delete) operations. When you name your endpoints using these conventions, Softyflow can provide additional optimizations and features.
- retrieve: Fetches a single record, usually by its unique ID.
- list: Retrieves a collection of records, with support for pagination.
- count: Returns the total number of records that match a given criteria.
- insert: Creates a new record.
- insertMany: Creates multiple records in a single operation.
- update: Modifies an existing record.
- delete: Removes a record.
- execute: A flexible endpoint type for custom operations that don't fit into the standard CRUD model.
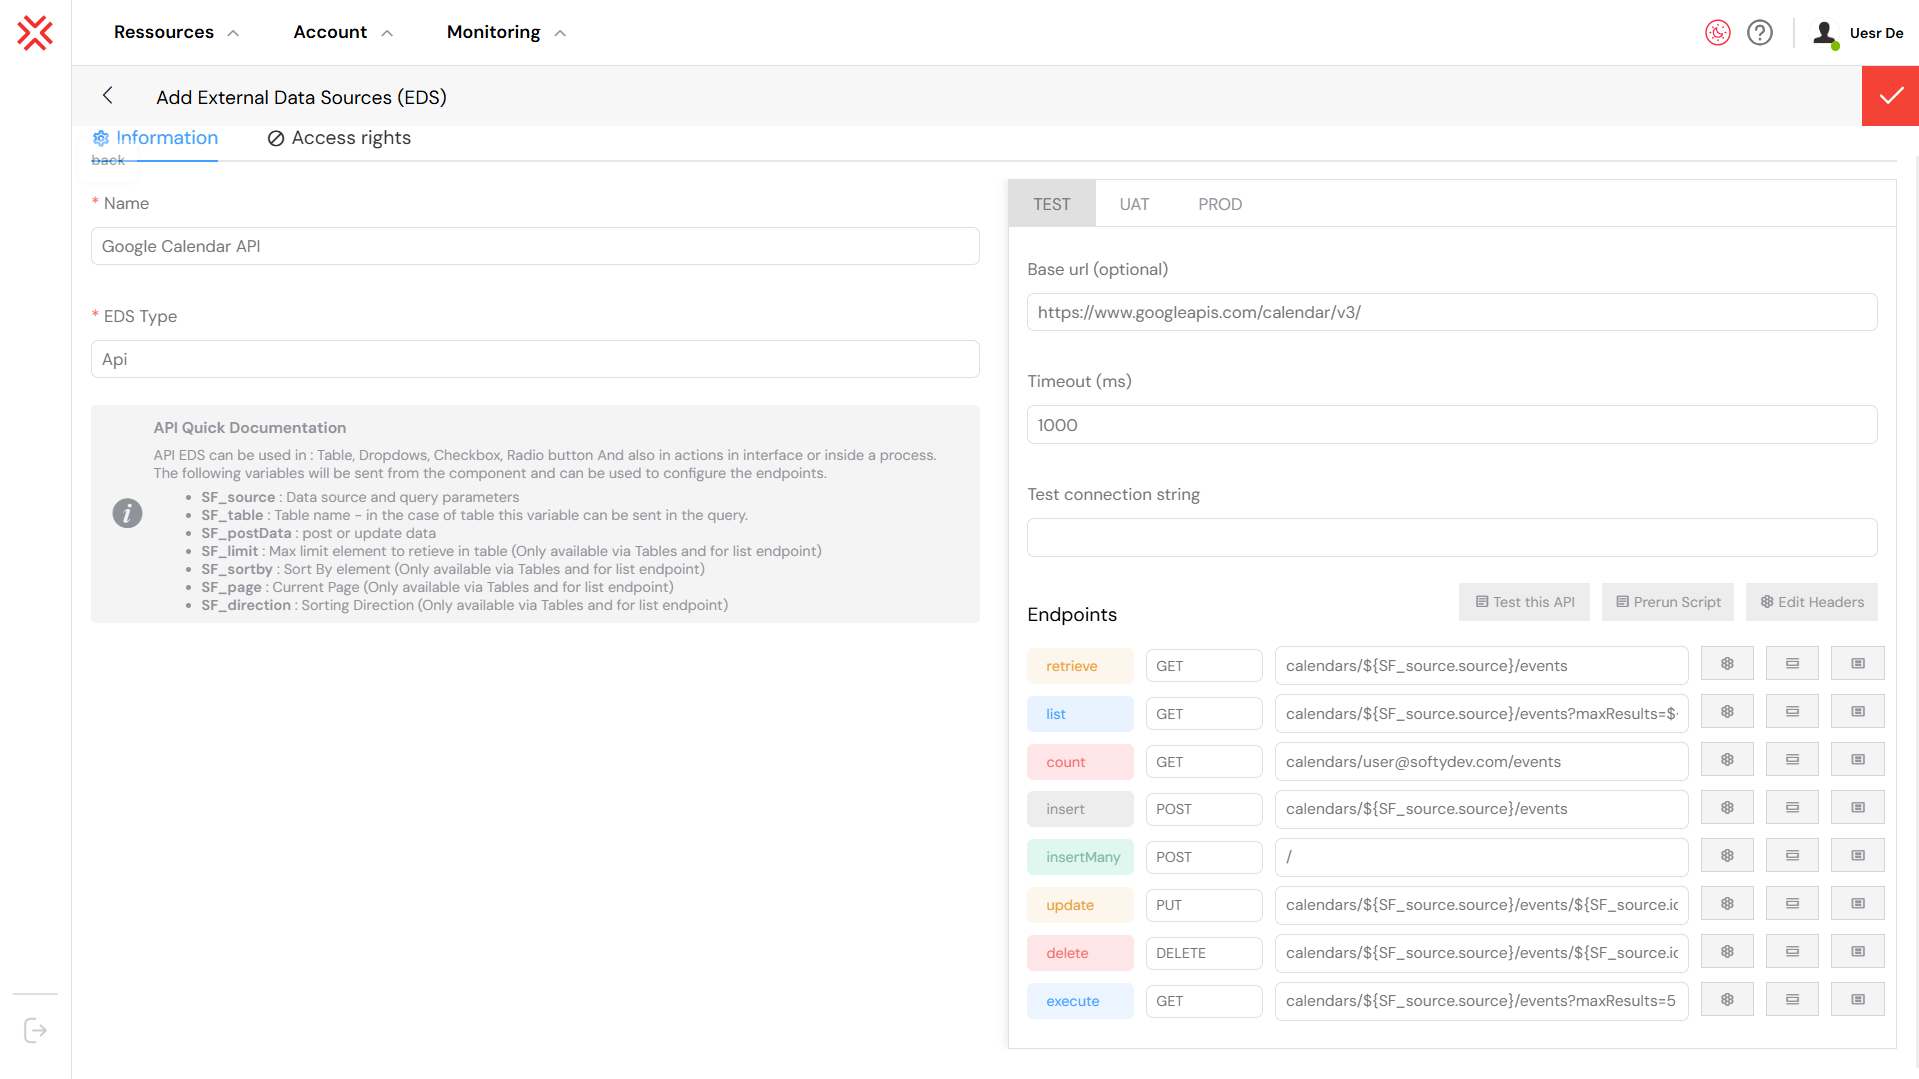
The endpoint list for our Google Calendar API EDS.
For each endpoint, you'll configure the following:
- Name: A logical name for the operation (e.g.,
list,create,update). - Method: The standard HTTP method (
GET,POST,PUT,DELETE, etc.). - URL: The specific URL for the API endpoint.
1.3.1. Advanced Request Customization
Softyflow provides several ways to customize the outgoing request for each endpoint.
Prerun Script: For ultimate flexibility, the Prerun Script tab allows you to write custom JavaScript code that executes before the API request is sent. This is incredibly powerful for dynamic request modification, such as generating custom authentication signatures, encrypting parts of the request body, or dynamically adding headers.
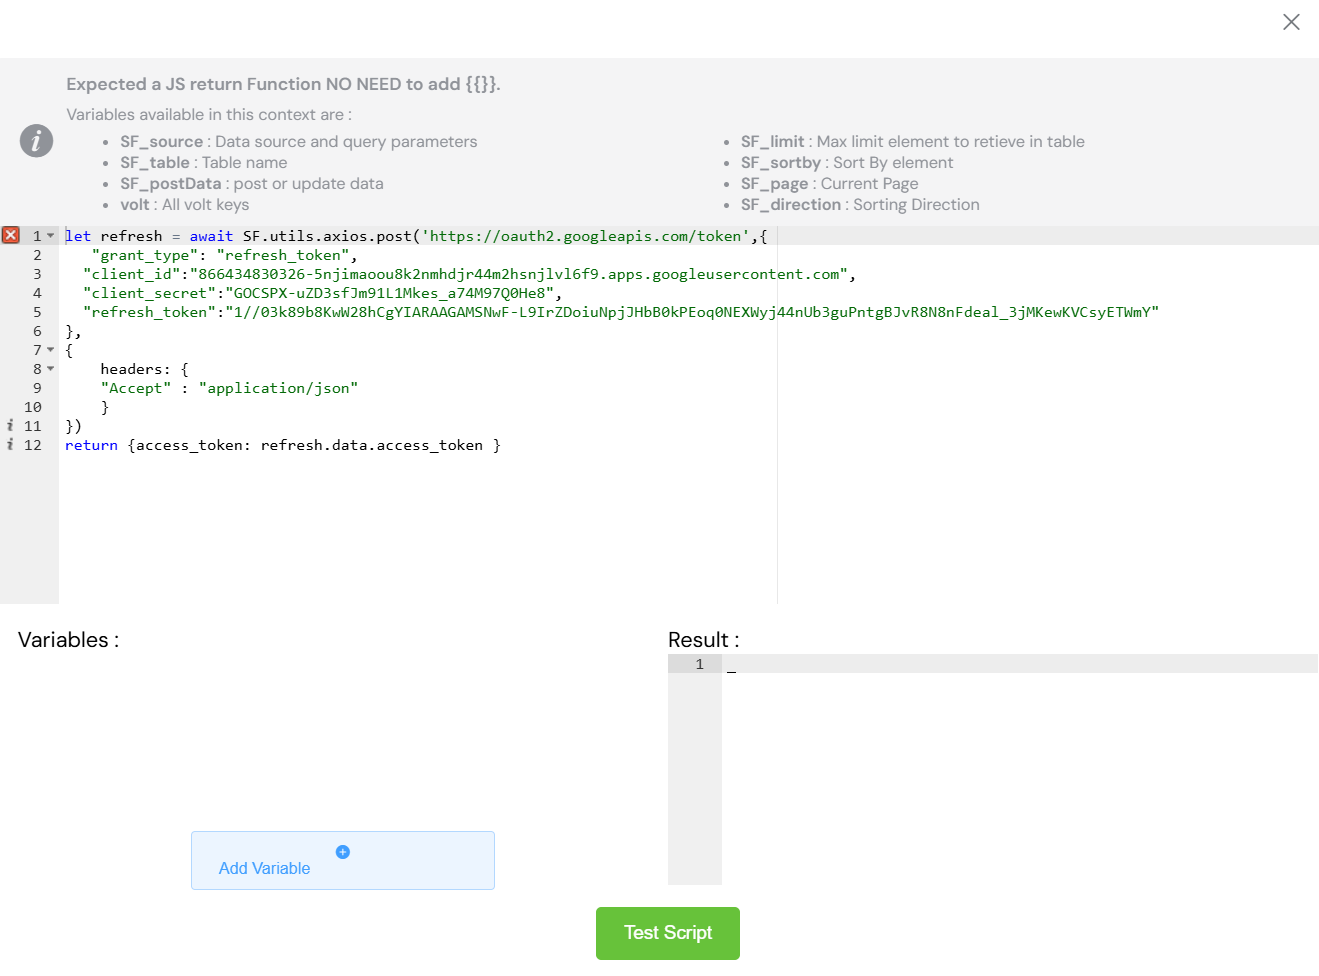
The Prerun Script tab offers a powerful way to customize requests.
1.3.2. Headers and Parameters:
The Headers and Params tabs provide a user-friendly interface for adding static or dynamic HTTP headers and request parameters. This is perfect for common tasks like setting the Content-Type or passing API keys.
When writing Prerun Scripts or other custom logic, you have access to a rich set of context variables. These variables provide information about the current request and allow you to create highly dynamic and intelligent integrations.
SF_source: An object containing the data source and query parameters.SF_table: The name of the table or resource being accessed.SF_postData: The data payload forPOSTandPUToperations.SF_limit: The maximum number of records to retrieve (forlistendpoints).SF_sortby: The field to sort by.SF_page: The current page number for paginated requests.SF_direction: The sort direction (1for ascending,-1for descending).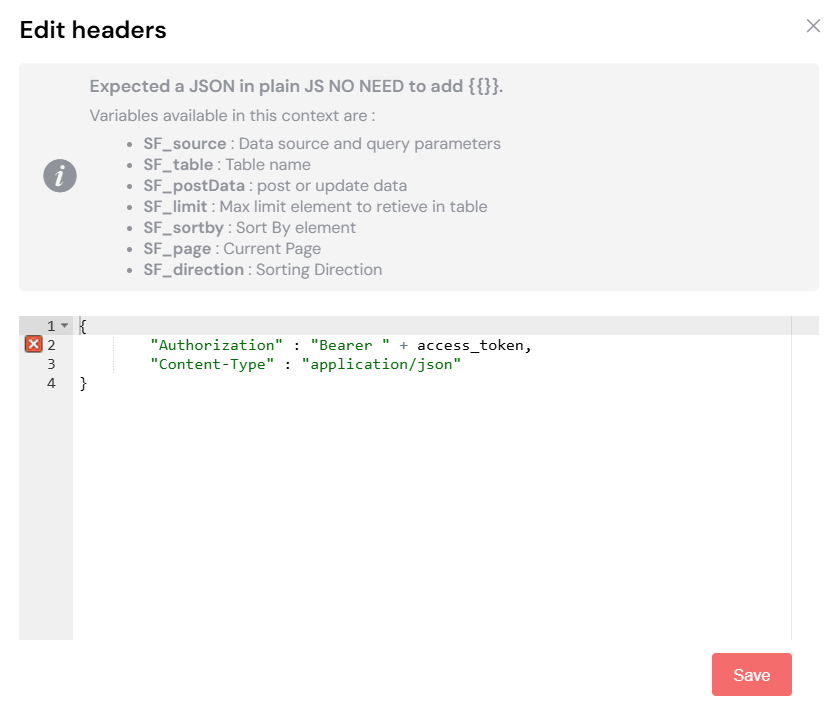
Setting the Content-Type header. 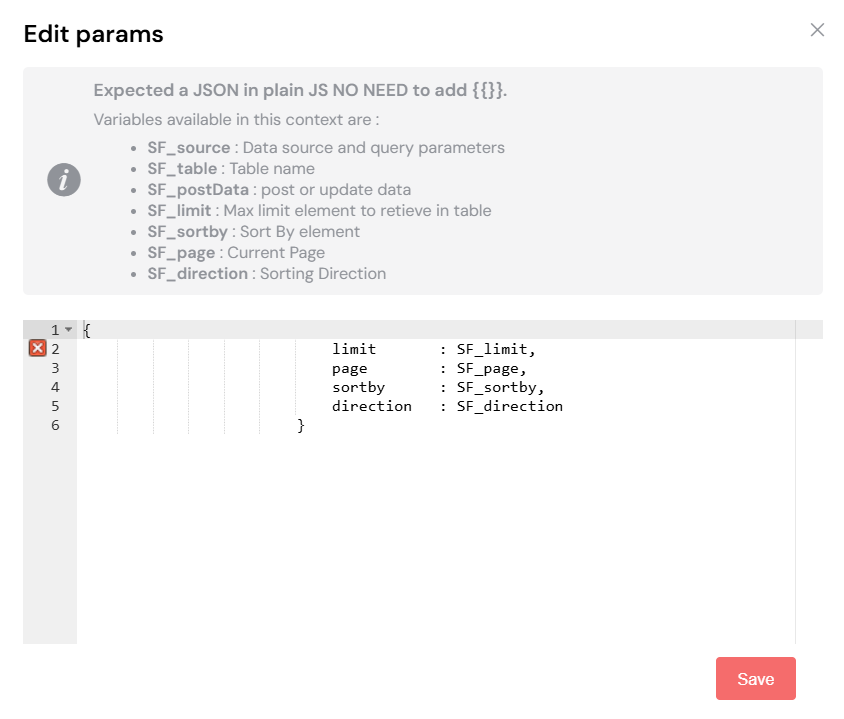
Adding request parameters.
1.3.3. Testing Your Endpoints
One of the most critical features of the EDS configuration screen is the built-in testing capability. Before you even integrate the EDS into a web page or process, you can test each endpoint to ensure it's working as expected.
The Test panel shows you the full API response, including the status code, headers, and body. This is an invaluable tool for debugging and verification, saving you hours of troubleshooting time.
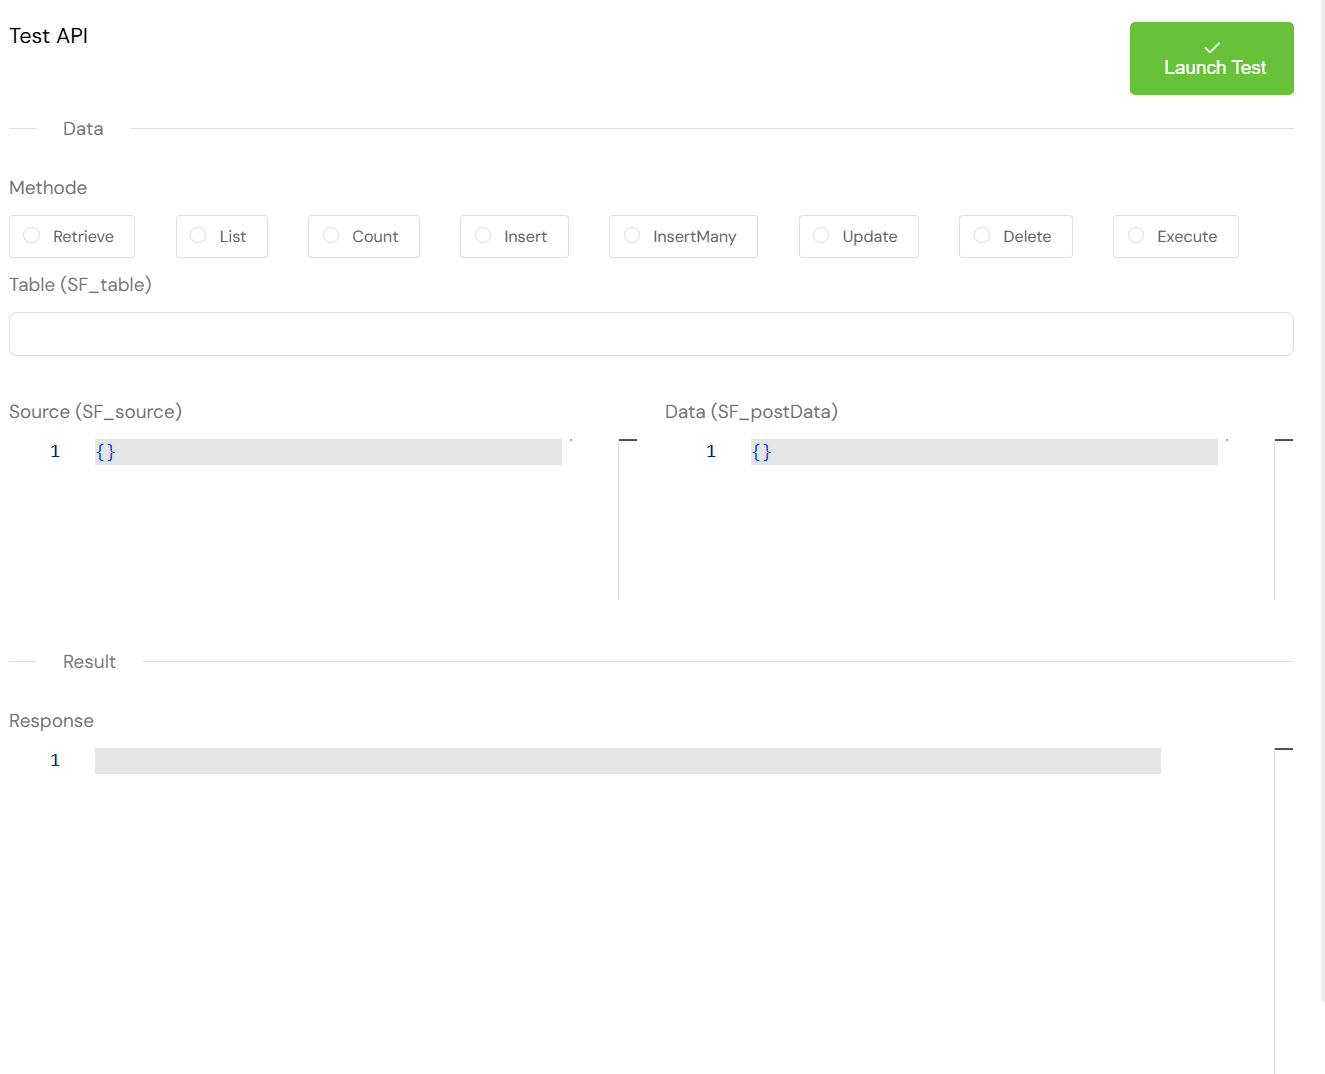
The Test panel showing a successful API response.
1.4. Bringing it all Together: Using Your EDS
Once your EDS is configured and tested, you can start using it throughout your Softyflow application. The beauty of the EDS feature is that it abstracts away the complexity of the API, allowing you to interact with it as if it were a simple database.
1.4.1. In Process Actions
Within the process modeler, you can use your EDS in various actions. The image below shows how to configure an action to interact with our API EDS. This allows you to integrate external data into your automated workflows seamlessly.
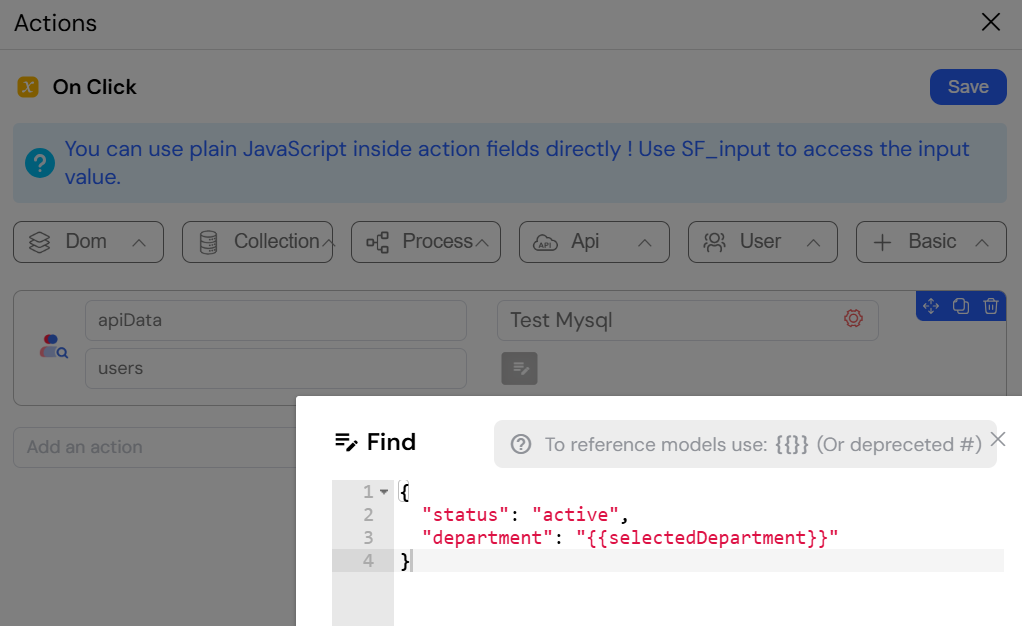
Calling EDS from a process action.
1.4.2. In Web Interface Widgets
The true power of EDS becomes apparent when you start building user interfaces. You can bind widgets directly to your EDS, creating dynamic and data-driven user experiences with minimal effort.
The following images demonstrate how to connect a Table widget to our API EDS.
Select the Data Source: First, you configure the widget to use an
EDSdata source and select theDatabase.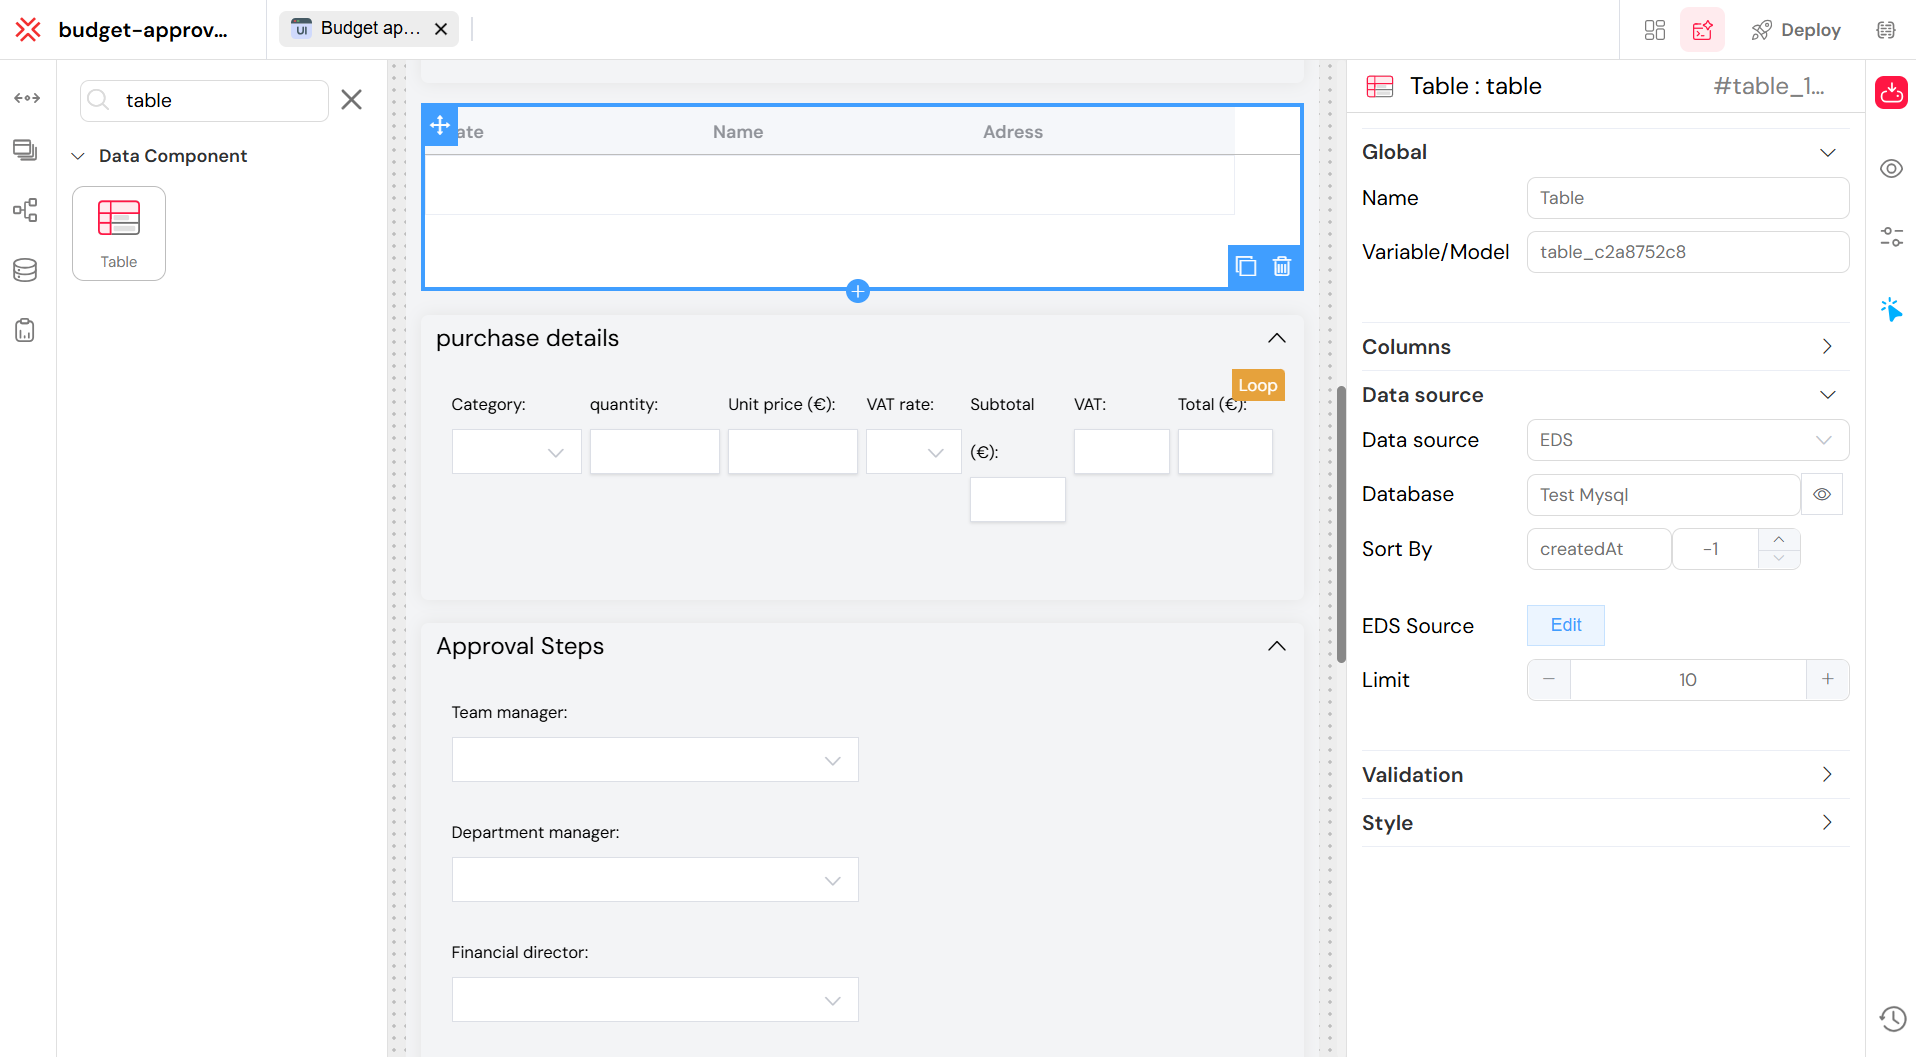
Selecting the EDS as the data source for a widget.
Map the Data Fields:
This selection explains a step in connecting a UI widget Table to a data source like an API.
- Select the Data Source: Data Source: Before this step, you would have chosen your data source. This could be an EDS (External Data Source), which might be a Database (like MySQL) or an API.
- Fetch Data: The system fetches data from that source. When fetching from a database, you can specify sorting, such as sorted by createdAt.
- Map Data Fields (This is what the text describes): After getting the data, you need to tell the widget how to display it. The text and image show that you are "mapping":
- The summary field from the API response to the label (the text the user sees).
- The id field to the value (the internal value of the selection).
In short, the selected text is about configuring a UI component to correctly display the data it receives from an external source.
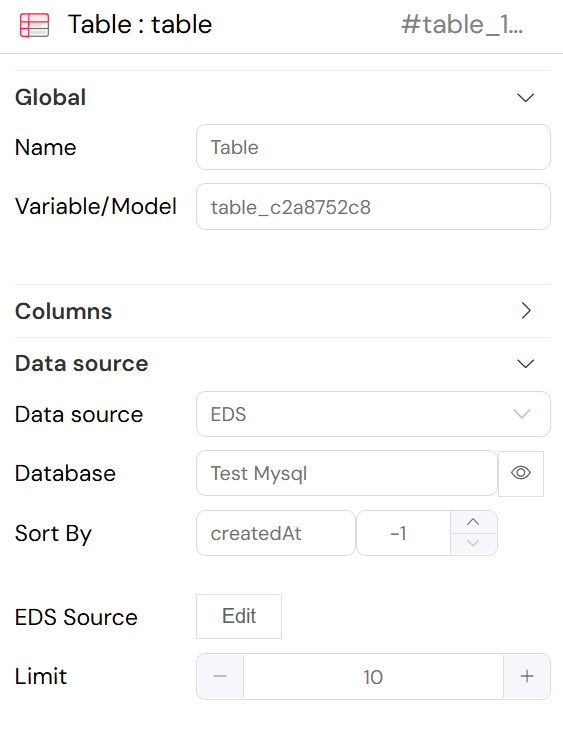
Mapping API fields to widget properties.
2. Scripts via Axios: The Developer's Toolkit for Advanced Integrations
When you need more control and flexibility than the EDS feature provides, Softyflow empowers you to write custom integration scripts using the popular axios library. This feature is available in the Process Modeler SDK and is ideal for complex scenarios, such as integrations that require custom logic, error handling, or multi-step API interactions.
2.1. Making Your First API Call
The axios library is available globally in your process scripts, so you can start making HTTP requests right away. Let's look at a few examples.
2.2. Basic HTTP Methods
Here are some examples of how to perform basic CRUD operations using axios.
2.2.1. GET: Fetching Data
This script demonstrates a simple GET request to fetch a single todo item from a public API. The await keyword is used to wait for the promise to resolve, and the response data is then logged.
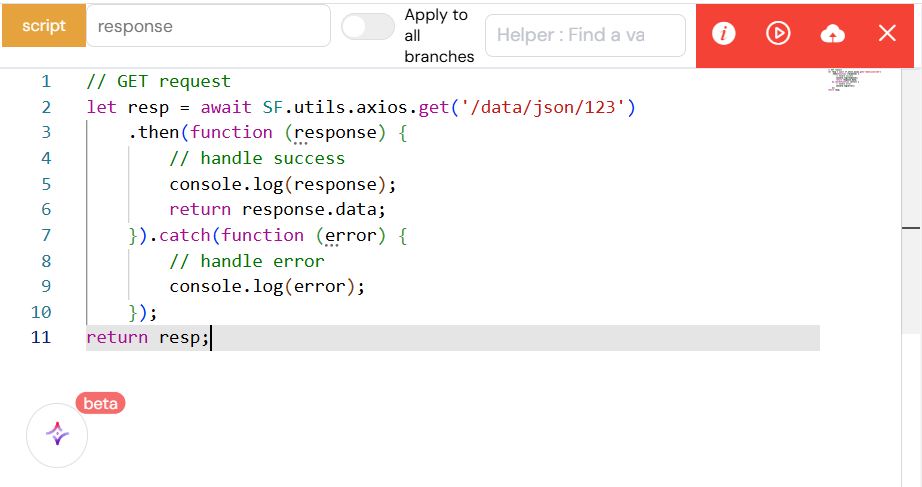
A simple GET request with axios.
2.2.2. POST: Creating Data
To create a new resource, you can use a POST request. This example sends a JSON payload to create a new todo item. The API response, which typically contains the newly created object with its server-assigned ID, is then logged.
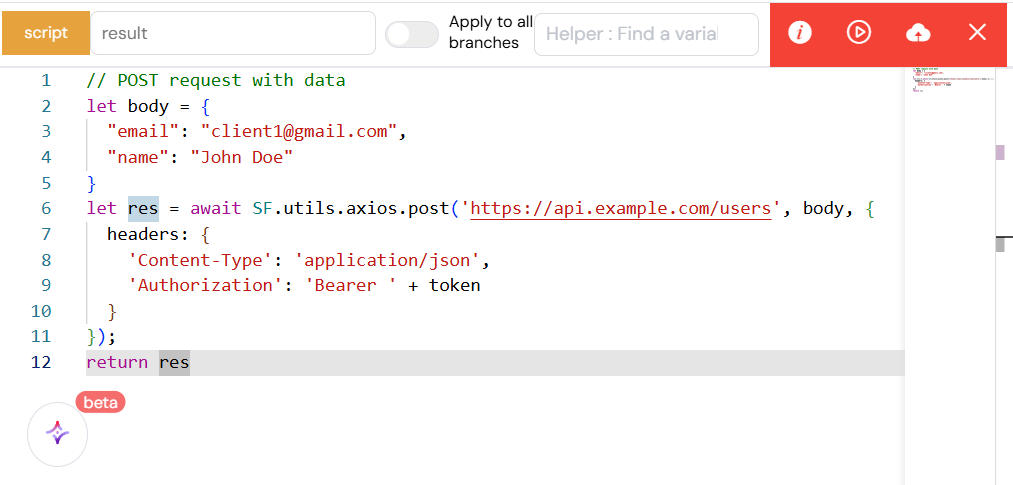
Creating a new resource with a POST request.
2.2.3. PUT: Updating Data
A PUT request is used to update an existing resource. This script sends a new payload to replace the todo item with id: 1.

Updating a resource with a PUT request.
2.2.4. DELETE: Removing Data
Finally, a DELETE request is used to remove a resource. This script sends a request to delete the todo item with id: 1.

Deleting a resource with a DELETE request.
2.3. Handling Authentication
Most real-world APIs require authentication. Here are a couple of common authentication patterns implemented with axios.
2.3.1. Bearer Token
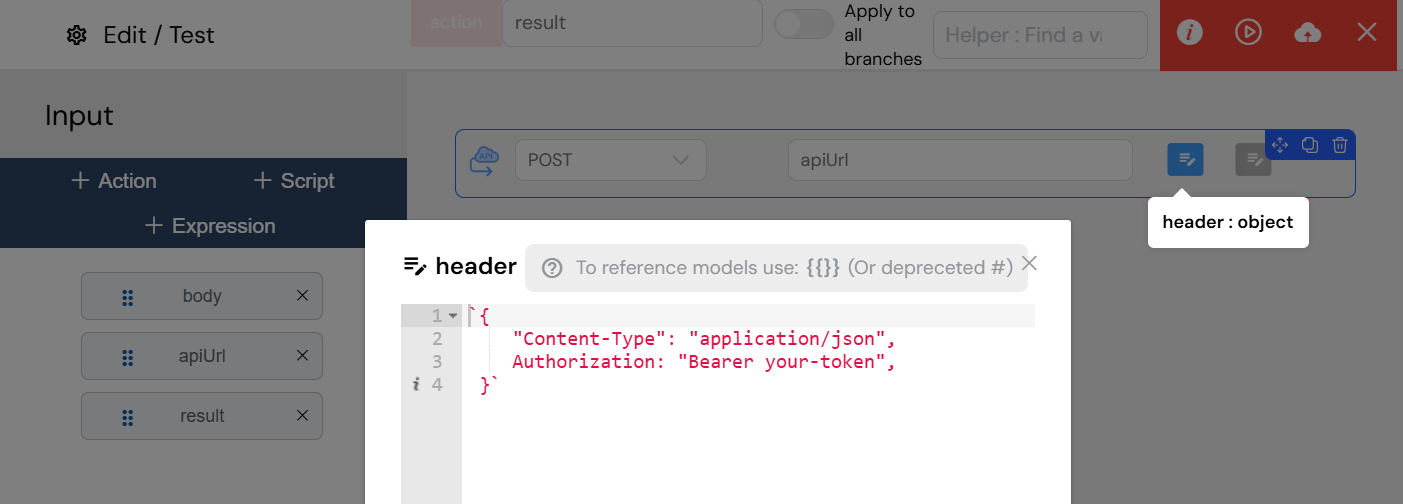
Bearer token authentication is a widely used standard. The token is sent in the Authorization header of the request. It's a good practice to store sensitive data like tokens in secure variables rather than hardcoding them in your scripts.
Sending a bearer token in the Authorization header.
2.3.2. API Key
Another common method is to use an API key, which can be sent as a query parameter, a header, or in the request body, depending on the API's requirements. The example below shows how to send an API key as a query parameter.
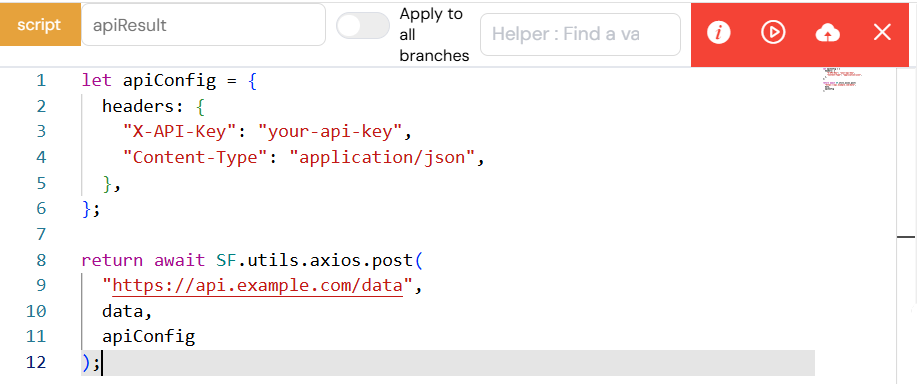
Using an API key as a query parameter.
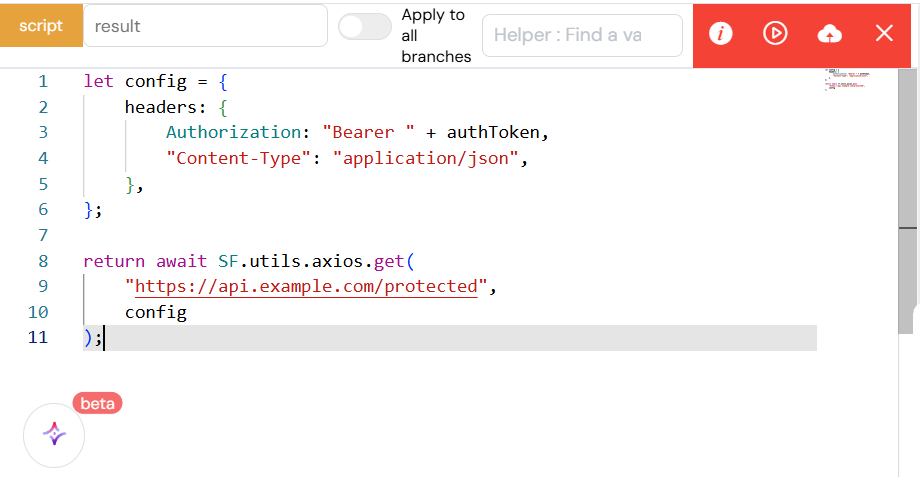
2.4. Advanced Example: Multi-Step Integration
The true power of scripting with axios shines in complex, multi-step integrations. In this example, the script first authenticates with an API by making a POST request to get a JWT token. It then uses that token to make a subsequent GET request to a protected endpoint. This pattern is very common when working with modern APIs.
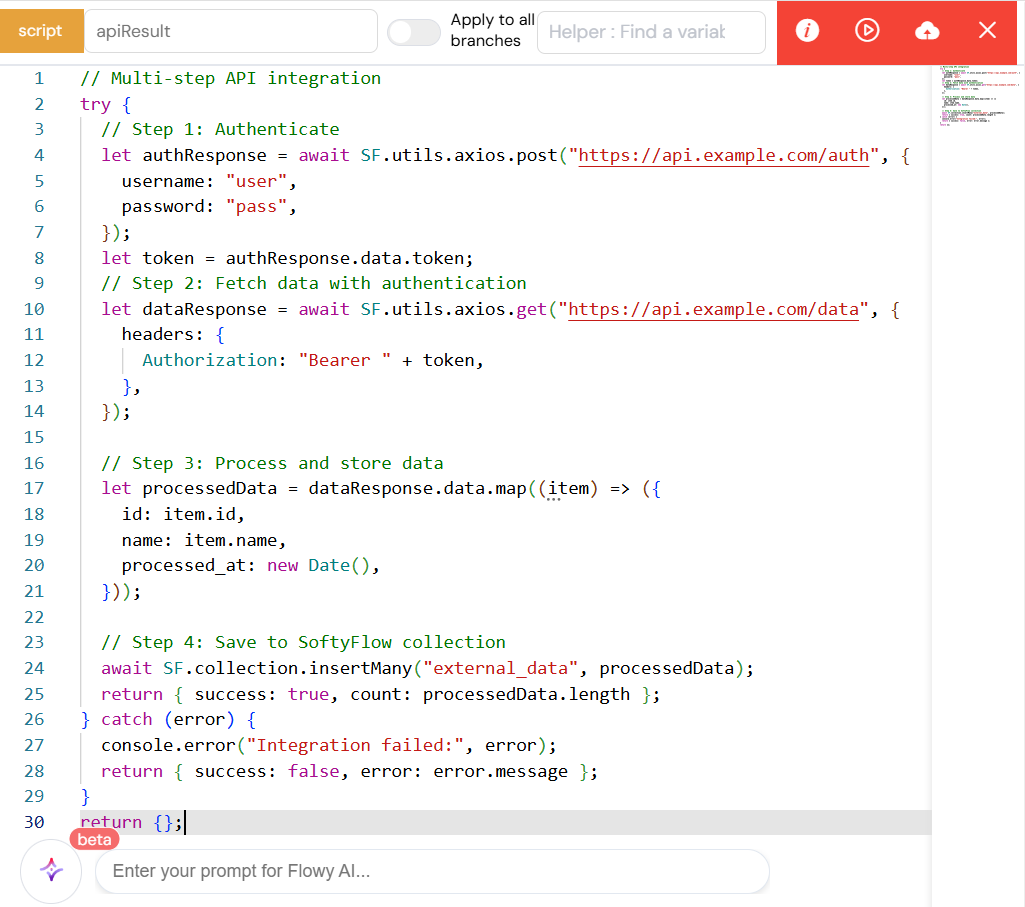
A multi-step integration: first authenticate, then fetch data.
3. Incoming APIs: Exposing Your Application to the World
Integrations are a two-way street. So far, we've focused on how Softyflow can consume external APIs. But what if you need external systems to communicate with your Softyflow application? This is where Incoming APIs come in.
This powerful feature allows you to create your own secure API endpoints that can trigger Softyflow processes, interact with your data, and execute custom logic. It's the perfect way to implement webhooks, build a public API for your application, or enable integrations with systems that need to initiate contact with Softyflow.
3.1. Building Your First Incoming API
Creating an incoming API is done through the Softyflow administration interface. You'll be presented with a code editor where you can write the logic for your API using JavaScript.
3.1.1. Accessing Request Data
Softyflow provides a set of global variables that you can use to access the incoming request's data:
SF_body: The parsed JSON body of the request.SF_headers: An object containing the HTTP headers.SF_query: An object containing the URL query parameters.SF_mode: The execution mode of the API (test,uat, orprod).SF_initiator: The user object of the user who initiated the API call.
The image below shows the API configuration screen, highlighting the available variables and the code editor.
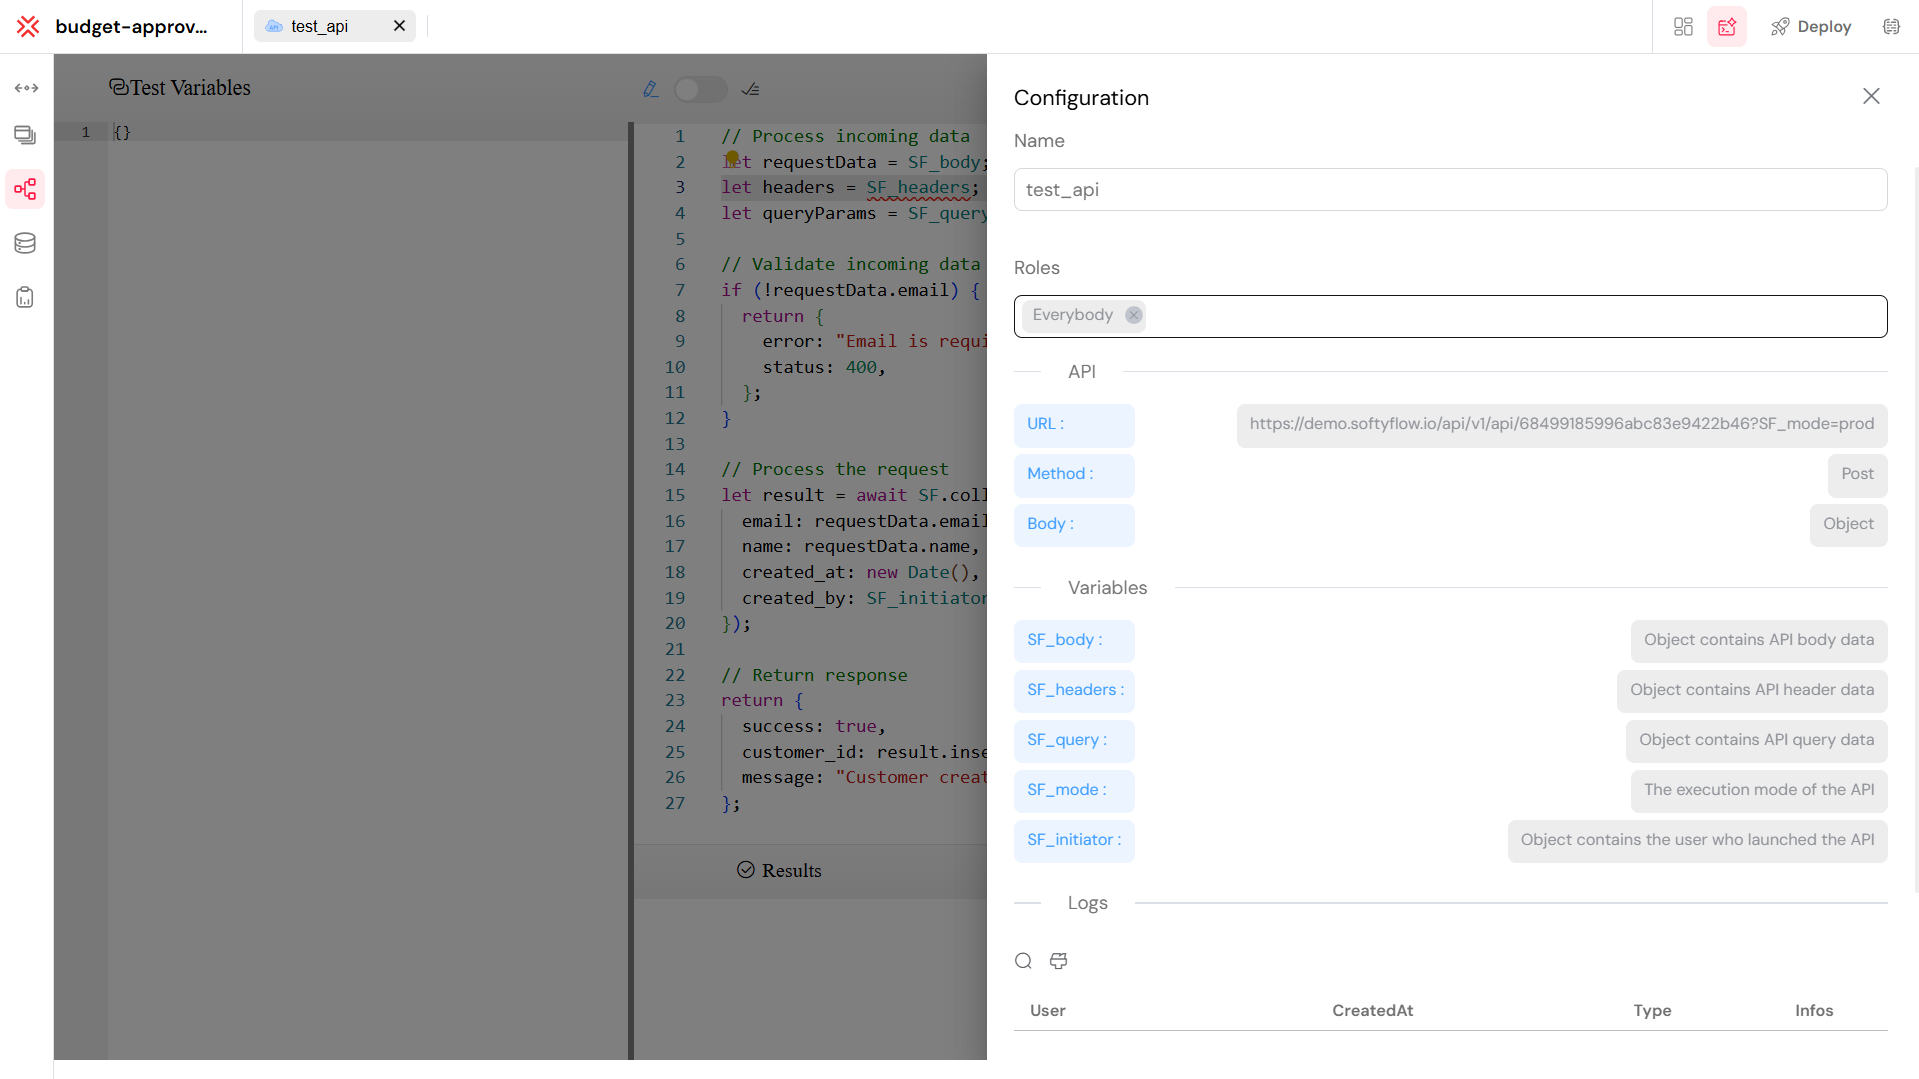
The Incoming API configuration screen.
3.2. Example API Implementation
A simple implementation of an incoming API in Softyflow is shown here. The script accesses the request body using the SF_body variable and returns it in the response. This demonstrates the basic structure of a Softyflow API, where you can process incoming data and send a response back to the caller.
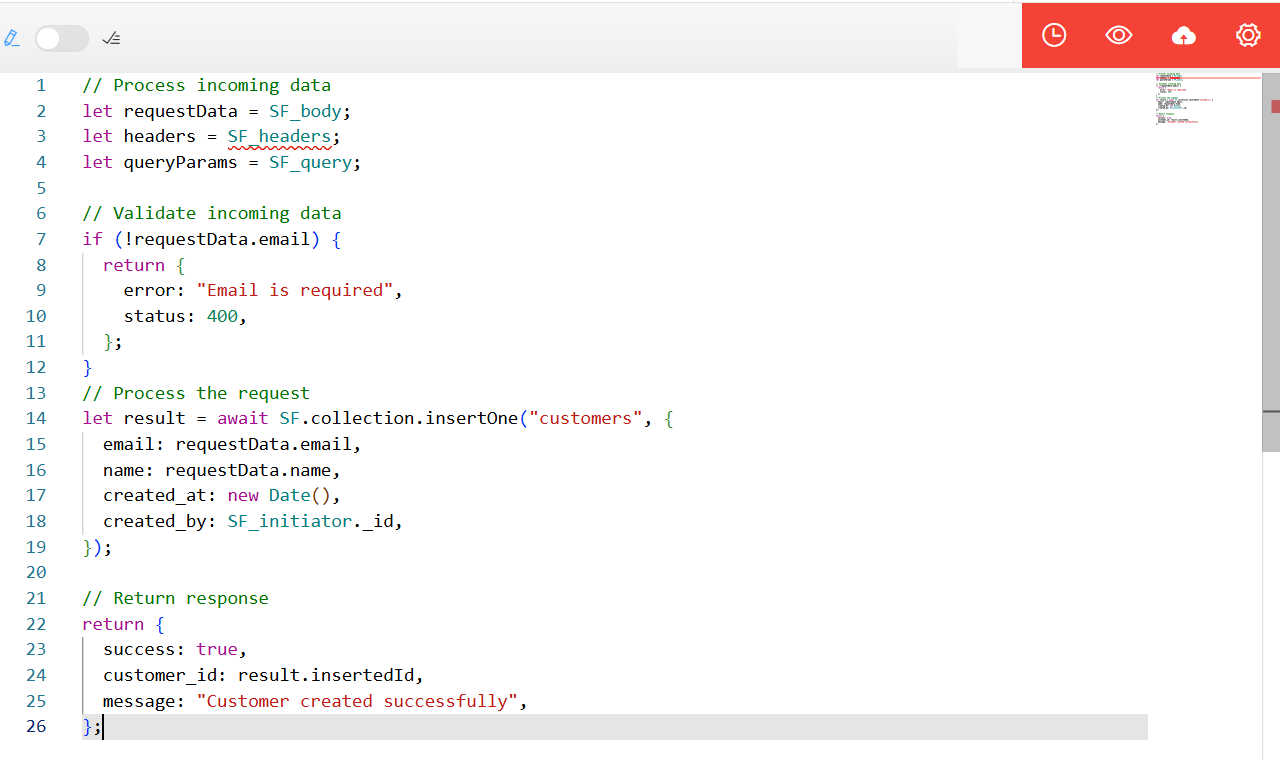
A simple echo API that returns the request body.
3.3. Consuming Your Incoming API
Once your API is created, you can call it from various places, both within and outside of Softyflow.
3.3.1. From within Softyflow: The InvokeApi Action
The easiest way to call an incoming API from within your Softyflow application is to use the InvokeApi action in your processes or web interfaces. This action provides a simple, no-code way to call your APIs, pass data to them, and handle their responses.
The image below shows the configuration of an InvokeApi action. You simply select the API you want to call, provide the body of the request (which can include dynamic variables), and specify a variable to store the response.
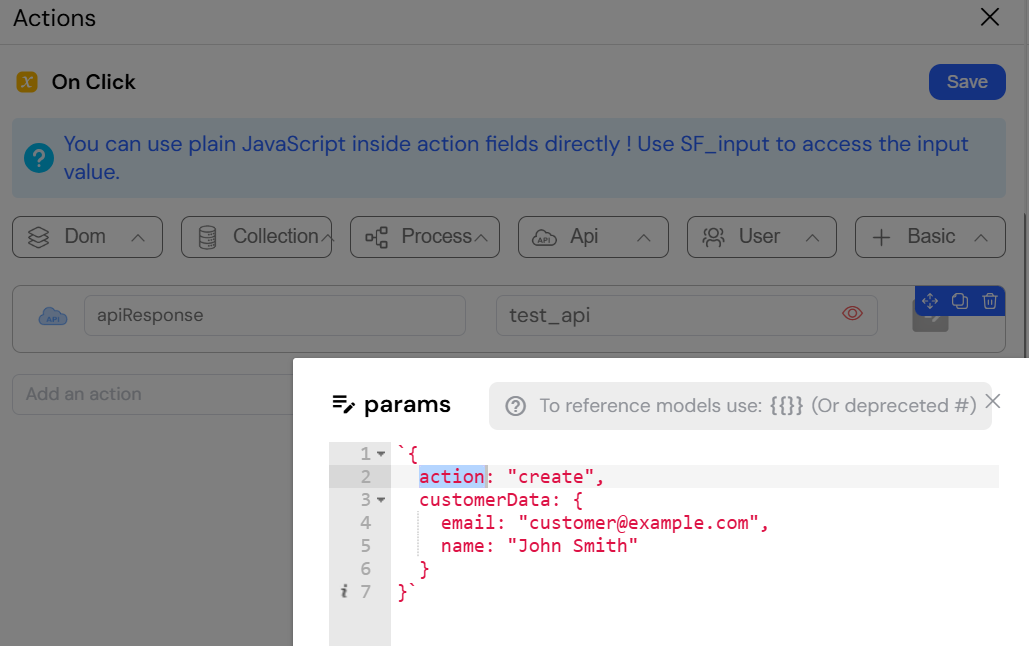
Configuring the InvokeApi action.
3.3.2. From External Systems: Getting the API URL
To allow external systems to call your API, you need to provide them with the API's URL. You can get this from the API management screen, as shown below.
Environment-specific URLs for your API.
3.4. Security and Managementq
Softyflow provides a robust set of tools for securing and managing your incoming APIs.
3.4.1. API Access Control
- Role-Based Access: You can restrict access to your APIs by assigning them to specific user groups.
- Public Access: For webhooks or other public-facing services, you can mark an API as "public" to allow access without authentication.
- Usage Monitoring: All API calls are logged, allowing you to monitor usage, track who is calling your APIs, and when.
3.4.2. Built-in API Testing
Testing is a first-class citizen in Softyflow's API module. The API editor includes a built-in testing tool that allows you to:
- Define Test Payloads: You can define test
SF_body,SF_query, andSF_headersdata in a JSON editor. - Execute Tests: Simply click the "Test" button to execute your API with the test data.
- View Results: The response from your API is displayed in a dedicated results panel, allowing you to quickly debug and iterate on your code.
- Monitor Logs: You can also monitor the application logs for more detailed debugging information.
4. Integration Best Practices
Building robust and reliable integrations requires more than just connecting systems. Here are some best practices to keep in mind when working with any of the integration methods in Softyflow.
4.1. Security First
- Validate Everything: Never trust data from external systems. Always validate input data on both the client and server sides to protect against common vulnerabilities like injection attacks.
- Enforce Authentication: Secure your APIs with robust authentication mechanisms. Use Softyflow's role-based access control for both incoming and outgoing integrations.
- Use HTTPS: Always use HTTPS for all API communications to encrypt data in transit and protect it from eavesdropping.
- Sanitize Data: Before storing or processing data from external systems, make sure to sanitize it to prevent cross-site scripting (XSS) and other attacks.
4.2. Robust Error Handling
- Expect the Unexpected: External systems can fail in unpredictable ways. Your integration logic should be resilient and able to handle network errors, timeouts, and unexpected API responses.
- Return Meaningful Errors: When building incoming APIs, provide clear and meaningful error messages to your consumers. Use standard HTTP status codes to indicate the nature of the error.
- Log Everything: Comprehensive logging is your best friend when it comes to debugging integration issues. Log all API requests and responses, as well as any errors that occur.
4.3. Performance Matters
- Timeouts are Crucial: Don't let your application hang waiting for a slow external API. Implement aggressive timeouts and have a fallback plan for when an API is unresponsive.
- Cache When Possible: If you are frequently requesting data that doesn't change often, consider caching the responses to improve performance and reduce the load on the external system.
- Monitor Performance: Keep an eye on the performance of your integrations. Softyflow's monitoring tools can help you identify bottlenecks and slow APIs.
4.4. Clear Documentation
- Document Your APIs: If you are building incoming APIs, provide clear and comprehensive documentation for your consumers.
- Provide Examples: Include code samples and examples to make it easier for developers to get started with your API.
- Version Your APIs: If you need to make breaking changes to an incoming API, consider creating a new version to avoid disrupting existing integrations.
By following these best practices, you can build integrations that are secure, reliable, and performant.
5. Conclusion and Next Steps
You now have a comprehensive understanding of the powerful integration capabilities available in Softyflow. From the low-code simplicity of External Data Sources to the developer-focused flexibility of axios scripting and the inbound potential of Incoming APIs, you have the tools you need to connect your application to any system or service.
As you continue your journey with Softyflow, here are some recommended next steps:
- Web Interface Design: Start building user interfaces that leverage the data from your newly configured integrations.
- Process Design: Incorporate your integrations into your business processes to automate workflows that span multiple systems.
- Database Integration: Learn how to combine data from your own database with data from external APIs.
- Reporting: Create insightful reports and dashboards that combine data from all your integrated sources.
- Testing and Deployment: Understand how to effectively test and deploy your integrated applications.
- Monitoring and Execution: Learn how to monitor the health and performance of your integrations in production.
For more hands-on experience, we highly recommend our step-by-step tutorials. And for detailed information on specific features, be sure to check out our reference guides for APIs, EDS, and the SDK documentation.