Role Management
Role management is a critical security feature in Softyflow that allows administrators to control what users can see and do across the platform. By defining roles, you can enforce fine-grained access control, ensuring that users only have permissions relevant to their responsibilities. This is essential for maintaining security, simplifying user administration, and ensuring compliance.
Roles can be assigned to individual users or organized into groups to streamline permissions across different environments such as TEST, UAT, and PROD. This functionality is deeply integrated with other platform features like authentication systems, deployment management, and the design of web interfaces and process workflows.
1. Accessing the Role Management Dashboard
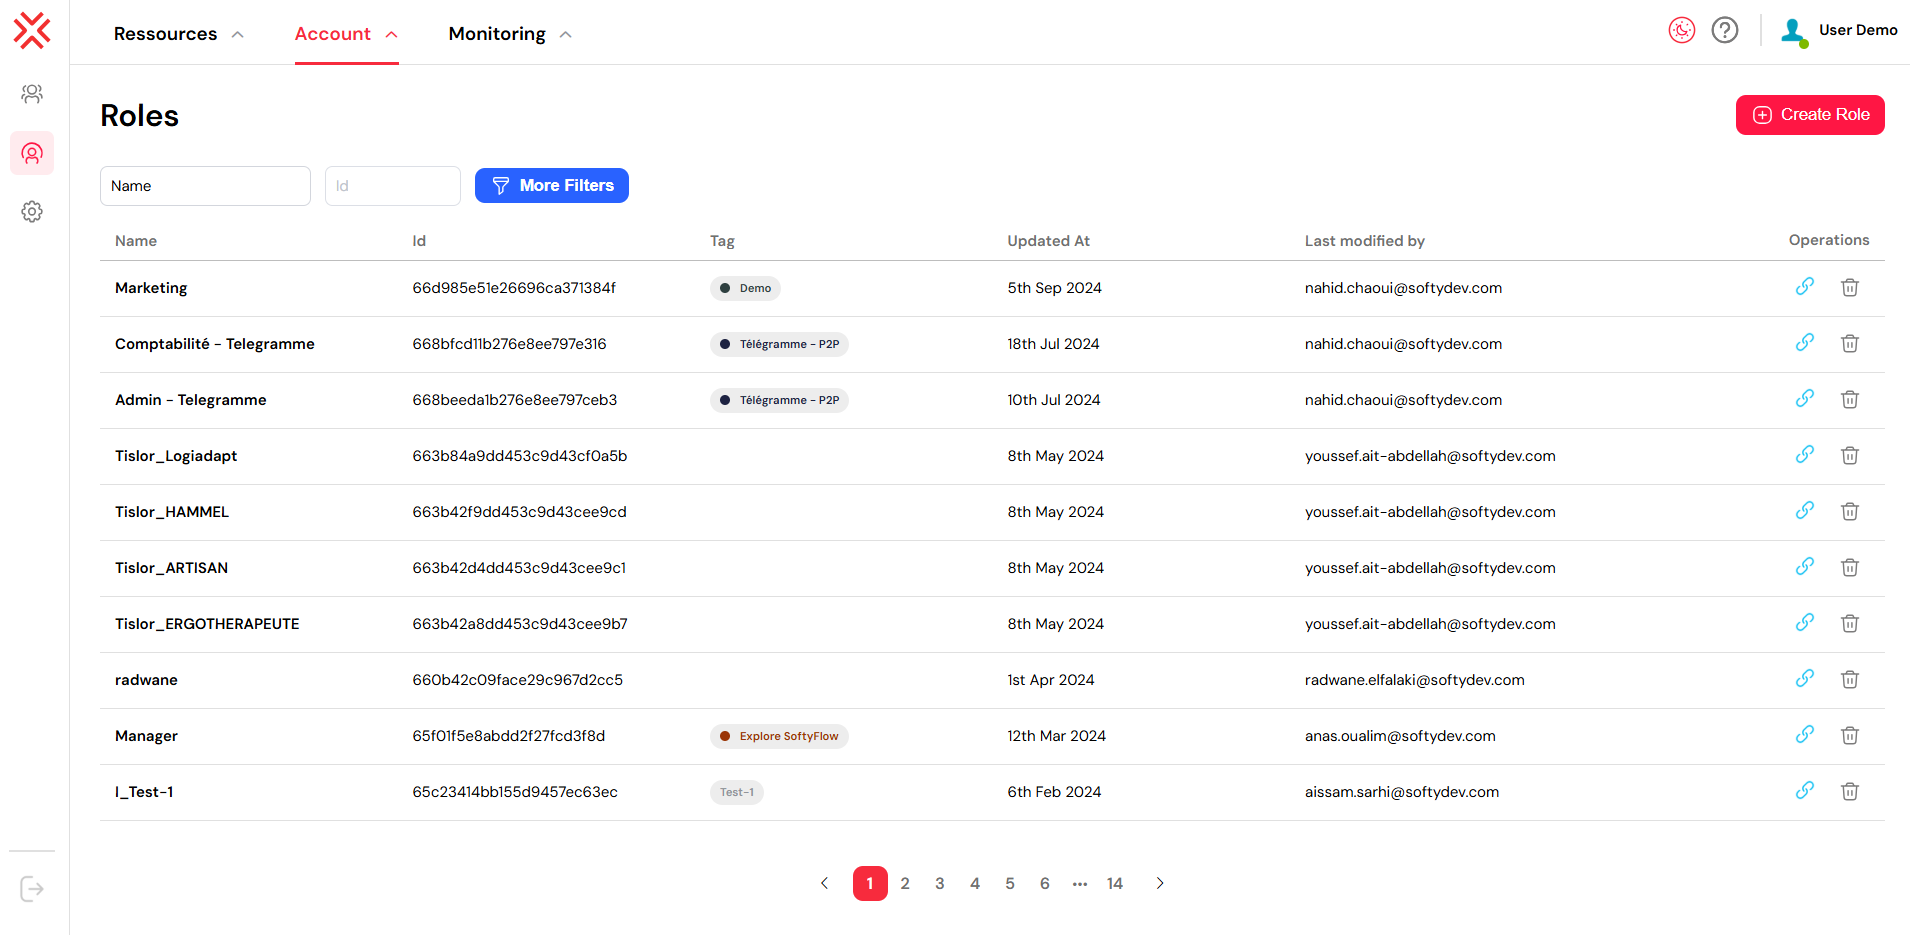
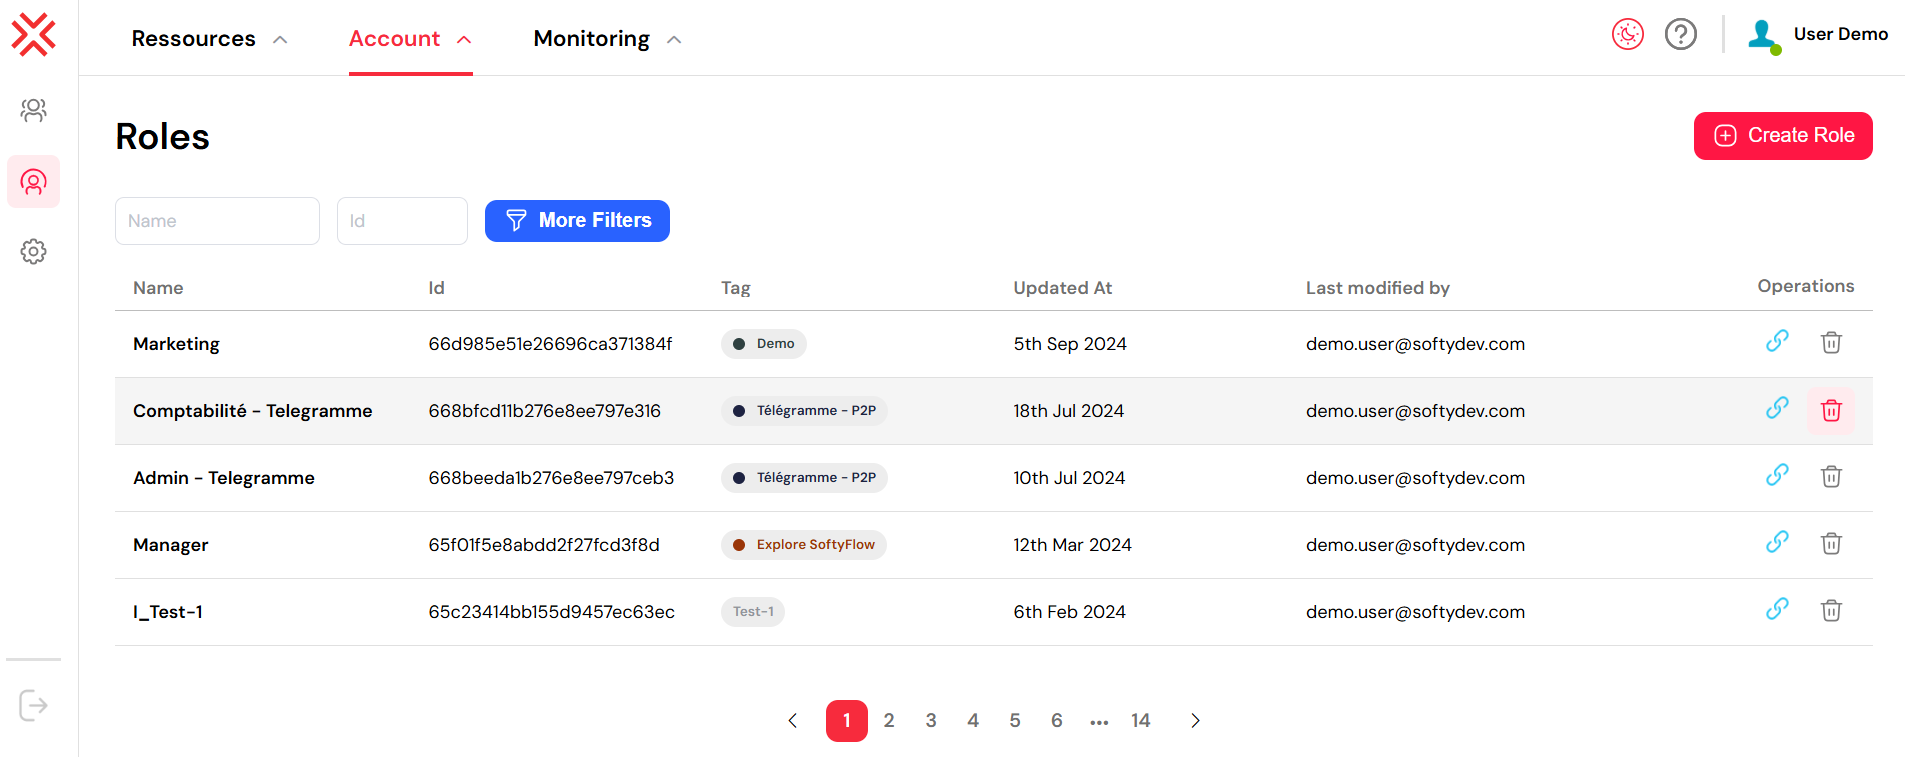
To begin managing roles, you first need to navigate to the central role management dashboard.
- From the top navigation menu, click on Account.
- Select Roles from the dropdown menu.
You will be directed to a comprehensive dashboard that lists all existing roles, along with key details such as their tag, creation date, the last user who modified them, and available actions.
2. Core Actions for Role Management
2.1. Creating a New Role
Creating a new role is the first step in defining a set of permissions.
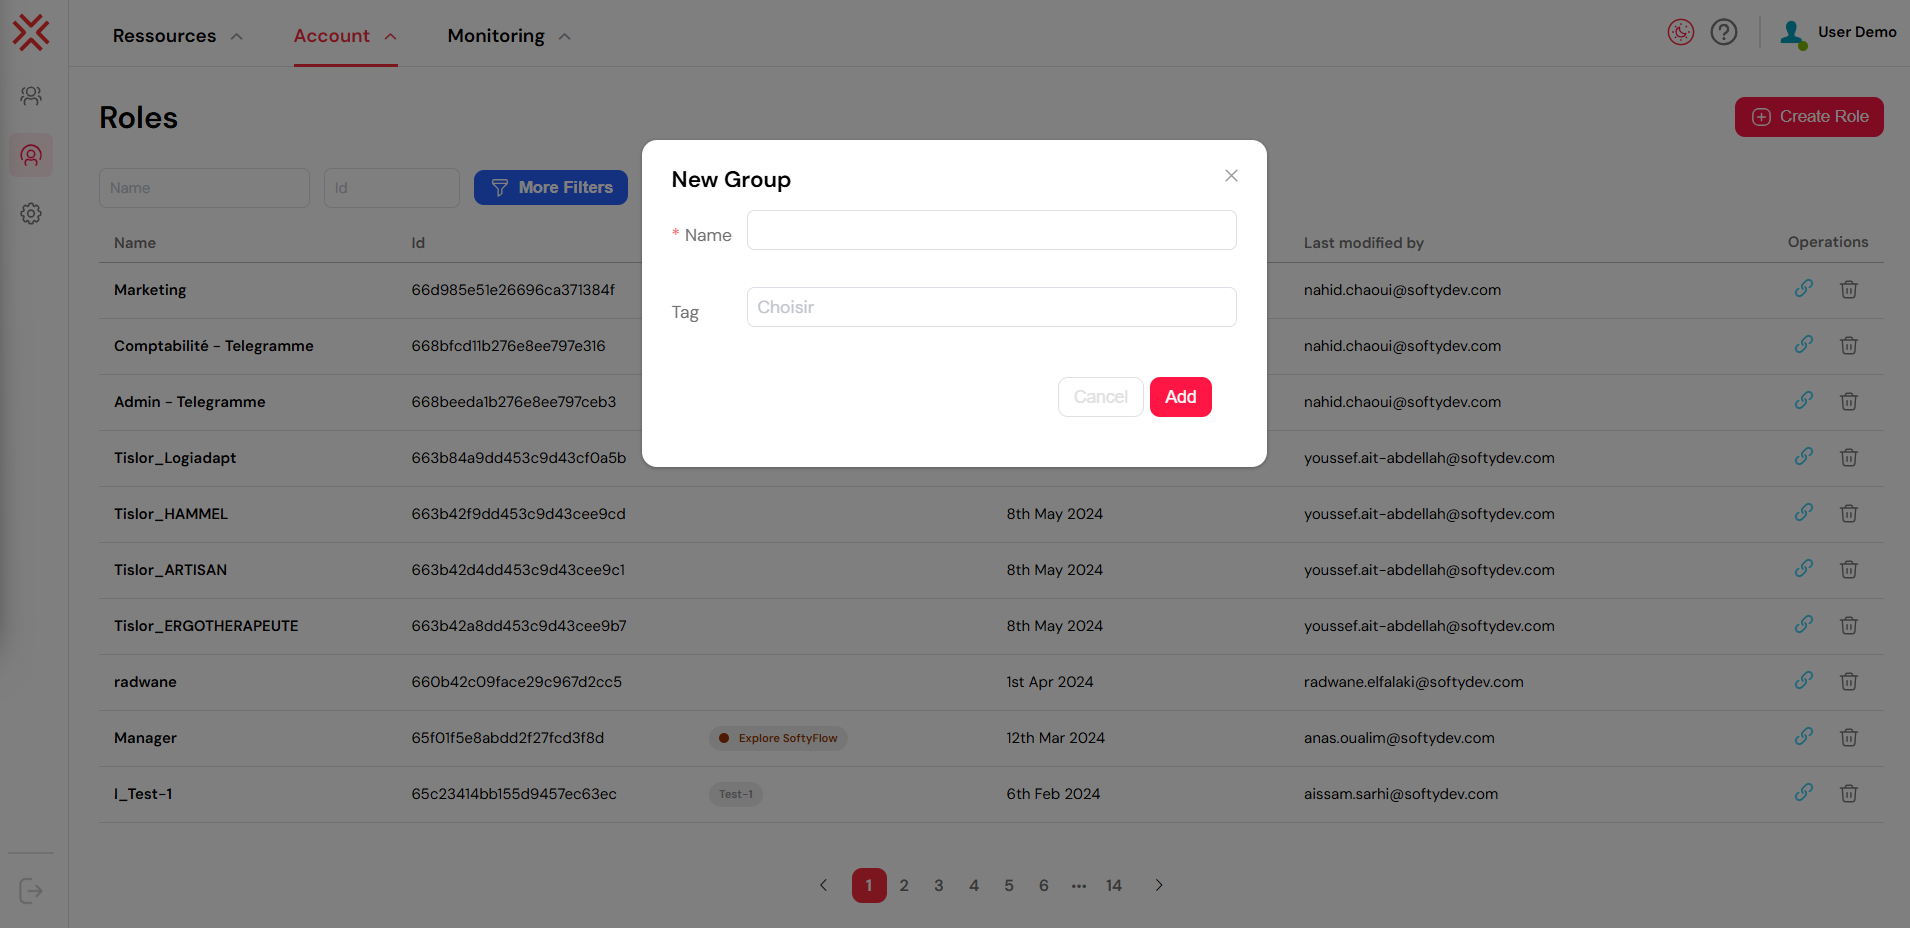
- Click the red Create Role button located in the top right corner of the dashboard.
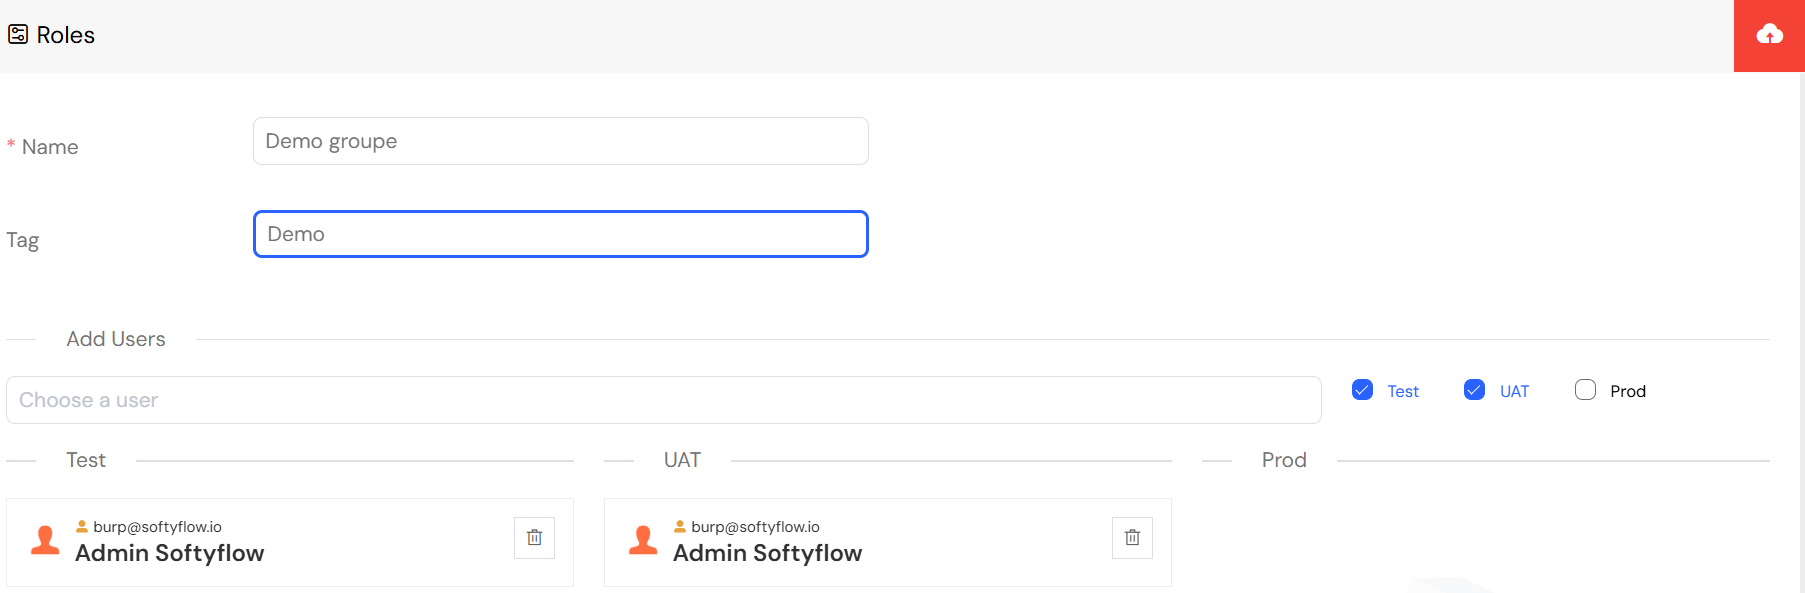
- A form will appear. Fill in the following fields:
- Role Name: Enter a clear and descriptive name for the role (e.g.,
HR_Manager,Process_Administrator). - Tag or Description: Optionally, add a tag to classify the role or a description for more context (e.g., "Grants access to the Telegram P2P project").
- Role Name: Enter a clear and descriptive name for the role (e.g.,
- Click Add to create the role.
Upon creation, Softyflow assigns a unique, system-generated Role ID. This ID is useful for internal referencing, integration scripts, and configuring home page redirections. You can easily copy this ID by clicking the link icon next to the role in the list.
✅ Best Practice: Adopt a consistent naming convention for your roles to improve long-term maintainability. For example: TeamName_Function_Environment (e.g., Finance_Approver_PROD).
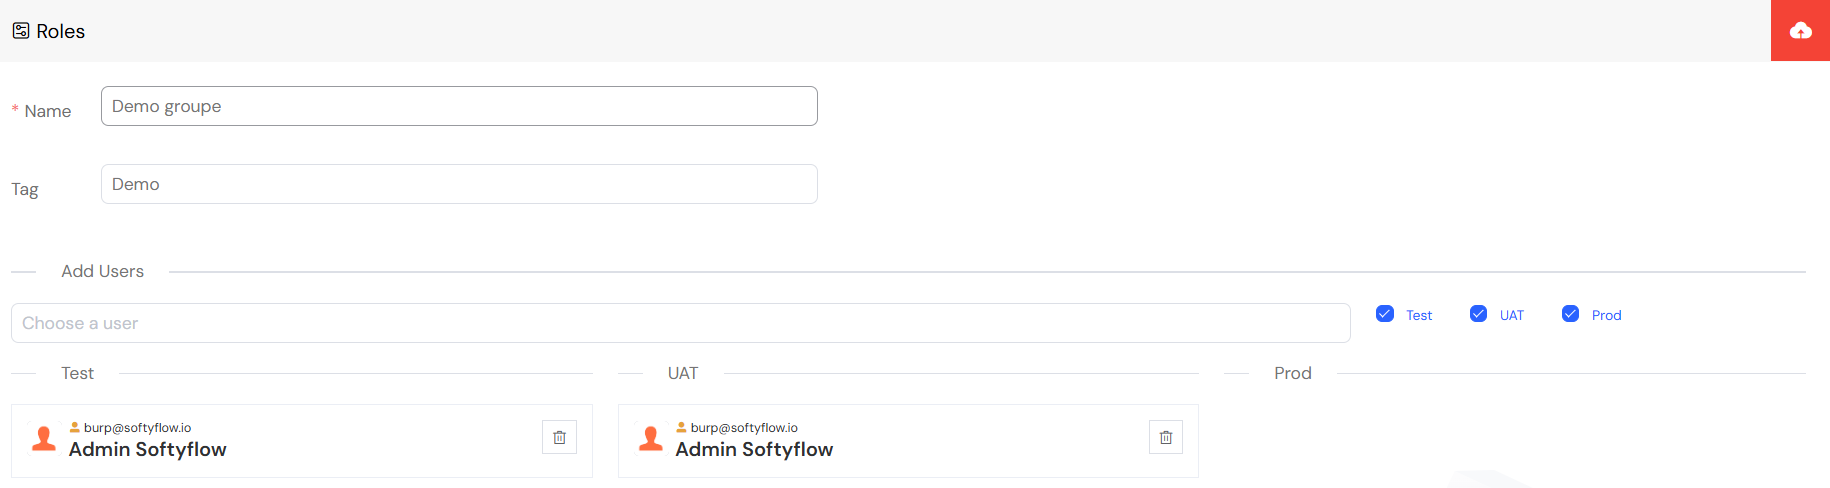
2.2. Assigning Users to a Role
Once a role is created, you must assign users to it to grant them the associated permissions.
- From the Roles list, click on the name of the role you wish to manage.
- Navigate to the Users tab within the role editor.
- Click Add Users to open a list of available users. You can filter this list by name, email, or access status to quickly find the right people.
- Select the users you want to add to the role.
Assignments can be configured separately for each environment, allowing you to grant production access only to senior team members while giving broader permissions in test environments.
⚠️ Caution: Assign roles with care, especially in the PROD environment, to prevent granting excessive administrative privileges.
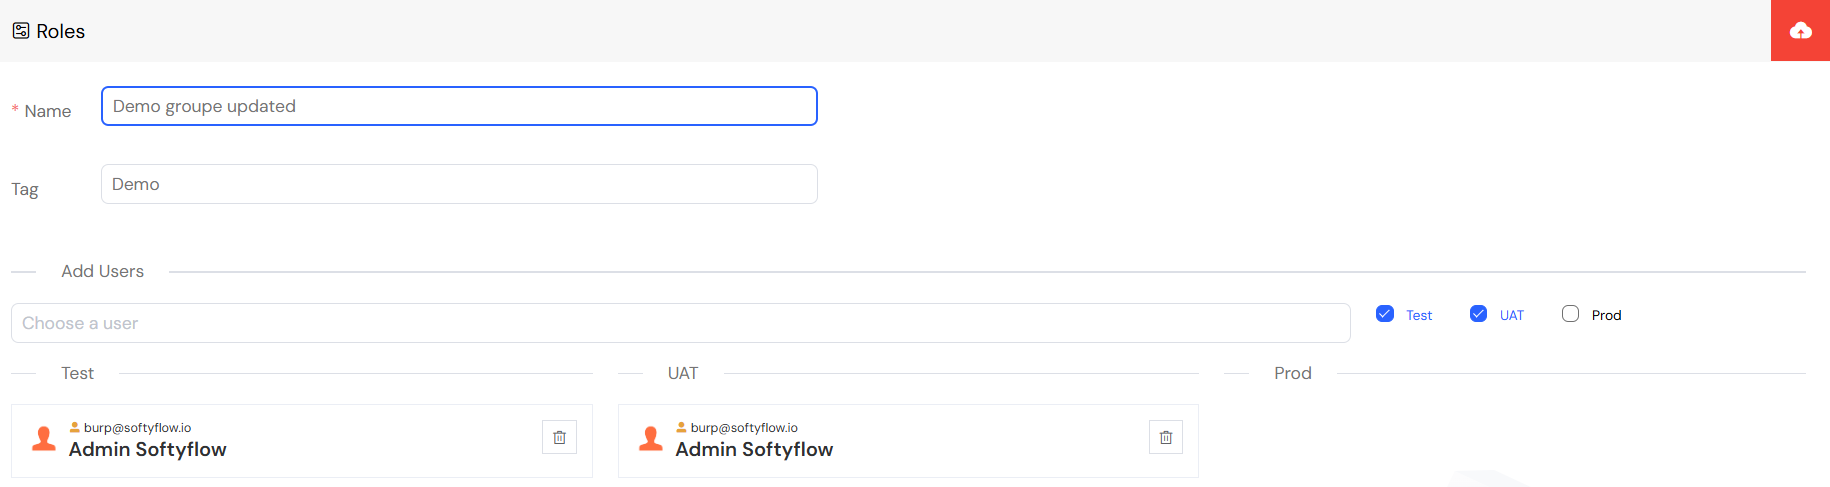
2.3. Updating an Existing Role
Organizational needs change, and roles must adapt. You can modify a role at any time.
- Navigate to the Roles dashboard via Account → Roles.
- Locate the role you want to edit and click on its row.
- From here, you can:
- Rename the role.
- Change its tag or description.
- Add or remove assigned users.
- Click Save to apply your changes.
All modifications take effect immediately and are tracked in the "Last Modified by" column. For auditing purposes, all role-related changes are recorded in the system logs.
2.4. Deleting a Role
If a role is no longer needed, you can delete it.
- Go to the Account → Roles dashboard.
- Find the role you want to remove and click the trash icon in the actions column.
- A confirmation dialog will appear. Confirm your choice to permanently delete the role.
The action is recorded in the system logs for security and auditing.
Note: In most cases, you do not need to manually unassign users before deleting a role. The system handles this automatically if no dependencies remain.
3. Project-Specific Role Management
3.1. Attaching a Role to a Project
You can scope a role's permissions to a specific project by using tags.
- Go to Account → Roles and either create a new role or edit an existing one.
- In the Tag field, select the name of the project you want to associate the role with (e.g.,
Demo Project).
This links the role to the project, enabling you to control UI visibility and data access on a per-project basis. This is particularly powerful when designing web interfaces where different roles should see different components.
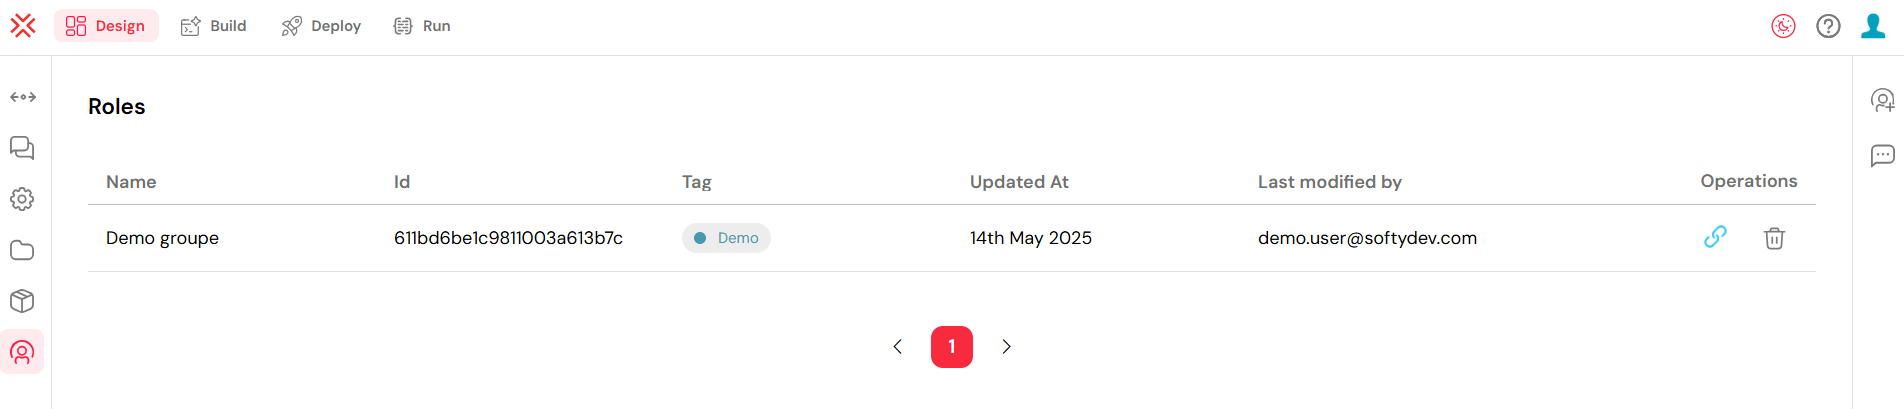
3.2. Viewing Roles Attached to a Project
You can also view all roles associated with a project directly from the project's interface.
- Navigate to the Ressources section of your project.
- Select a project from the list.
- Click the Design tab at the top.
- In the left-hand sidebar, click Roles.
This view displays all roles linked to the project, neatly organized by environment (Test, UAT, Prod). From here, you can manage which users are assigned in each environment, which is crucial for maintaining a secure deployment pipeline.
4. Integration and Best Practices
4.1. Role-Based Access in Development
Roles are a fundamental part of the development lifecycle in Softyflow:
- Web Interface Design: Dynamically show or hide UI components based on user roles.
- Process Design: Assign tasks in a workflow to specific roles to automate business processes.
- Database Integration: Secure data by controlling access based on roles.
- API Integration: Use roles to secure API endpoints and external system communications.
4.2. Environment-Specific Role Configuration
Tailor role permissions for each environment to enhance security and testing effectiveness:
- Test: Grant broad access to developers for thorough testing.
- UAT: Provide restricted access to business users for acceptance testing.
- Prod: Enforce the principle of least privilege with minimal required access for all users.
Learn more about this in the Test & Deploy documentation.
4.3. Monitoring Role-Related Activities
Keep track of how roles are being used and modified:
- System Logs: Audit role assignments, creations, and deletions.
- Run & Instance Management: Monitor which roles are executing processes and tasks.
- Home Redirection: Configure unique landing pages for different user roles to personalize their experience.
What's Next?
Now that you have a solid understanding of role management, explore related administration and development topics:
Administration:
- User Management: Assign the roles you've created to users.
- Authentication & SSO: Integrate roles with your single sign-on solution.
- Mail Management: Configure notifications for role-based workflows.
Development:
- Project Setup: Begin building applications that incorporate role-based access control.
- Web Interface Design: Create dynamic user interfaces that adapt to user roles.
- Process Design: Automate workflows with role-based task assignments.