Authentication & SSO
The Authentication & SSO section of your settings is the gateway to securing your Softyflow platform. It empowers administrators to meticulously define and enforce how users can log in, manage sophisticated Single Sign-On (SSO) configurations, and implement robust password security policies that align with your corporate standards.
A well-configured authentication system is the first line of defense in protecting your applications and data. It works in seamless conjunction with role management to ensure that every user has secure and appropriate access to web interfaces and process workflows.
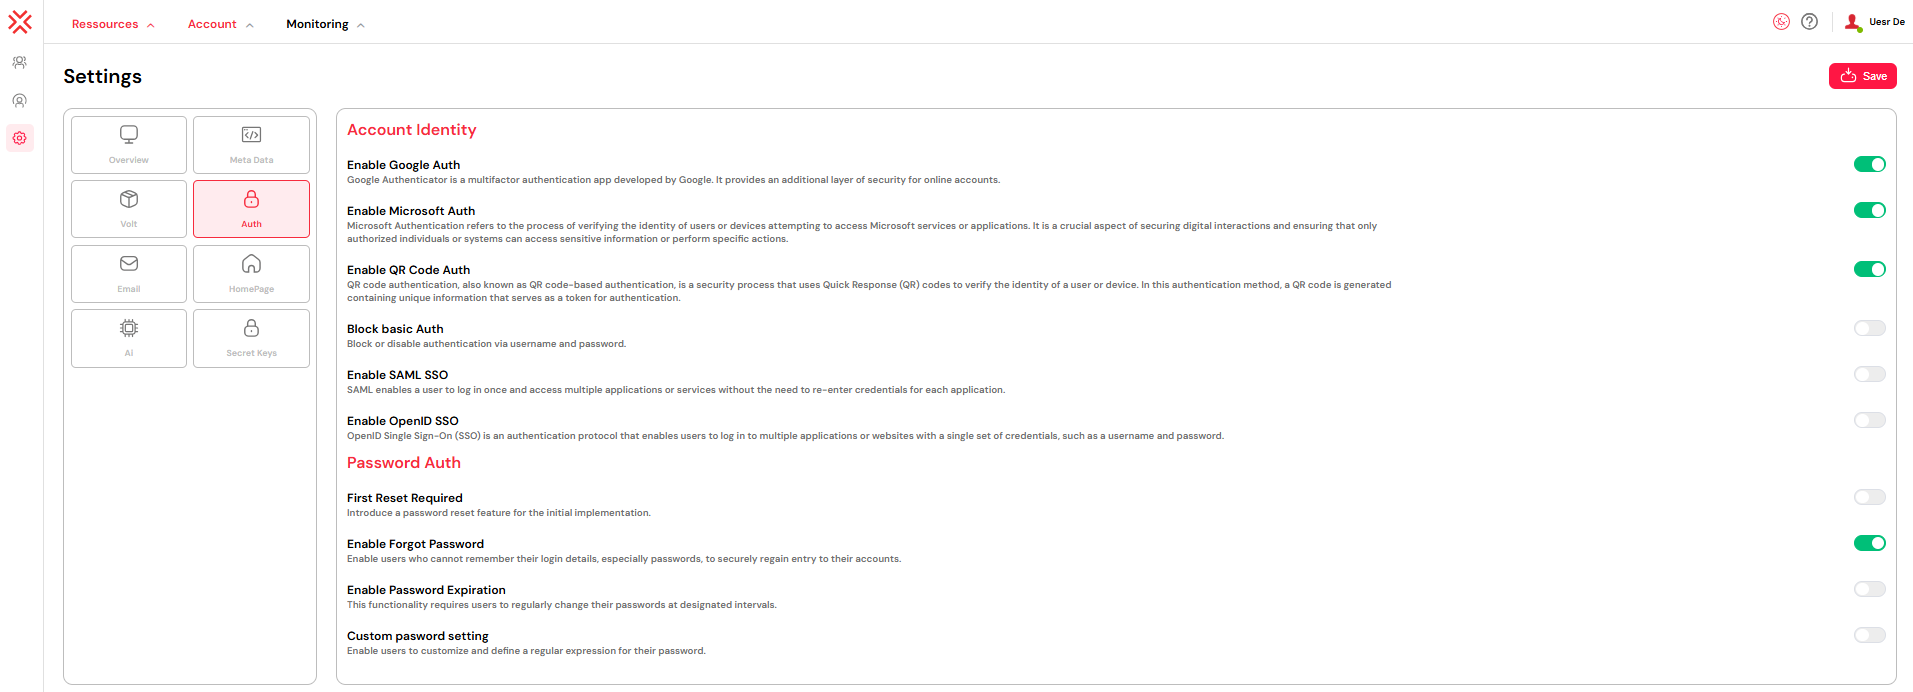
To access these critical settings, navigate to Account > Settings > Auth from the top navigation menu.
1. Exploring the Different Authentication Methods
Softyflow provides a flexible and comprehensive suite of authentication strategies, allowing you to choose the methods that best fit your organization's security posture and user needs.
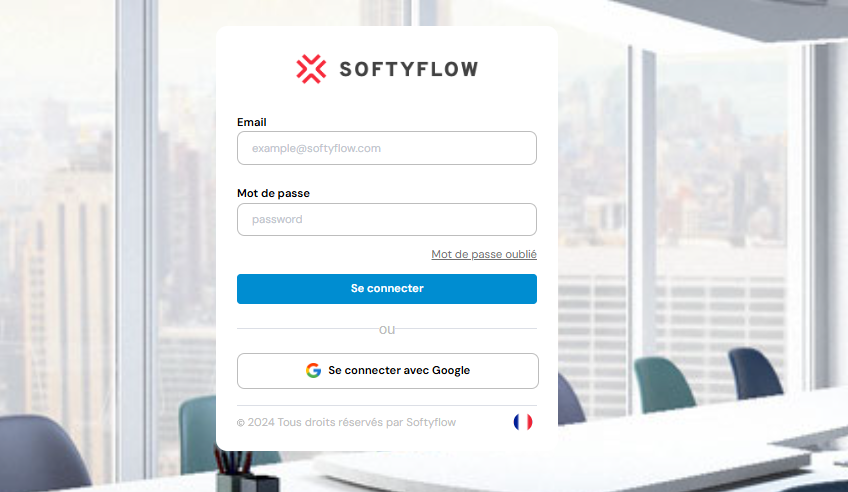
1.1. Google Authenticator (2FA)
This method adds a critical second layer of security (Two-Factor Authentication) by requiring a time-based one-time password (TOTP) from the Google Authenticator mobile application. After successfully entering their standard password, users must provide a 6-digit code from the app to complete the login process. This effectively protects against unauthorized access even if a user's password has been compromised.
This is an especially vital security measure for users with IDE access, as they have the ability to modify applications, data structures, and processes.
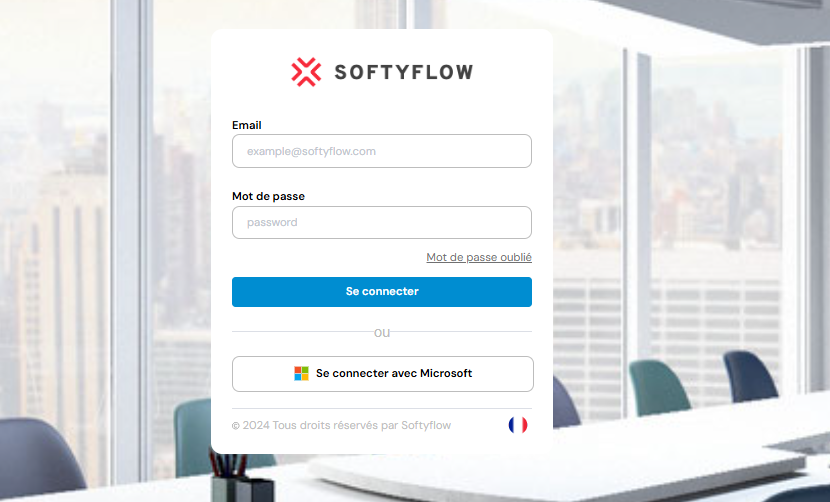
1.2. Microsoft Authenticator (2FA)
Functionally similar to the Google Authenticator, this option leverages the Microsoft Authenticator mobile app to provide time-sensitive, one-time codes. It offers the same high level of protection against password theft and phishing attacks, and is an ideal choice for organizations that are standardized on the Microsoft Azure and Office 365 ecosystem.
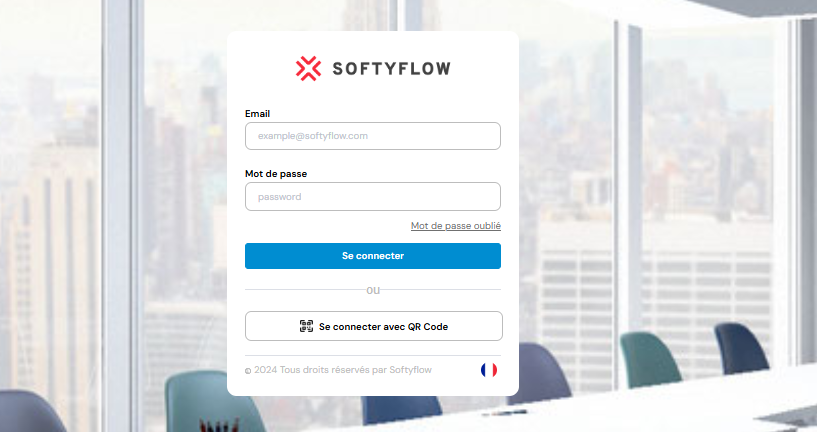
1.3. QR Code Authentication
This method allows users to scan a unique, dynamically generated QR code with a compatible authentication application on their mobile device to complete the login process. This approach is often favored for its convenience and speed, providing a seamless and password-less access flow. It is particularly effective for linking new devices to an account or for use in mobile applications built on the Softyflow platform.
1.4. SSO with SAML 2.0
Softyflow provides robust support for SAML 2.0-based Single Sign-On (SSO), enabling users to authenticate seamlessly using your organization's existing Identity Provider (IdP), such as Azure AD, Okta, or ADFS. This is an essential feature for enterprise environments, as it centralizes credential management and provides a frictionless login experience. The SAML integration works in harmony with Softyflow's user management and automatically provisions role assignments based on the attributes passed by the IdP.

1.4.1. Key Benefits of SAML SSO Integration
- Centralized User Management: User authentication is handled by your central IdP, reducing administrative overhead.
- Enhanced Security: Leverages the security policies of your IdP, such as MFA, conditional access, and password policies.
- Improved User Experience: Users can log in to Softyflow with their existing corporate credentials without needing to remember another password.
- Automated Provisioning: New users can be automatically created in Softyflow upon their first SSO login, with roles assigned based on IdP group memberships.
1.4.2. Configuration Steps and Example
Configuring SAML 2.0 involves a two-way trust setup between Softyflow (the Service Provider or SP) and your Identity Provider (IdP).
Step 1: In Your Identity Provider (e.g., Azure AD, Okta)
- Create a new SAML application for Softyflow.
- You will need to provide your Softyflow instance's Assertion Consumer Service (ACS) URL. This URL is where the IdP will send the SAML assertion after a user authenticates. You can typically find this in your Softyflow SAML configuration page, and it usually looks like this:
https://<your-softyflow-domain>/api/v1/sso/saml/acs - You will also need the Entity ID for your Softyflow instance. This is a unique identifier. It often defaults to the same ACS URL or another unique URI like
https://<your-softyflow-domain>/api/v1/sso/saml/metadata - Configure the IdP to send the necessary user attributes in the SAML assertion, such as
email,firstName,lastName, andgroups. - Once saved, the IdP will provide you with the following critical information that you will need for the next step in Softyflow:
- Identity Provider Entry / Sign-On URL: The IdP's login endpoint.
- Issuer / Entity ID: The IdP's unique identifier.
- X.509 Certificate: The public certificate used to verify the signature of the SAML assertions.
Step 2: In Softyflow
Navigate to Account > Settings > Auth and enable the SSO toggle. Then, fill in the configuration form using the information you obtained from your IdP.
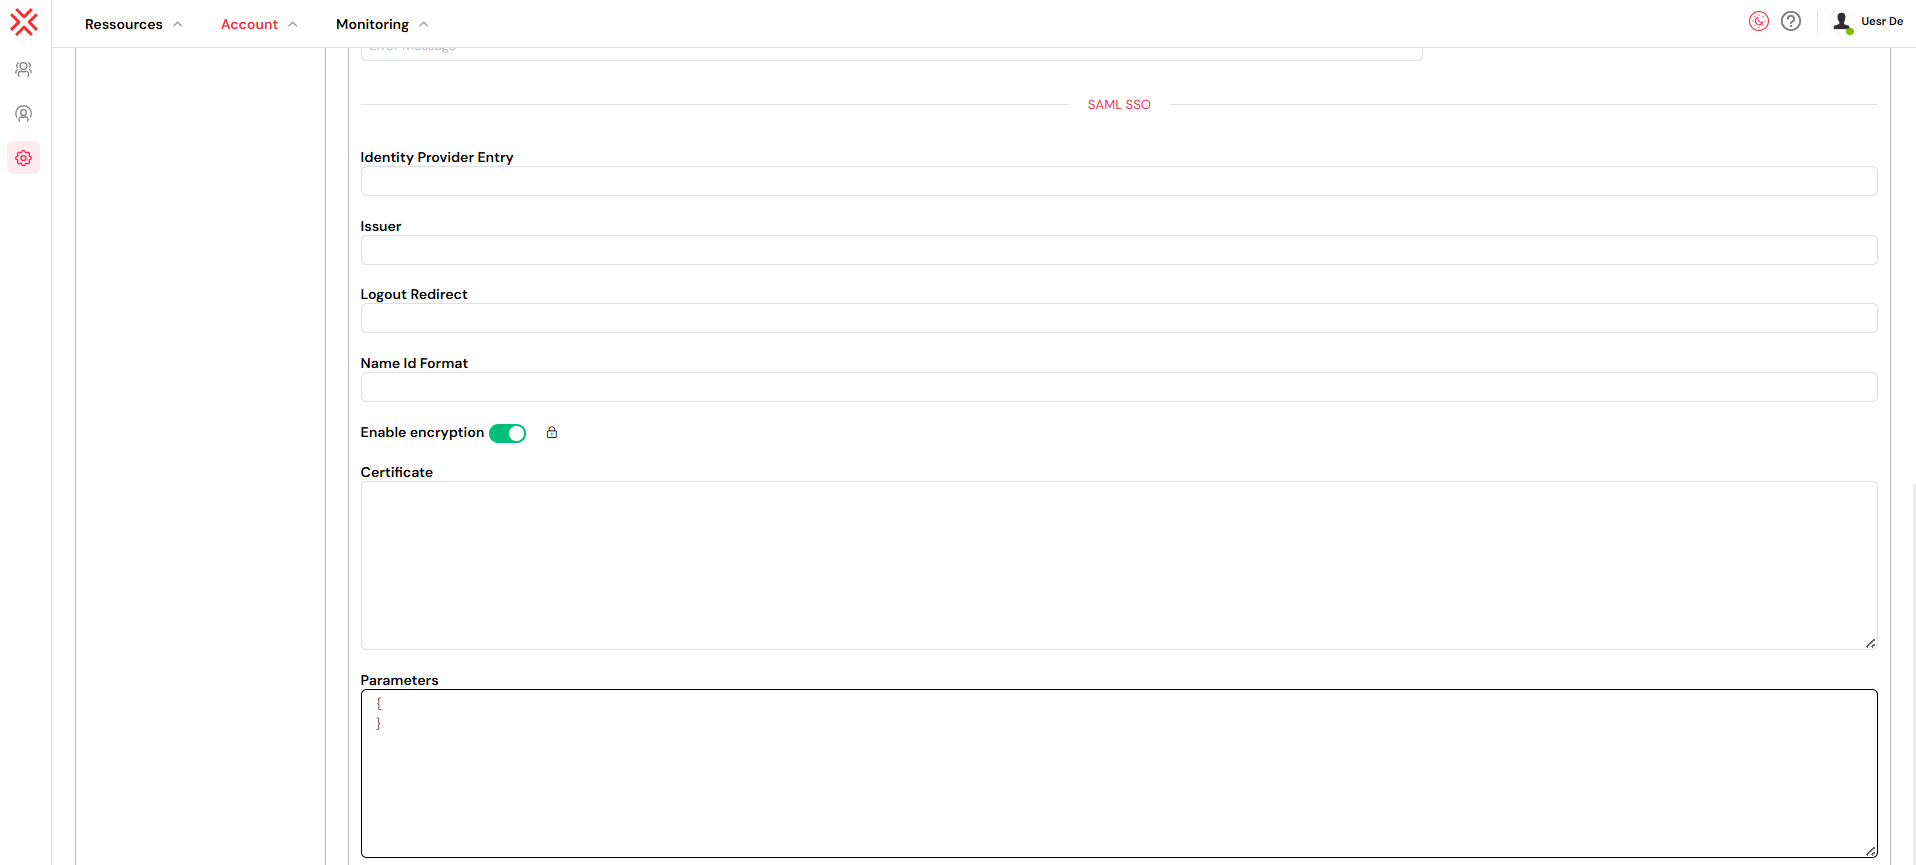
Here is an example of how to fill the fields:
- Identity Provider Entry: Paste the Sign-On URL from your IdP.
- Example:
https://your-idp.com/app/your-app-id/sso/saml
- Example:
- Issuer: Paste the Issuer/Entity ID from your IdP.
- Example:
http://www.your-idp.com/exk123abc456
- Example:
- Logout Redirect: The URL where users are sent after logging out. This is often the main login page of the IdP or your company portal.
- Example:
https://your-idp.com/logout
- Example:
- NameID Format: This specifies the format of the user identifier.
urn:oasis:names:tc:SAML:1.1:nameid-format:emailAddressis a common and recommended choice if you are using email as the primary user identifier. - Enable Encryption: Check this box if your IdP is configured to send encrypted assertions. You will need to provide your service provider (Softyflow) public certificate to the IdP for this to work.
- Certificate: Paste the full content of the X.509 Certificate provided by your IdP. It should start with
-----BEGIN CERTIFICATE-----and end with-----END CERTIFICATE-----. - Parameters: This section is for advanced configurations. For example, you can map SAML assertion attributes to Softyflow user properties. This is crucial for Just-In-Time (JIT) provisioning and role mapping.
RelayState: Often left empty unless your IdP requires a specific value.AuthnContext: Can be used to request a specific authentication strength from the IdP, e.g.,urn:oasis:names:tc:SAML:2.0:ac:classes:PasswordProtectedTransport.
After saving the configuration, users will be redirected to your IdP's login page when they attempt to access Softyflow. Upon successful authentication, they will be redirected back to Softyflow and automatically logged in.
1.5. OpenID Connect (OIDC)
In addition to SAML, Softyflow also supports OpenID Connect (OIDC), a modern authentication protocol built on top of OAuth 2.0. OIDC uses JSON Web Tokens (JWT) to carry identity information and is the preferred method for integrating with modern Identity Providers like Google, Azure AD, Okta, and Auth0. This method is highly versatile and can be used to secure everything from user logins to API integrations and custom authentication workflows.
2. Advanced Password Management Policies
Softyflow allows you to enforce strong and customizable password policies to ensure a high standard of access control across the platform.
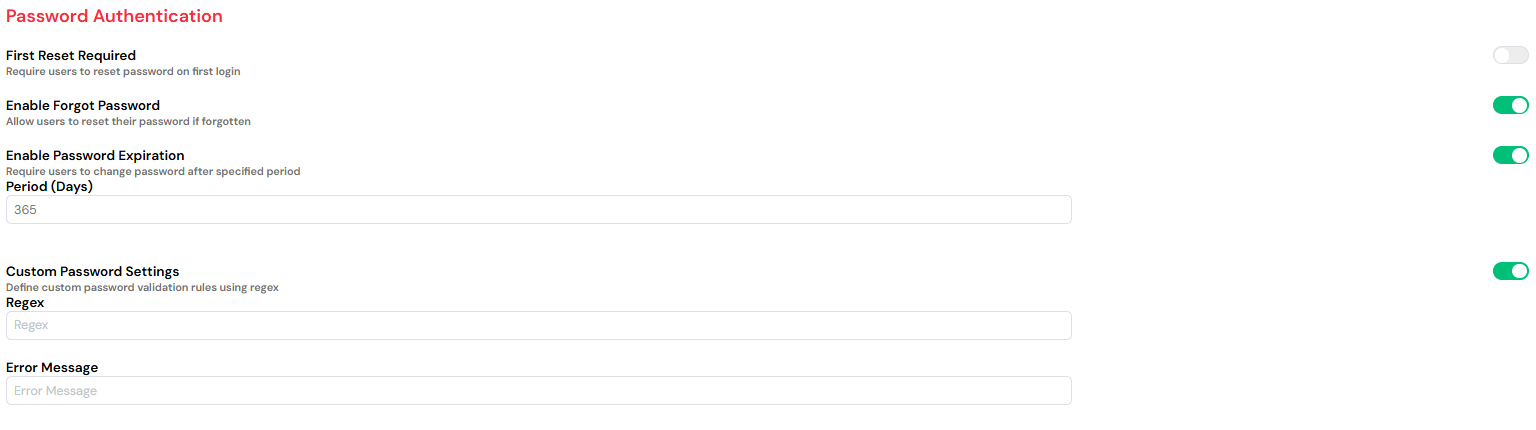
2.1. Force Reset on First Login
This security feature compels users to reset their password immediately upon their first login. It is a crucial step for enhancing account protection after an administrator has performed the initial user creation and set a temporary password.
2.2. Enable "Forgot Password" Feature
Activating this feature provides users with a self-service option to reset their password if they forget it. When a user clicks the "Forgot Password" link on the login page, the system will send a secure, one-time reset link to their registered email address, using the configured mail providers.
2.3. Enforce Password Expiration
This policy requires users to update their password periodically, reducing the risk associated with compromised credentials. You can specify the exact number of days before a password expires and a new one must be created. This is particularly important for users with elevated privileges, such as those with IDE access.
2.4. Custom Password Complexity Rules
You can use regular expressions (regex) to define and enforce specific password complexity requirements, such as minimum length, and the mandatory inclusion of uppercase letters, numbers, or special symbols.
- Example Regex: `^(?=.[A-Z])(?=.\d)[A-Za-z\d]{8,}
- Accompanying Message: "Password must be at least 8 characters long and must include at least one uppercase letter and one number."
By intelligently combining these authentication methods, SSO protocols, and password policies, you can create a multi-layered security framework that protects your platform while adapting to your internal IT practices. These settings work in concert with role management to guarantee that users have the appropriate level of access to web interfaces, process workflows, and monitoring tools.
3. Integrating Authentication into Your Development Workflow
3.1. Key Development Considerations
When designing and building applications on the Softyflow platform, it is crucial to keep authentication and authorization requirements at the forefront:
- Web Interface Design: Design dynamic user interfaces that adapt based on the authenticated user's context, roles, and permissions.
- Process Design: Architect your business workflows to rigorously respect authentication and authorization boundaries, ensuring tasks can only be executed by the appropriate users.
- Database Integration: Implement granular data access controls that are directly tied to the authenticated user's identity and role.
- Integration: Securely use authentication tokens (like OAuth tokens or API keys) for making calls to external APIs and systems.
3.2. Monitoring and Auditing Authentication Activities
Maintain a clear view of authentication activities across your platform to ensure security and compliance:
- System Logs: Actively monitor login attempts (both successful and failed), password reset events, and other security-related occurrences.
- User Management: Regularly review user login history and access patterns to identify anomalies or inactive accounts.
- Run & Instance Management: Track which authenticated users are initiating and executing critical business processes.
3.3. Essential Security Best Practices
Implement a comprehensive, multi-layered security strategy by following these recommended practices:
- Enforce Multi-Factor Authentication (MFA): Mandate the use of 2FA for all users, especially those with administrative privileges or access to sensitive data.
- Leverage Role-Based Access Control (RBAC): Combine your robust authentication policies with granular role management to enforce the principle of least privilege.
- Conduct Regular Security Audits: Utilize the system logs to proactively monitor authentication patterns and investigate any suspicious activity.
- Maintain Environment Separation: Configure distinct and stricter authentication requirements for your production environment compared to your test and development environments.
Next Steps
With your authentication and security policies configured, continue to fortify and enhance your platform with these related topics:
Next Steps in Security Administration:
- User Management: Proceed to create and manage user accounts that will be subject to your new authentication rules.
- Role Management: Define the precise access levels and permissions that will be granted to users after they successfully authenticate.
- Settings: Continue to explore other global platform settings and security policies.
- Mail Management: Ensure your email providers are correctly set up for handling password resets and security notifications.
- System Logs: Master the art of monitoring authentication events and other critical security logs.
- Home Redirection: Create personalized, role-based landing pages to greet your users after they log in.
Next Steps in Secure Development:
- Project Setup: Begin the process of building secure, enterprise-grade applications from the ground up.
- Web Interface Design: Learn to design sophisticated user interfaces that are fully aware of and responsive to the user's authentication context.
- Process Design: Create secure and resilient business workflows that incorporate proper authorization checks at every step.
- Integration: Implement secure API integrations and custom authentication flows to connect Softyflow with your wider IT ecosystem.