Schedule Management
The Schedule Management system is a core automation feature within Softyflow, enabling you to execute processes and tasks at predefined times or recurring intervals. This powerful tool is essential for automating repetitive workflows, such as generating daily reports, performing nightly data synchronization, or triggering real-time processes. This guide offers a comprehensive walkthrough of creating, managing, and monitoring schedules to ensure your operations run seamlessly and efficiently.
With support for multiple scheduling patterns, integration across all environment modes (Test, UAT, and Production), and built-in error handling with automated notifications, the scheduling system provides the reliability and flexibility required for modern business process automation.
1. Key Features at a Glance
- Flexible Scheduling: Define schedules with specific start dates, recurring intervals (e.g., every 30 minutes), or highly specific timings using Cron expressions.
- Multi-Environment Support: Safely develop and test your schedules by deploying them independently across TEST, UAT, and PROD environments.
- Centralized Management: Utilize the Softyflow IDE for a unified interface to create, monitor, and manage all scheduled tasks across your projects.
- Proactive Error Handling: Receive automatic email notifications for any failed process execution, allowing you to identify and resolve issues immediately.
- Comprehensive Audit Trail: Every scheduled execution is logged, providing detailed records for performance monitoring, debugging, and compliance purposes.
2. Creating a New Scheduled Task
This section provides a step-by-step guide to configuring a new scheduled task directly from the Softyflow IDE.
2.1. Accessing the Scheduling Interface
To begin, navigate to the central scheduling dashboard in the Softyflow IDE:
- From the main menu, click on Ressources.
- Select Scheduling Tasks from the dropdown menu.
This dashboard provides a complete overview of all existing schedules and is the starting point for creating new ones.
2.2. Initiating the Creation Process
On the scheduling dashboard, click the "Create Scheduling Tasks" button located in the top-right corner. This will open the configuration dialog for your new schedule.
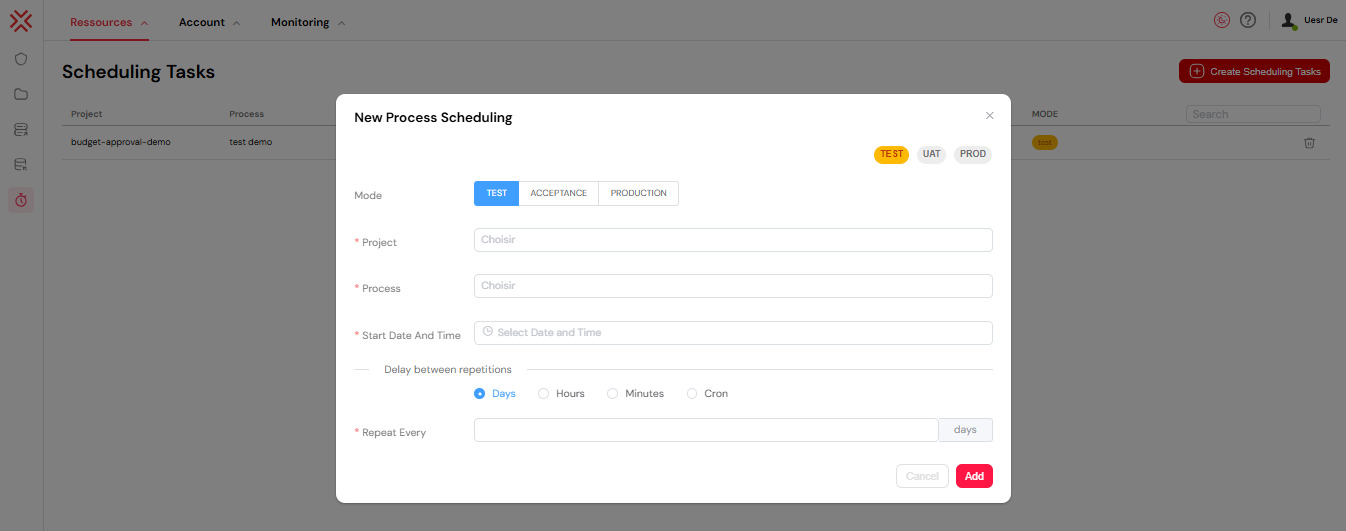
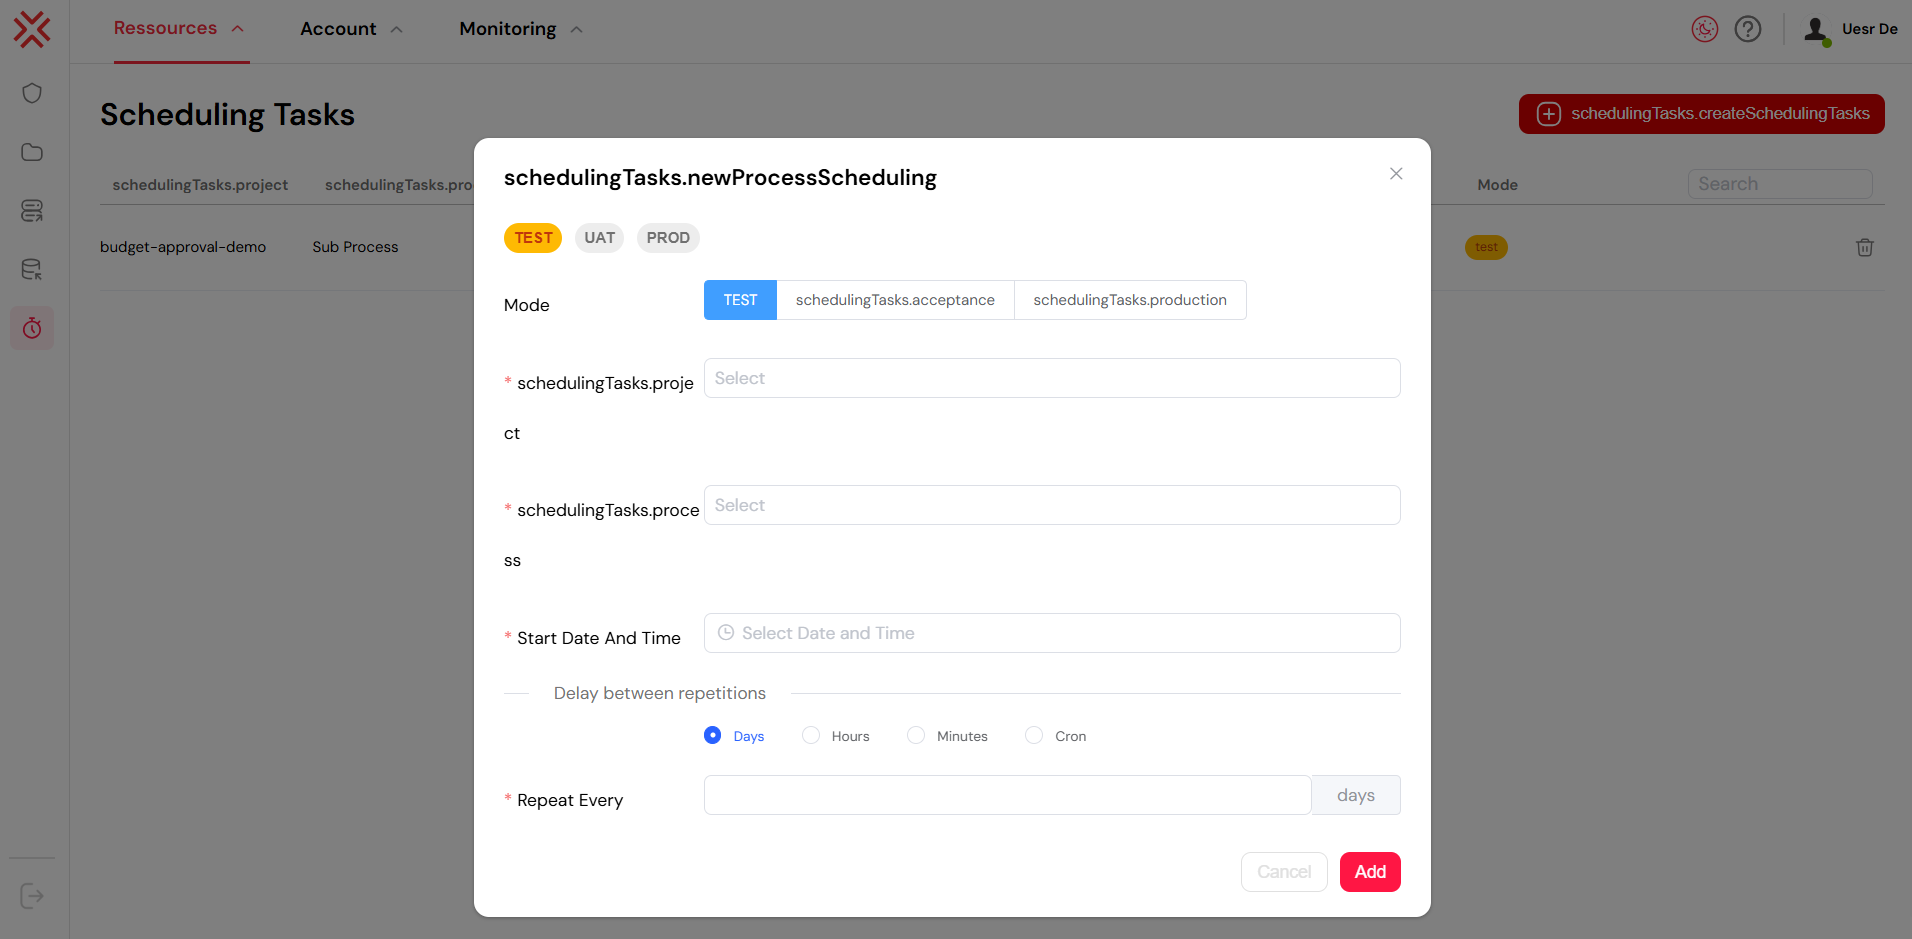
2.3. Configuring the Schedule
The creation dialog is organized into logical sections to simplify configuration.
2.3.1. Environment and Process Selection
This is the most critical step, as it determines what process will run and in which environment.
- Environment Mode: Choose the target environment for the schedule. Each environment is isolated, allowing for safe development and testing.
- TEST: For development, debugging, and initial validation.
- UAT: For User Acceptance Testing, simulating production conditions.
- PROD: For live execution of business-critical processes.
- Project and Process:
- First, select the Project containing the desired process.
- Next, choose the Process to be executed. The list is automatically filtered to show only the processes available within the selected project.
2.3.2. Setting the Start Time
- Start Date and Time: Use the calendar and time picker to define the exact moment the schedule should become active. The time is configured with minute-level precision.
3. Advanced Scheduling Options
After setting the basic parameters, you must define the execution frequency using one of the available patterns.
3.1. Interval-Based Scheduling
This option is perfect for tasks that need to run at regular, fixed intervals.
- How It Works: Select a unit of time (Days, Hours, or Minutes) and specify a numerical value for the delay. The first execution will occur after the specified interval has passed from the Start Date and Time.
- Example: To run a process every 2 hours, select "Hours" and enter
2in the delay field. The process will execute two hours after the specified start time and repeat every two hours thereafter.
3.2. Cron Expression Scheduling
For more complex and fine-grained scheduling needs, Softyflow supports standard Cron expressions. This provides maximum control over the execution schedule.
3.2.1. Understanding Cron Syntax
A Cron expression is a string composed of 7 fields, each representing a specific time unit. Softyflow uses the following format:
Seconds (0-59) | Minutes (0-59) | Hours (0-23) | Day of Month (1-31) | Month (1-12) | Day of Week (0-7) | Year (1970-2099)
Note: For Day of Week, both 0 and 7 represent Sunday.
3.2.2. Common Cron Examples
- Every weekday at 9:00 AM:
0 0 9 * * MON-FRI * - Every day at 2:30 PM:
0 30 14 * * * * - The first day of every month at midnight:
0 0 0 1 * * * - Every 15 minutes:
0 */15 * * * * *
3.2.3. Real-Time Validation
To prevent errors, the system includes a built-in Cron expression validator:
- A green checkmark appears if the expression syntax is valid.
- A red X indicates a syntax error. Click the validation button to see a detailed error message that will help you correct the expression.
Tip: For creating and validating complex Cron expressions, you can use external tools like Crontab Guru.
4. Monitoring and Managing Schedules
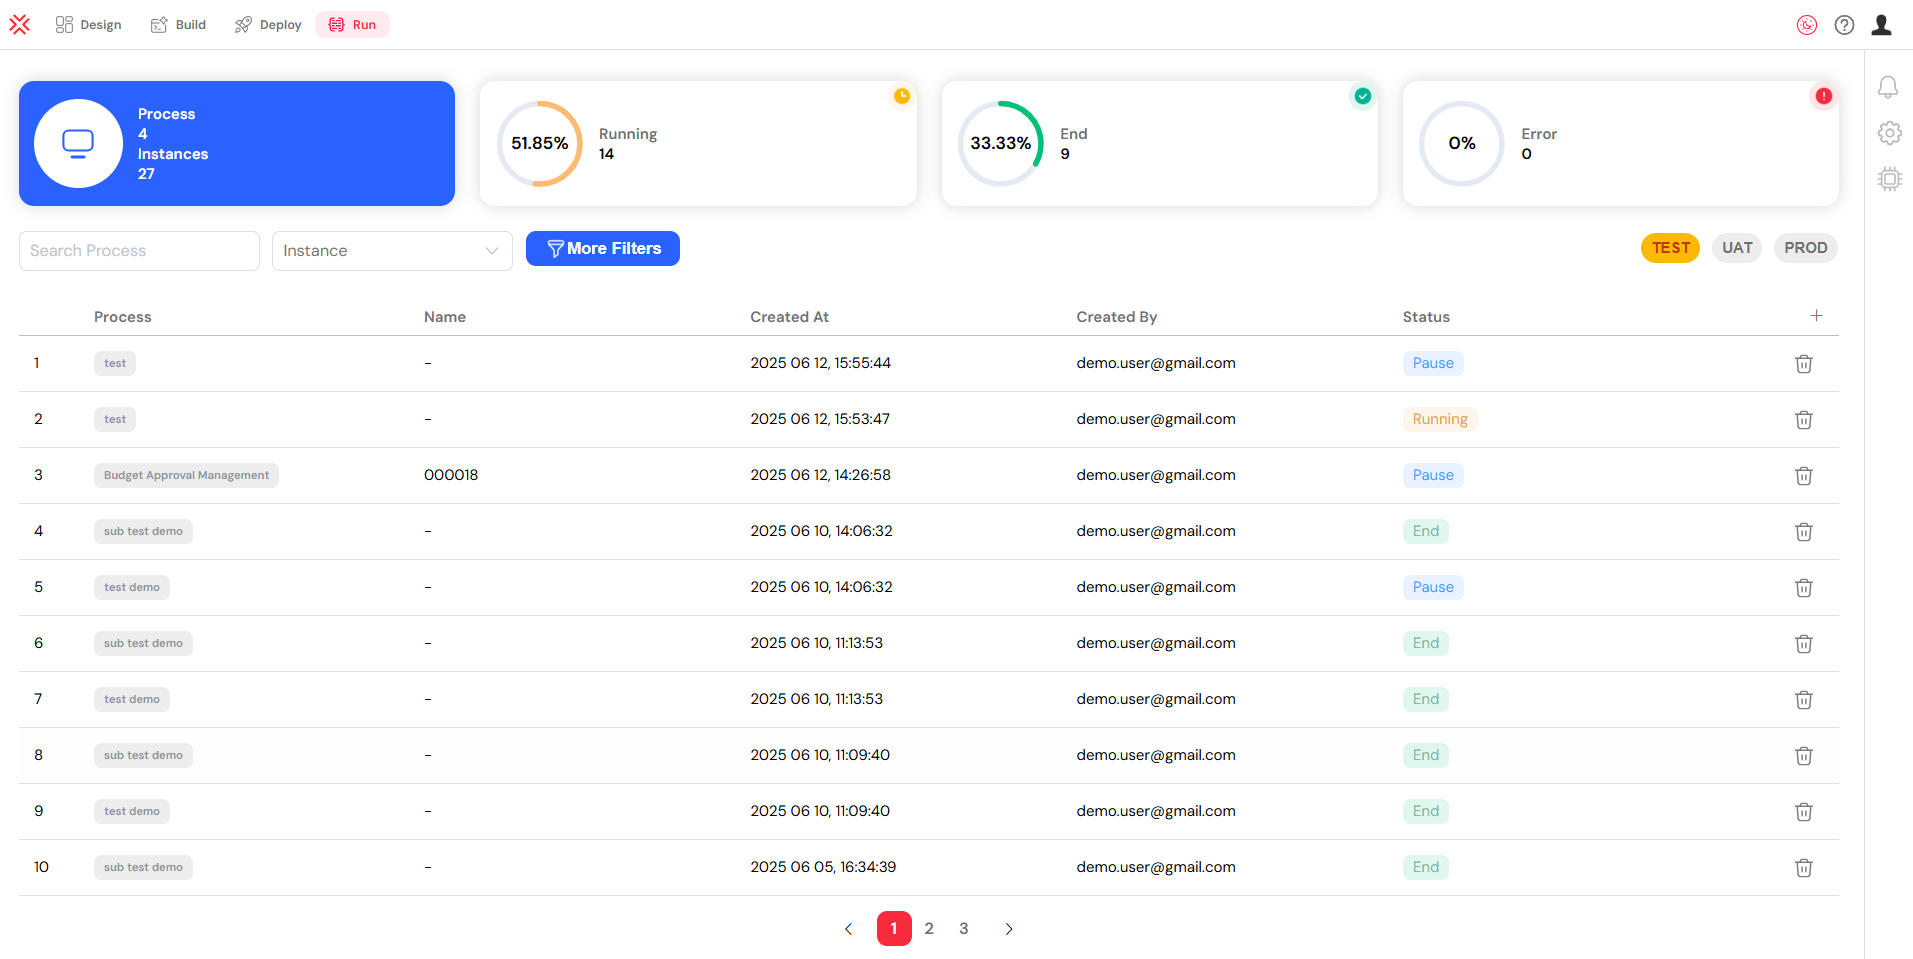
The scheduling dashboard provides a centralized location for monitoring the status and lifecycle of your tasks.
- Viewing Schedules: The dashboard lists all configured schedules, displaying key information such as the associated project, the next scheduled run time, the target environment, and the current status.
- Editing a Schedule: Click the edit icon to modify an existing schedule. You can change its frequency, update the target process, or adjust its start time.
- Pausing and Resuming: You can temporarily disable a schedule without deleting it by using the "Pause" function. A paused schedule can be reactivated at any time by resuming it.
- Deleting a Schedule: Permanently remove a schedule that is no longer required. This action cannot be undone.
5. Error Handling and Notifications

Softyflow provides robust mechanisms to automatically detect and report execution failures, ensuring that you can respond to issues proactively.
5.1. Automatic Error Detection
The system continuously monitors scheduled jobs and flags several types of issues:
- Failed Process Instances: Occurs when a process starts as scheduled but terminates unexpectedly due to an error.
- Execution Timeouts: Triggered if a process runs longer than its configured maximum execution time.
- System-Level Errors: Failures originating from the scheduling service itself.
5.2. Email Notifications for Failures
To ensure prompt attention to failures, the system can send automatic email notifications to a predefined list of recipients.
Configuration Requirements:
- Mail Provider: An email service provider (e.g., SMTP) must be correctly configured in the system settings. For more details, see the Mail Configuration Guide.
- Project Recipients: You must define a list of email addresses in the project's settings to receive these notifications.
Notification Content: The email provides a clear and actionable summary of the failure, including:
- The project and process that failed.
- A list of all failed instance IDs.
- The exact timestamp of the failure.
- A direct link to each failed instance in the Softyflow interface, allowing for immediate investigation.
5.3. How to Resolve Errors
- Analyze the Notification: Read the failure notification email carefully to understand the context and scope of the error.
- Inspect the Failed Instance: Use the link in the email to navigate directly to the failed instance. Review the execution logs and process variables to diagnose the root cause.
- Fix the Underlying Issue: Correct the problem. This may involve modifying the process design, fixing an issue in an integrated system, or correcting the input data.
- Rerun or Reschedule: Once the fix is deployed, you can either manually rerun the failed instance or wait for the next scheduled execution.
6. Best Practices for Scheduling
Adhering to these best practices will help you create schedules that are reliable, efficient, and easy to manage.
6.1. General Guidelines
- Test in Lower Environments: Always create and thoroughly test schedules in the TEST environment before promoting them to UAT or PROD.
- Avoid Over-Scheduling: Be mindful of system resources. High-frequency schedules (e.g., every minute or less) on heavy processes can degrade overall system performance.
- Stagger Heavy Loads: If you have multiple resource-intensive processes, schedule them at different, non-overlapping times to avoid resource contention.
- Set Realistic Timeouts: Configure appropriate timeout limits for your processes to prevent them from running indefinitely and consuming resources.
6.2. Cron Expression Tips
- Use External Validators: For complex expressions, use an online Cron generator or validator like Crontab Guru to ensure the syntax and timing are correct before saving.
- Consider Time Zones: All schedules run based on the server's time zone. Ensure your Cron expressions are written accordingly.
- Document Your Expressions: Add comments or notes in your project's internal documentation to explain the purpose of complex Cron expressions, especially for maintenance purposes.
6.3. Environment Management
- Maintain Environment Isolation: Never point a TEST schedule to a PROD system or vice-versa. Use distinct schedules for TEST, UAT, and PROD.
- Promote with a Checklist: Before enabling a schedule in production, double-check its configuration against a deployment checklist to ensure everything is correct.
- Monitor Post-Deployment: After deploying a new schedule to production, closely monitor system performance (CPU, memory, database load) to ensure it doesn't introduce bottlenecks.
7. Troubleshooting Common Issues
This section addresses common problems you may encounter with the scheduling system and provides guidance on how to resolve them.
7.1. Schedule Does Not Execute
- Check Start Date and Time: Ensure the schedule's start date/time is not set to a future point or incorrectly in the past. If the start date is in the past, the scheduler might not trigger it as expected depending on the pattern.
- Validate the Process: Confirm that the scheduled process has been deployed to the target environment and has not been deleted or disabled.
- Confirm Agenda Service is Running: Verify with your system administrator that the underlying Softyflow Agenda service is active and running without errors.
7.2. Cron Expression Is Not Working as Expected
- Verify All 7 Fields: Remember that Cron expressions in Softyflow require all seven fields (including
SecondsandYear). Many online tools only use five. - Check Special Characters: Double-check that special characters like
*,/,-, and?are used correctly according to standard Cron syntax. - Use the Built-in Validator: The real-time validator in the UI is your most reliable tool for catching syntax errors before you save.
7.3. Email Notifications Are Not Being Sent
- Check Mail Configuration: Go to the administration settings and confirm that the mail provider settings are correct, and test the connection if possible.
- Verify Recipient List: Check the project settings to ensure that the recipient email addresses are correctly entered and that there are no typos.
- Review Spam/Junk Folders: Ask the intended recipients to check their spam or junk email folders, as automated notifications can sometimes be flagged.
7.4. System Performance Degradation After Enabling a Schedule
- Review Schedule Frequency and Process Complexity: A very frequent schedule running a complex, long-running process is a common cause of performance issues.
- Analyze Database Load: The scheduling service uses the database for coordination. High database load can slow down the scheduler. Investigate for slow queries or resource contention.
- Identify Overlapping Jobs: Check if multiple long-running jobs are scheduled to start at the same time, which can lead to resource competition.
If you continue to experience issues, consult the detailed system logs or contact your system administrator for further assistance.