Settings
The Settings section allows you to configure essential aspects of your workspace—from branding and security to user authentication and metadata. This is where you define how your organization experiences and interacts with the platform.
These settings work closely with user management, role management, and authentication systems to provide a cohesive platform experience.
To access the settings, go to Account > Settings from the top navigation bar.
1. Overview
In the Overview tab, you can manage the appearance and branding of your workspace, including the homepage users see when they log in.
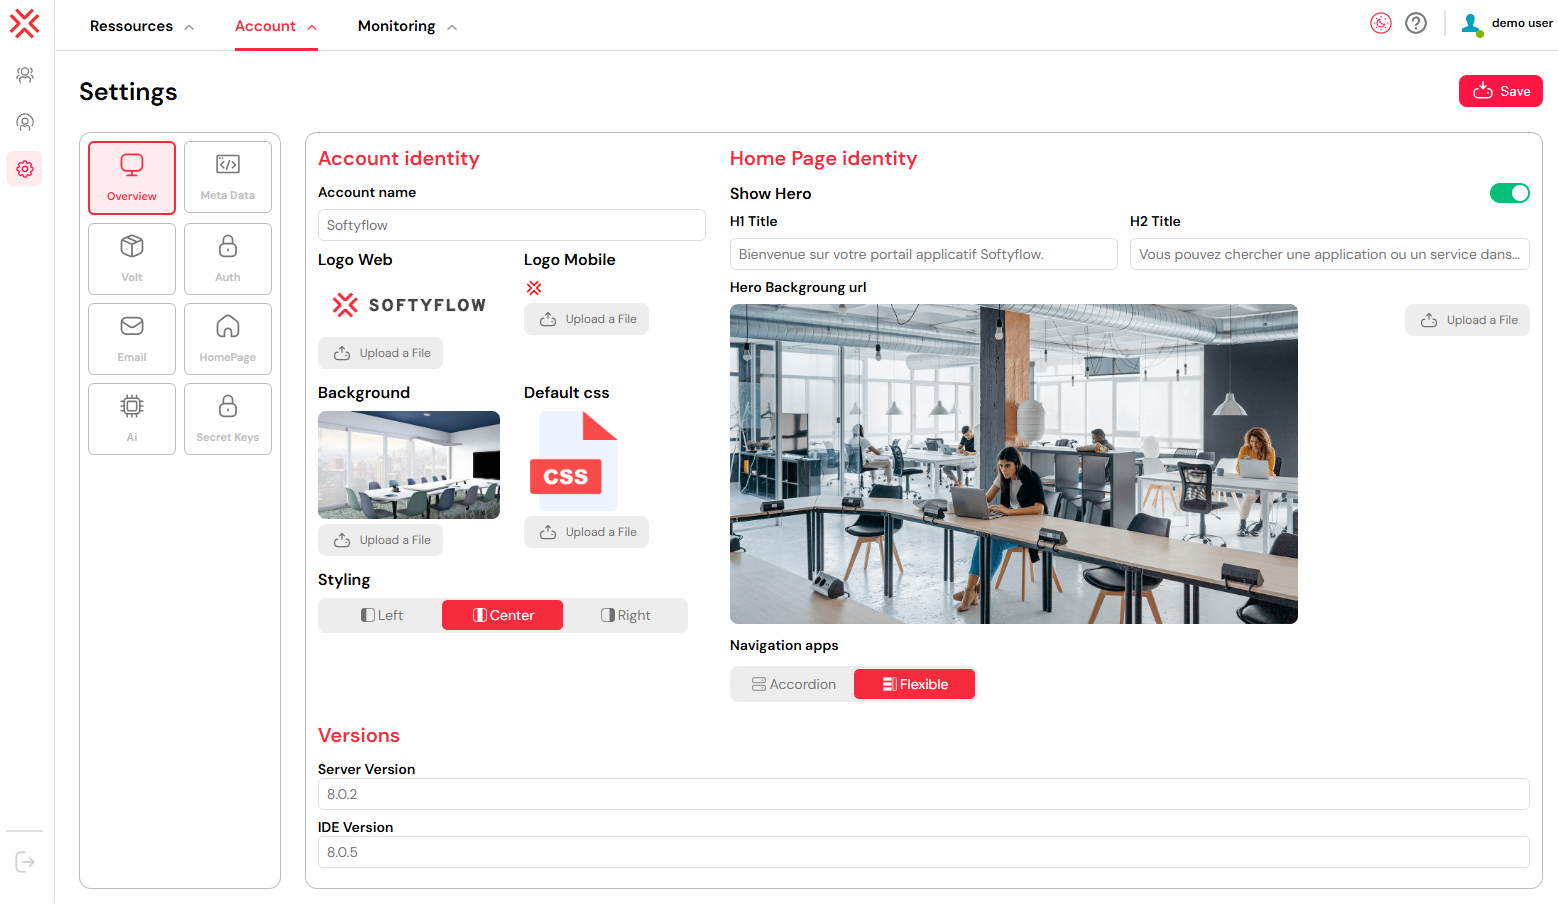
1.1. Account Identity
- Account Name: Set your organization's name.
- Logo Web / Logo Mobile: Upload custom logos for desktop and mobile views that appear in web interfaces.
- Background: Upload a custom image for the login screen background (works with authentication settings).
- Default CSS: Apply a global CSS file to define the design of all interfaces and web applications.
1.2. Home Page Identity
- Show Hero: Toggle the visibility of the homepage banner section.
- H1 Title / H2 Title: Customize the main headings displayed on the homepage.
- Hero Background URL: Set the background image shown in the homepage banner.
- Styling: Align homepage content to the left, center, or right.
These settings ensure consistency and alignment with your internal brand guidelines across all user interfaces and can be combined with home page redirection for personalized user experiences.
1.3. Versions
- Server Version: Indicates the backend version in use.
- IDE Version: Displays the version of the interface development environment (IDE) used for project development.
2. Metadata
The Metadata tab allows you to enrich user profiles with custom attributes such as department, region, or seniority level. These fields can control visibility, drive workflow logic, or personalize user interfaces.
You can create, update, or delete metadata fields under Settings -> Meta Data.
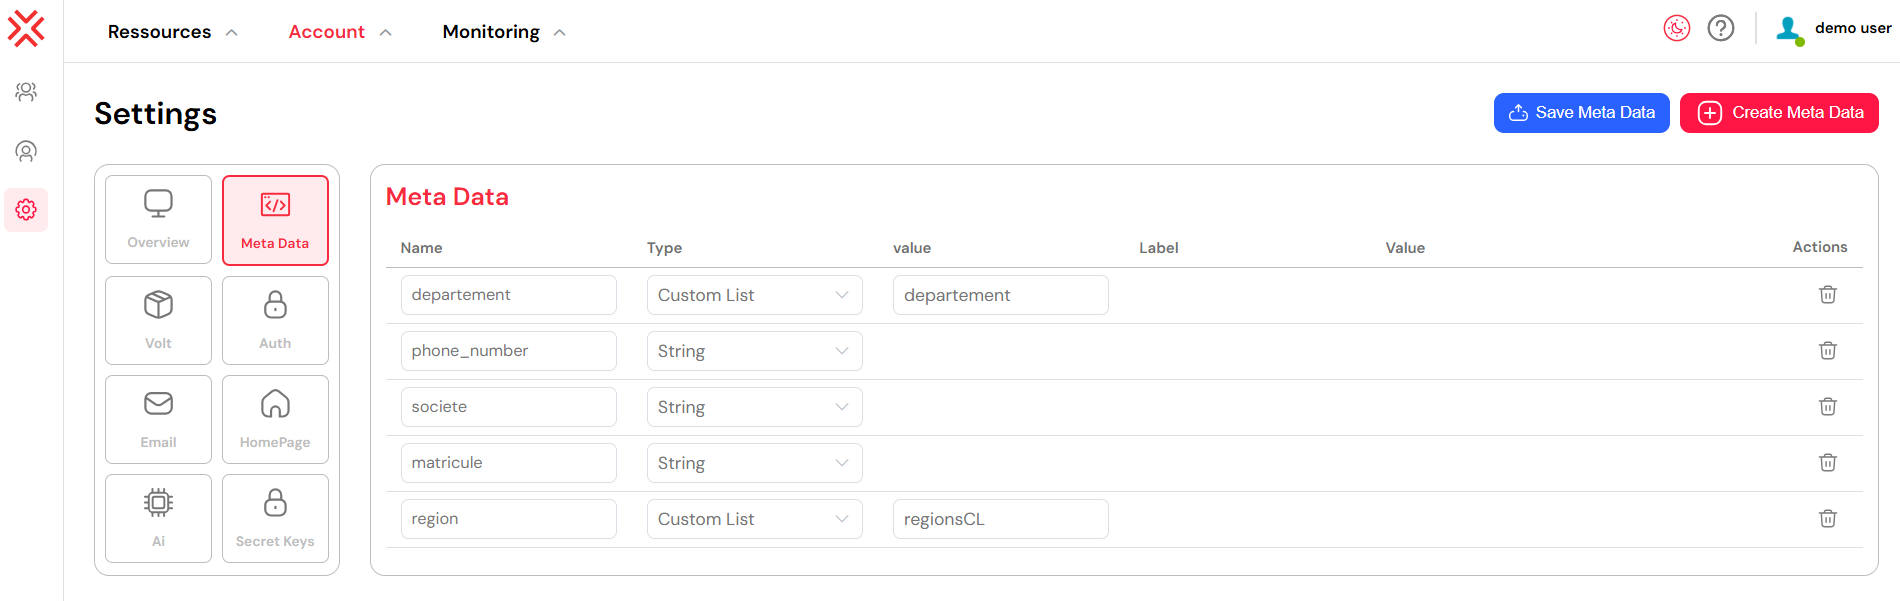
2.1. Creating Metadata
To create a new metadata field:
- Go to
Account -> Settings, then open theMeta Datatab. - Click the
Create Meta Dataat the top right. - Fill in the required details:
- Name: The internal name of the metadata field.
- Type: Choose from:
- String
- Number
- Boolean
- Custom List (single select)
- Custom List (multi-select)
- Collection (single select)
- Collection (multi-select)
- User Picker
For Custom List, specify the list name.
For Collection, define the collection name, label, and value fields.
Click Save Meta Data to finalize the metadata creation. This metadata can then be used in user management, role assignments, web interface logic, and process workflows.
2.2. Updating Metadata
To modify existing metadata:
- In the Meta Data tab, find the field you wish to update.
- Modify its name, type, or associated values.
- Click
Save Meta Datato apply changes.
2.3. Deleting Metadata
To delete a metadata field:
- In the Meta Data list, locate the item to remove.
- Click the trash icon.
- Confirm the deletion when prompted.
⚠️ Caution: Deleting metadata used in workflows or interface access rules may disrupt platform behavior.
3. Volt
Volt is Softyflow's secure vault for storing sensitive variables and secrets required across your platform.
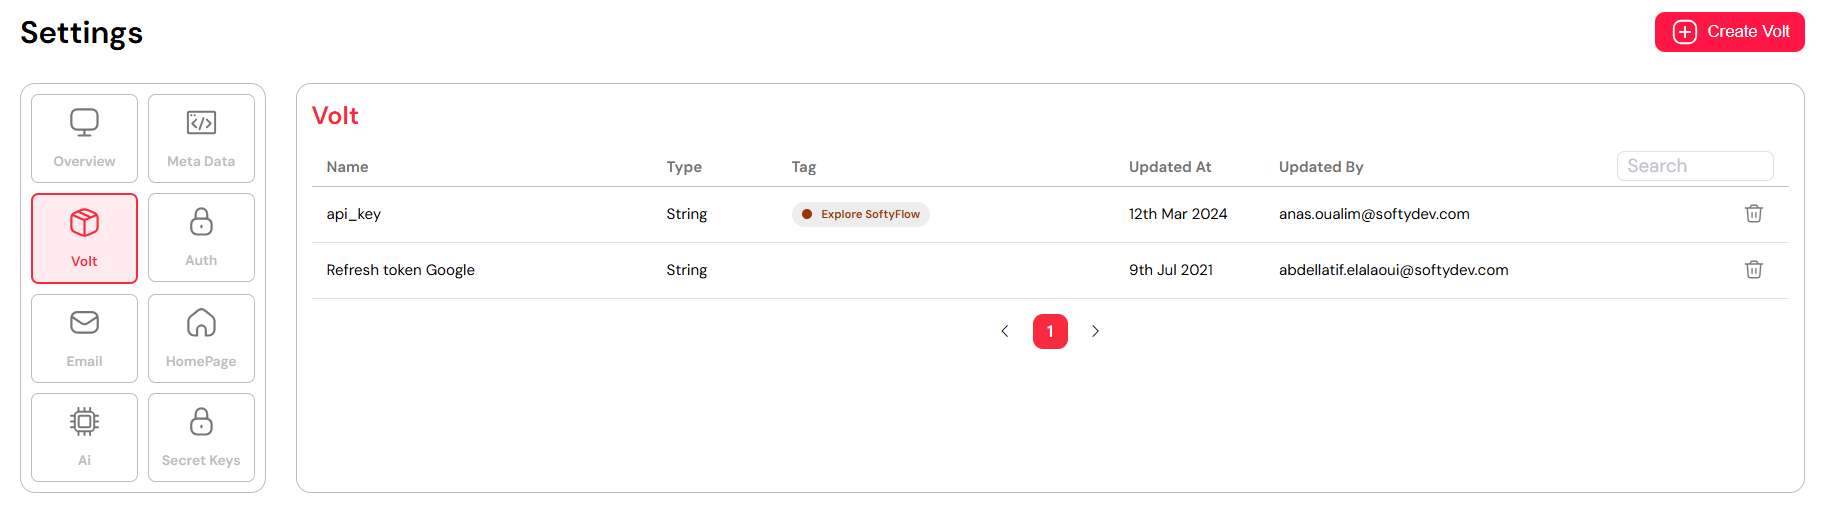
3.1. What you can store
- API keys for external integrations
- Authentication tokens for process workflows
- Database credentials for database connections
- Encryption secrets
- Webhook tokens or client secrets
3.2. Key Features
- Encrypted Storage: All values are encrypted and never exposed in plain text.
- Name-based Access: Secrets are referenced by name only in processes and integrations.
- Supported Use Cases:
- API configurations for external systems
- Workflow steps (e.g., HTTP tokens) in process design
- Custom scripts (JavaScript, SQL, PDF generation)
- External integrations (SMTP, GraphQL, third-party APIs)
- Environment Isolation: Define separate secrets for TEST, UAT, and PROD environments matching your deployment strategy.
- Role-based Access Control: Only authorized users can manage secrets.
- Failover Mechanism: Supports fallback and retry if a secret is missing.
- Auditing: All secret access is logged in system logs for traceability.
Access Path: Account → Settings → Volt
Volt centralizes sensitive value management, ensuring security and consistency across applications.
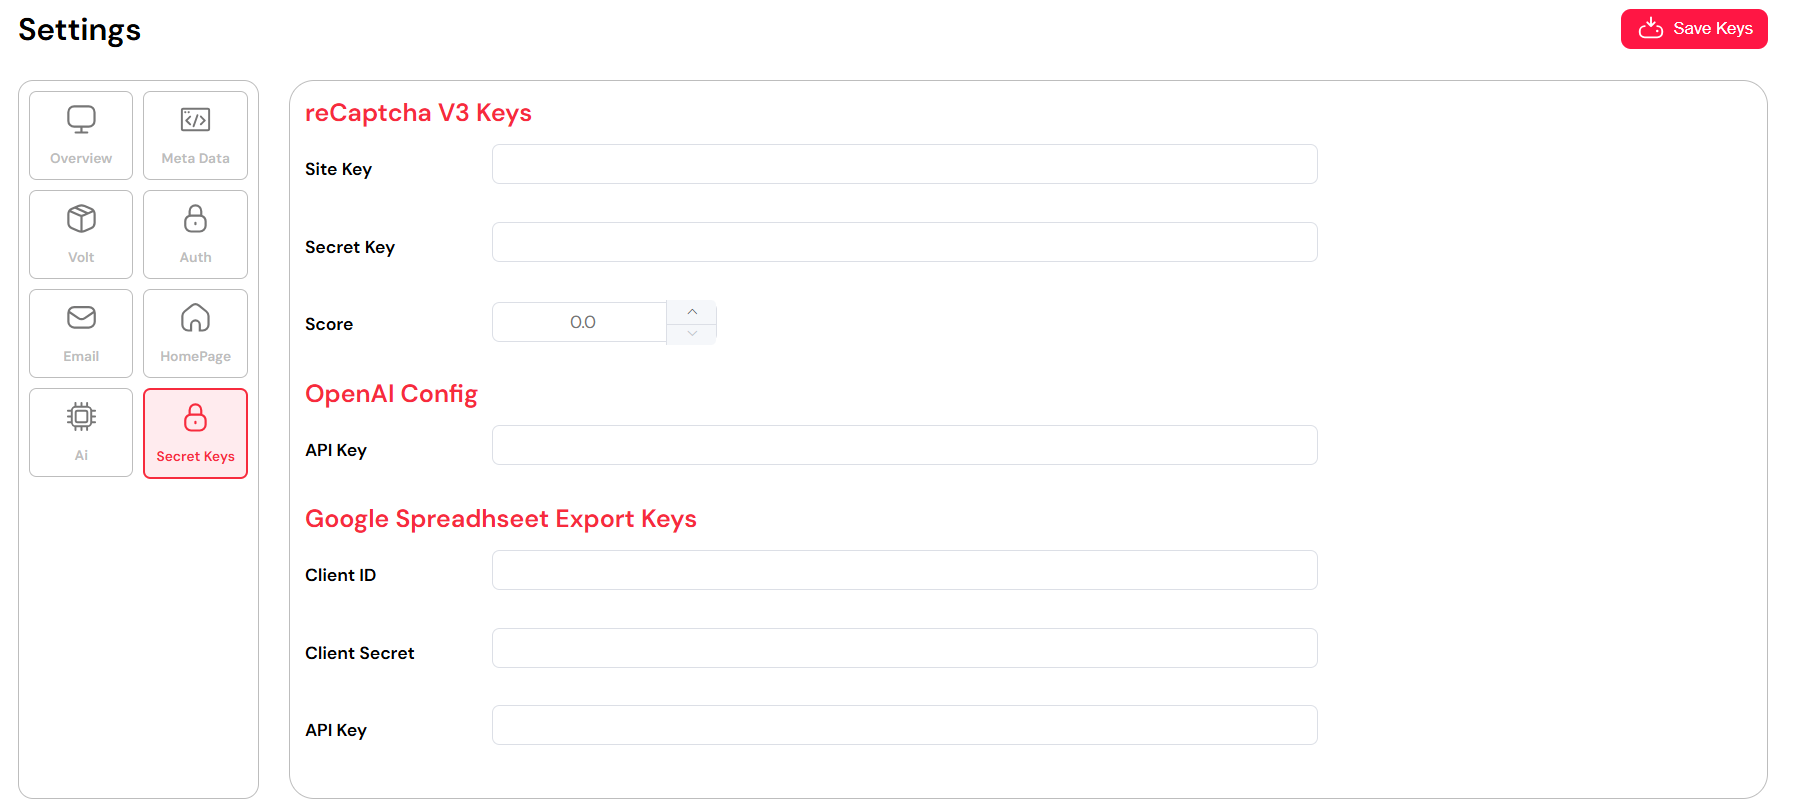
4. Secret Keys
The Secret Keys section stores credentials and API keys required by integrated third-party services or UI components.
These secrets are used in various parts of the platform, such as web interfaces or automation scripts, and are always encrypted.
4.1. Use Cases
- reCAPTCHA V3: Prevents bot submissions in web interface forms.
- Google Spreadsheet: Enables export of form/report data from reporting systems.
- Google Drive Picker: Lets users select files from Google Drive within web forms.
- OpenAI: Connects to AI services like text generation or enrichment for process automation.
4.2. Fields Per Provider
reCAPTCHA V3
- Site Key
- Secret Key
- Score Threshold
OpenAI
- API Key
Google Spreadsheet Export
- Client ID
- Client Secret
- API Key
🔒 Security: These credentials are encrypted. Only admins with proper permissions can access or modify them.
How to configure
- Go to
Account → Settings → Secret Keys - Fill in the fields with credentials provided by the third-party service
- Click Save Keys
Once saved, these credentials can be used securely via platform variables, process scripts, or integration connectors.
5. Settings Integration
5.1. Development Usage
Settings integrate across the development workflow:
- Project Setup: Use platform settings to configure new projects
- Web Interface Design: Apply branding and metadata in user interfaces
- Process Design: Use metadata and secrets in workflow logic
- Database Integration: Use Volt secrets for secure database connections
- Integration: Use API keys and secrets for external system connections
- Reporting: Apply branding and metadata filters in reports
5.2. Administration Integration
Settings work with other administration features:
- User Management: Metadata fields enrich user profiles
- Role Management: Metadata can drive role-based access control
- Authentication: Branding appears in login interfaces
- Mail Management: Secret keys enable email provider integration
- Home Redirection: Use metadata in redirection rules
5.3. Monitoring & Security
Track settings usage and maintain security:
- System Logs: Monitor settings changes and secret access
- Run & Instance Management: See how settings affect running processes
- Environment Management: Configure different settings for test and production environments
6. Next Steps
Continue configuring your platform:
Administration Configuration:
- User Management - Apply metadata to user profiles
- Role Management - Use settings for role-based access
- Authentication - Apply branding to login interfaces
- Mail Management - Use secret keys for email providers
- System Logs - Monitor settings and security events
- Home Redirection - Use metadata in personalized redirections
Development Application:
- Project Setup - Start projects with proper configuration
- Web Interface Design - Apply branding and use metadata
- Process Design - Use secrets and metadata in workflows
- Database Integration - Secure database connections with Volt
- Integration - Use API keys for external system connections
- Test & Deploy - Configure environment-specific settings