Web Modeler
1. Web Modeler Description
Softyflow Web Modeler is a user-friendly application that gives users powerful features for designing their own UIs. It uses an easy-to-use drag-and-drop interface designed for all types of developers, from No-code/ Low-Code developers to professional software engineers. It offers a large configuration, many UIs components, and script editor if you want to go further.
2. Setting of Web Interface
Once you create the web interface, you can configure it via the page settings tab:
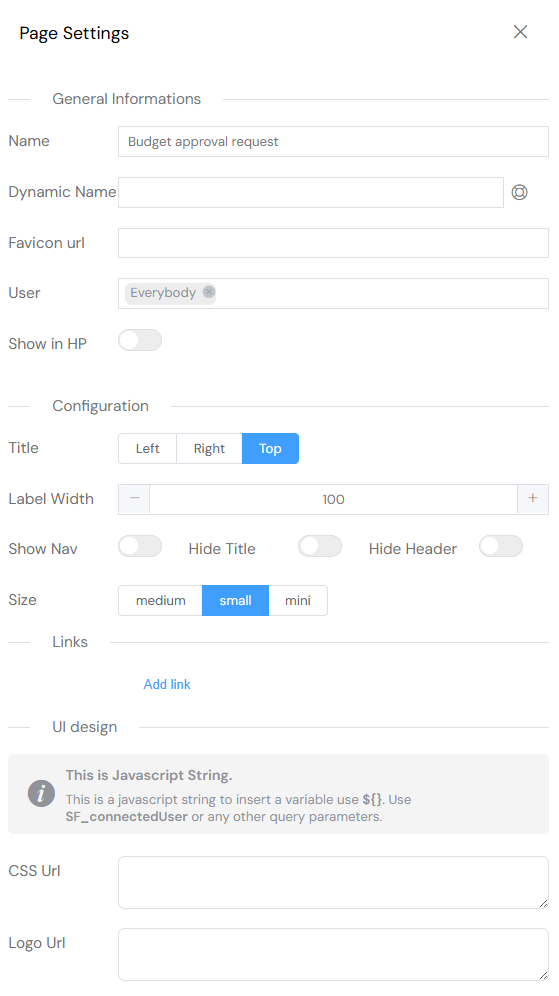
- General Informations
- Name: The name you choose for the page, it will appear in each screen of the web interface.
- Favicon url: You can set your favicon that will be your website icon, tab icon, or bookmark icon. You can choose any image format you want and insert the URL to use the favicon.
- User: The users or Group or users allowed to open and interact with the interface.
- Show in HP: Display or not the interface in the Home Page.
- Configuration:
- Title: Where you want to place the title of each component. You can choose among: Left, Right or Top.
- Label width: Set the width of page elements
- Show side bar: Choose if the side bar will be shown or not. Each element of the sidebar correspond to a section in the page. Only visible sections will appear in the sidebar.
- Size: The size of page's elements. You can choose among: medium small or mini
- Language: Define the language of the page. It is usefull for the predefined texts, to choose among: English, French and Arabic.
- Menu Bar: Choose the navigation bar you want to display in your page.
- Screens: You can attach many screens to the same interface. Gathering interfaces with similar components or behviour into screens, will help you reduce the amount of web interfaces and gain in performance.
- Links:
3. Widgets
The web modeler contains a list of ready to use components with drag and drop functionality to easily create layouts and web pages. Each component is configurable in three levels:
- Global configuration : Configuration shared between all components.
- Custom configuration : Configuration depending proper to each type of component.
- Validation : Component management in each screen.
3.1. Global Configuration
All components have in common a configuration that requires defining a name, a model and an ID.
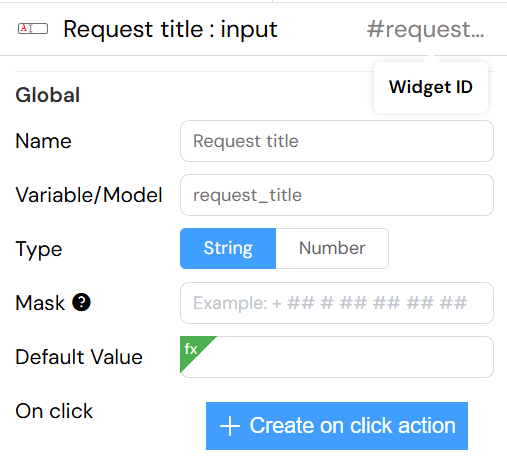
- Name : Name you give to your components. In some cases: PopUp, Divider or Input it will be shown in redering
- Model : Distinctive name that holds the component data model.
- ID : A unique distinctive identifier you give to your componant.
Every component should have a distinct model, unless 2 components are supposed to point on the same data model. ( In most cases it should be unique )
3.2. Components
Softyflow offers many pre-built components that can be divided to four categories: Basic components, Advance Components, Layout Components and chart components.
| Components | Type | Components | Type |
|---|---|---|---|
| Timer | Basic components | Title | Basic components |
| Text | Basic components | Thumbnail | Basic components |
| Divider | Basic components | Card | Advance components |
| HTML | Basic components | Image | Advance components |
| Input | Basic components | File Upload | Advance components |
| Text Area | Basic components | GroupPicker | Advance components |
| Number | Basic components | Table | Advance components |
| Radio Button | Basic components | Steps | Advance components |
| Checkbox | Basic components | UserPicker | Advance components |
| Time | Basic components | Widget History | Advance components |
| Date | Basic components | Grid | Layout |
| Dropdown | Basic components | Section | Layout |
| Autocomplete | Basic components | PopUp | Layout |
| Switch | Basic components | Drawer | Layout |
| Slider | Basic components | Tabs | Layout |
| Button | Basic components | QR code scanner | Layout |
| Rate | Basic components | Basic Charts | Chart Components |
4. Screens
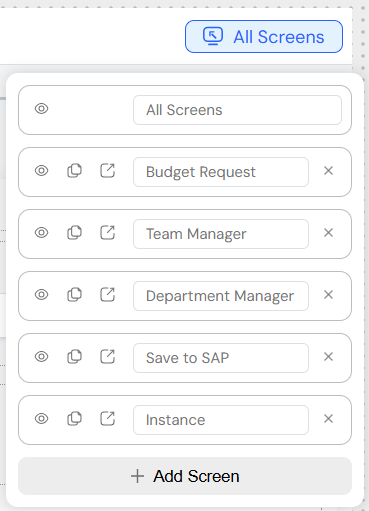
4.1. Create Screens
On the Page Settings you can create as many screens as you want and link them to the same page / Web Interface.
4.2. Manage Screens
Softyflow offers a rule management for each widget that let you set or personalize the rules of widgets for each screen.
- Available: Weither the widget is available or not in the screen.
- Visible: The widget is available, but you can chose if it is shown or not.
- Required: Useful to choose if an input in a form is required or not.
- Disable: You can disable a widget.The user interactions with it are disabled.
5. Managing the Navigation
Navigation's management is about creating a system that empowers users to interact with your application. Softyflow offers a Nav bar tool that will help you direct the navigation to the way it pleases you.
5.1. Nav bar
In UI a NavBar is a section used to aid visitors in accessing pages. In Softyflow, you can create easily a NavBar using the web modeler.

5.2. Arrange navigation
Once the NavBar created You can add elements to it.
Each element is an interface with a specific ID, for redirection when clicked; or a dropdown that contain a list of interfaces.

You can choose among users or group of users, the ones to display to each element of the Navbar.
6. Actions
Softyflow allows you to attach [actions](/docs/ressources/project/web-interface/actions) to your UI components. Those [actions](/docs/ressources/project/web-interface/actions) can be triggered On mounted: when the interface is rendered, in mode Watch: A specific component is watched and if it is touched, clicked or updated the action will be executed, in mode On click: the action is executed when the component (it has to be a button) is clicked or Computed: when the function will 'compute' the return value from existing information.
You can use many actions for a given component.
7. Script
Softyflow is built and based on VueJS 2 - it uses the same lifecycle hooks and it offers you scriptable functions to control that functionality.
Mounted() (DOM Insertion)
Mounted hook is the most used lifecycle hook, called after the DOM has been rendered : allows you access to the component immediately after first render.Most frequently used to run page initializing DOM manipulation.
important: do not use mounted to fetch data, the propre hook is Created().
Mounted () : it will execut after rendering the component.
Read More